Pattern grading rules are the x and y movements assigned to each grade point for each size step, and they are derived from a size chart in three stages: read the change in each body measurement between sizes (the increment), divide that change between the pattern pieces that cover it, then split each piece's share between its grade points. Where the chart's increments change partway through the range, the rules change too; those points are called breaks. Every table in this article is an illustrative example to show the method, not an industry standard or a recommended size chart.
If the terms grade point, nest and base size are new, start with pattern grading basics. This article picks up from there and goes into the numbers.
Start with the size chart
A size chart lists body measurements for each size. A brand develops its own from its target customers, fit tests and, often, published sizing surveys or standards for its market. There is no universal chart, which is why one brand's medium differs from another's.
Example size chart (illustrative)
| Measurement (cm) | S | M | L | XL | XXL |
|---|---|---|---|---|---|
| Bust | 84 | 88 | 92 | 96 | 102 |
| Waist | 66 | 70 | 74 | 78 | 84 |
| Hip | 92 | 96 | 100 | 104 | 110 |
| Back waist length | 40.0 | 40.5 | 41.0 | 41.5 | 42.0 |
| Shoulder width | 37.5 | 38.5 | 39.5 | 40.5 | 41.5 |
| Neck | 34 | 35 | 36 | 37 | 38.5 |
Example only. These numbers are invented to make the arithmetic readable; do not use them as a fit standard.
Step 1: increments and breaks
The increment is the difference between neighbouring sizes. From the example chart:
| Measurement | S→M | M→L | L→XL | XL→XXL |
|---|---|---|---|---|
| Bust | 4 | 4 | 4 | 6 |
| Waist | 4 | 4 | 4 | 6 |
| Hip | 4 | 4 | 4 | 6 |
| Back waist length | 0.5 | 0.5 | 0.5 | 0.5 |
| Shoulder width | 1 | 1 | 1 | 1 |
| Neck | 1 | 1 | 1 | 1.5 |
Illustrative increments derived from the example chart above.
Between XL and XXL the girth increments jump from 4 to 6 cm. That is a break: the grade rules for every point that depends on girth must change at that step. Breaks are common at the transition to larger sizes because bodies do not grow evenly, and charts that ignore this tend to fit the largest sizes poorly.
Note what does not change much: length grows by 0.5 cm per size, shoulder by 1 cm. Girth, length and width each need their own rules.
Step 2: from body to pieces
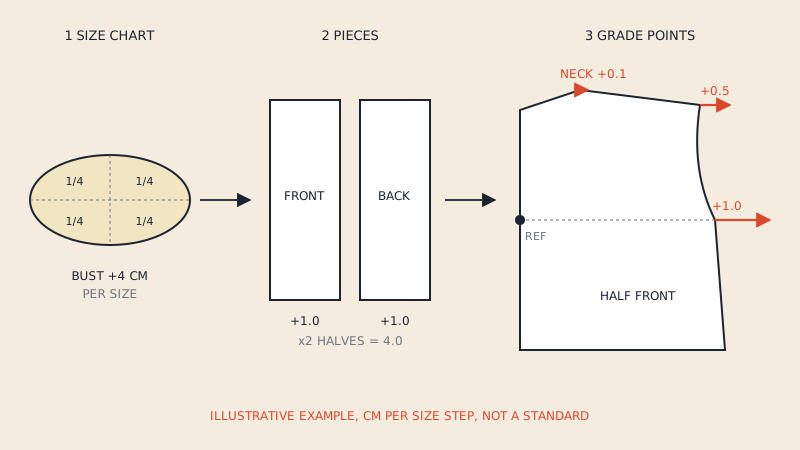
Body measurements are full circumferences; pattern pieces cover parts of them. For a bodice cut as half front (on the fold) and half back (on the fold), each piece covers a quarter of the body girth.
So a 4 cm bust increment gives each piece 1 cm of width per size. If the front and back are not equal, for example a front that is wider than the back at the bust, the share may be split unevenly, such as 1.1 cm front and 0.9 cm back. That split is a grading decision, and it should be the same through the range unless a break says otherwise.
| Piece | Share of 4 cm bust increment | Share of 6 cm (after break) |
|---|---|---|
| Half front | 1.0 | 1.5 |
| Half back | 1.0 | 1.5 |
| Total for half body ×2 | 4.0 | 6.0 |
Example distribution for a two-piece bodice cut on the fold; other garment constructions split differently.
With side panels, princess seams or a two-piece sleeve, the increment is shared between more pieces, and each seam that crosses the girth line gets part of it.
Step 3: from pieces to grade points
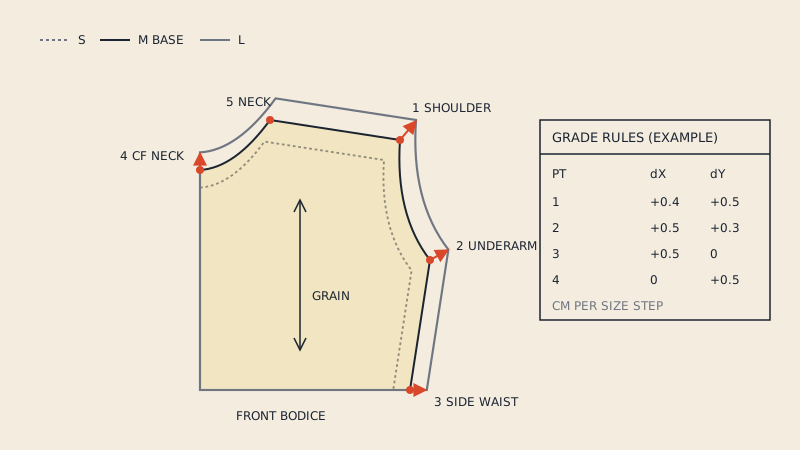
Each piece's share is then turned into movements of its grade points, measured from a fixed reference. Take the half front with the reference on centre front at the bust line:
- Underarm and side seam. The width at the bust line is measured from centre front to the side seam, so the underarm point moves the full 1 cm outwards.
- Shoulder point. It follows the shoulder width increment instead: 1 cm across the whole back or front means 0.5 cm for a half piece.
- Side neck point. It follows the neck increment, which is small: a 1 cm neck circumference increment shared by four quarter-pieces, and split again between neck width and neck depth, leaves about 0.1 cm sideways.
This is the point of grading in one picture: in the same size step, the side seam moves 1 cm, the shoulder 0.5 cm and the neck 0.1 cm. A percentage enlargement would move them all by the same proportion.
Length works the same way vertically. The 0.5 cm back-waist-length increment is split between the shoulder-to-armhole area and the armhole-to-waist area.
Writing the rule table
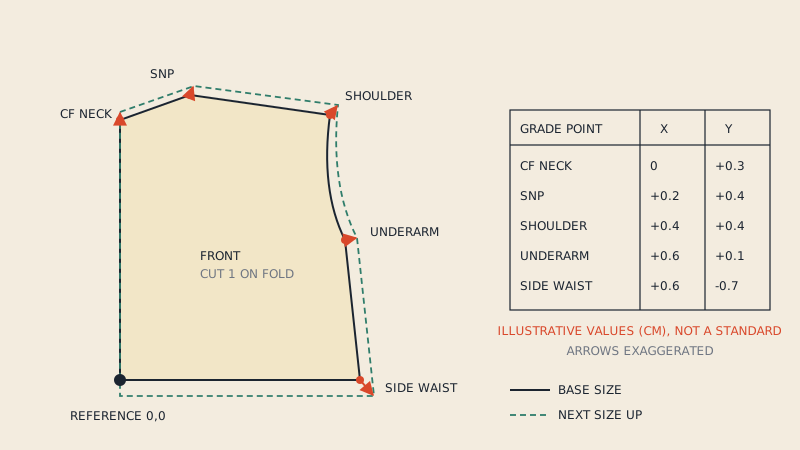
A rule table lists every grade point with its x and y movement per size step. A simple example for the half front, for steps up to the break and after it:
| Grade point | x per step (S→XL) | y per step (S→XL) | x per step (XL→XXL) | y per step (XL→XXL) |
|---|---|---|---|---|
| Centre-front neck | 0 | +0.2 | 0 | +0.25 |
| Side neck point | +0.1 | +0.3 | +0.15 | +0.3 |
| Shoulder point | +0.5 | +0.3 | +0.5 | +0.3 |
| Underarm | +1.0 | 0 | +1.5 | 0 |
| Side waist | +1.0 | −0.3 | +1.5 | −0.3 |
| Centre-front waist | 0 | −0.3 | 0 | −0.3 |
Illustrative grade rules in cm, measured from a reference at the bust line on centre front; not a standard and not a recommended grade.
Check the result: the underarm moves 1.0 cm across, which delivers the piece's bust share, and the shoulder point moves 0.5 cm in both columns because the example chart has no break in shoulder width. The neck and shoulder points move upward from the bust line and the waist points downward, so the length between them grows; with these example values it grows by 0.6 cm per step, a little more than the chart's 0.5 cm, which you would correct by adjusting the y values. That kind of cross-check is exactly what a rule table needs before it is used.
Conventions you need to agree on
- Reference point. Rules are relative to a fixed point, so the same table moved to a different reference gives a different nest.
- Axes and signs. Which direction is positive x and y depends on the piece's orientation in the CAD system. A rule table copied to a mirrored piece without adjusting signs grades it the wrong way.
- Incremental or cumulative. Some tables give movement per step; others give the total from the base size for each size. Know which you are reading.
- Units. Centimetres, millimetres or inches; mixing them is a common source of nests that explode.
- Base size. Rules are written from the base size up and down. If the base changes, the table needs rewriting, not just shifting.
Checking rules against the chart
After grading, measure the graded pattern, not just the rules:
- Measure the bust, waist and hip of each graded size along the pattern, minus darts and seam allowance, and add ease back in your calculation as planned.
- Compare the garment measurement increments with the chart increments.
- Check that length points grade as the chart's length rows say.
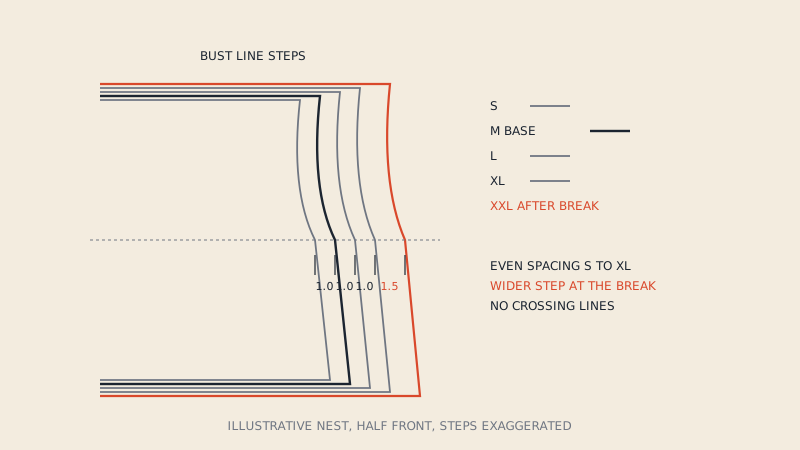
- Inspect the nest: even spacing between equal steps, a visible change of spacing at the break, no crossing lines.
- Walk the seams in one size from the small end and one from the large end. Grading errors often show up as seams that match in the base size but not at the edges of the range.
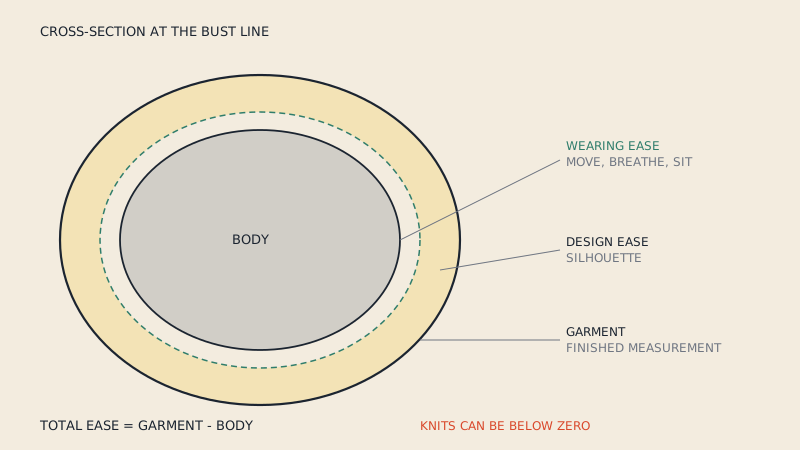
Remember that the pattern includes ease on top of body measurements. Usually ease stays roughly constant through the range, but it can also be graded. Ease in pattern making explains the difference between wearing ease and design ease.
Where rule tables live
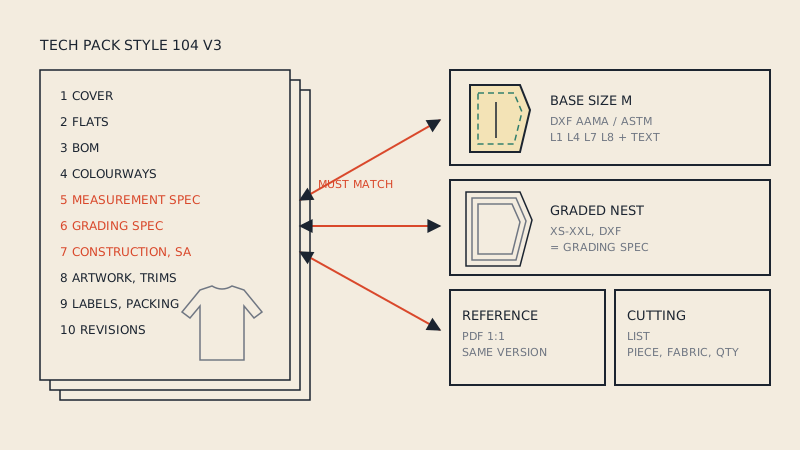
In pattern CAD, rule tables are usually stored separately and attached to pieces by grade point, so one table can grade a whole family of styles. In manual grading, the table is a sheet next to the grading ruler. Either way, document it: a factory or a new pattern maker needs the size chart, the rule table and the base size to reproduce the grade. The tech pack guide covers what to send alongside pattern files.
Whether to grade by hand or in software, and when to outsource it, is compared in grading by hand vs in CAD.
A note on our service
Our converter does not create grade rules or new sizes. It takes a vector PDF pattern and extracts one chosen size into DXF AAMA; if the PDF has several sizes, you can switch between them for free after paying. Grading itself happens in your CAD or with a grader.
FAQ
What are pattern grading rules?
They are the planned x and y movements of each grade point on a pattern piece for each size step. Together they turn the base size into the full size range.
How do you calculate grading increments from a size chart?
Subtract each body measurement in one size from the same measurement in the next size. The difference is the increment, which is then divided between the pieces and grade points that cover that measurement.
What is a break in pattern grading?
A break is a place in the size range where the increment changes, for example from 4 cm to 6 cm in girth for the larger sizes. Rules for the affected grade points change at that step.
Is there a standard set of grading rules?
There is no single universal set. Brands and factories develop rules from their own size charts and fit standards, and published sizing standards differ by country and market. Treat any example table, including the ones here, as a method illustration.