The grain line on a sewing pattern is the long straight arrow printed on each piece. To place it, lay the piece on the fabric, measure from one end of the arrow to the selvedge, then measure from the other end, and move the piece until both measurements are the same. Pin, check once more, and only then cut. That ten-second check is what keeps trouser legs from twisting and hems from hanging lower on one side.
This is the practical guide to placing a grain line. For what the grain, selvedge and bias actually are and why they behave differently, see grainline vs selvage vs bias.
What the grain line arrow tells you
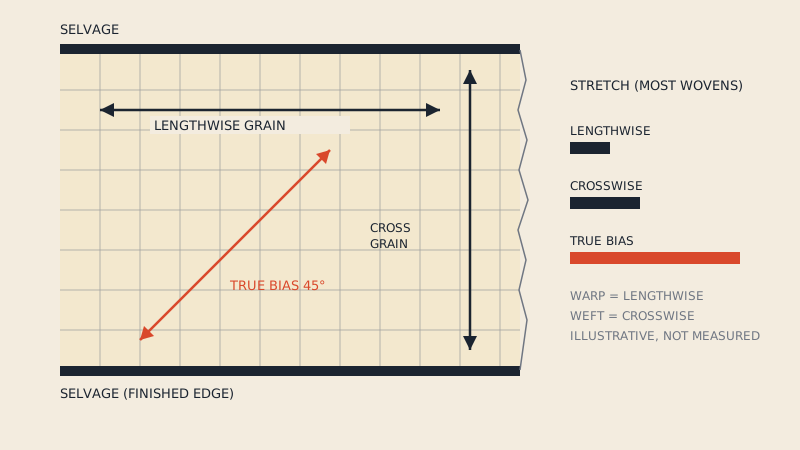
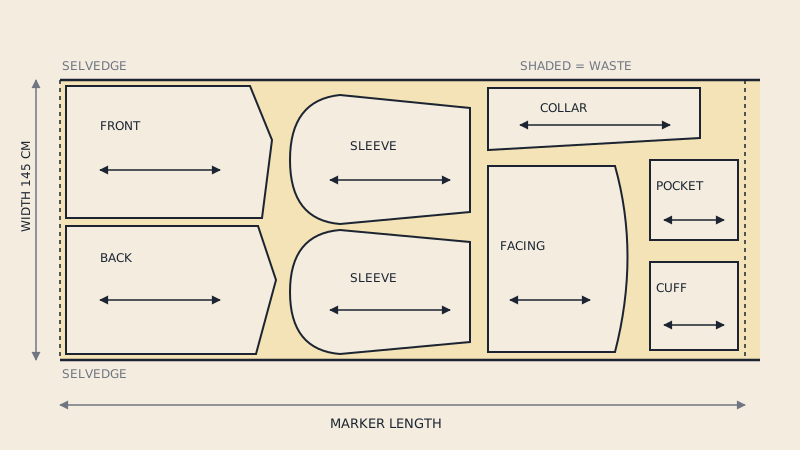
The arrow shows which direction of the piece must run parallel to the lengthwise grain of the fabric, the direction of the warp threads and the selvedge. It does not matter where on the fabric the piece sits, only that the arrow is parallel.
Variations you will see on patterns:
| Marking | Meaning |
|---|---|
| Straight line with an arrowhead at both ends | Place parallel to the lengthwise grain; the piece can face either way |
| Arrowhead at one end only | Place parallel to the grain, with the arrow pointing in a set direction, usually towards the top of the garment; used for napped, pile or one-way prints |
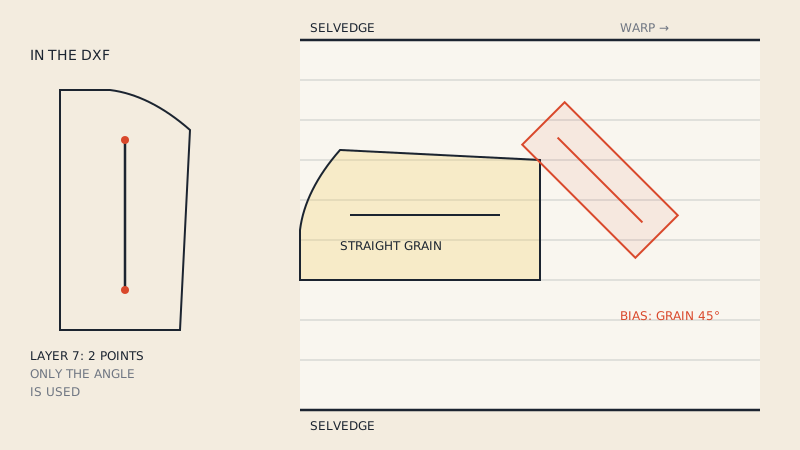
| Line at 45° to the piece's centre, labelled "bias" | Cut on the true bias |
| Line marked "cross grain" or perpendicular to the usual direction | Place parallel to the crosswise grain (selvedge to selvedge) |
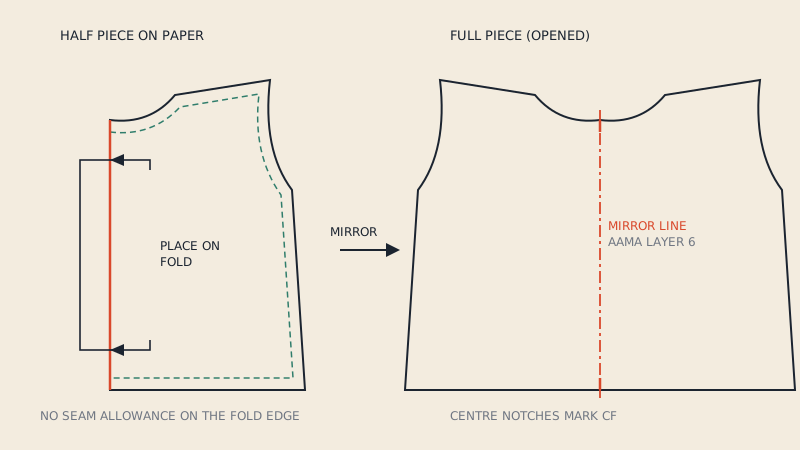
| Bracket with arrows at the edge, labelled "place on fold" | The edge goes on the fold, which itself runs on the grain; explained in place on fold |
| "Grain line" plus "or cross grain" | Either direction is allowed, often for yokes, cuffs or pocket pieces |
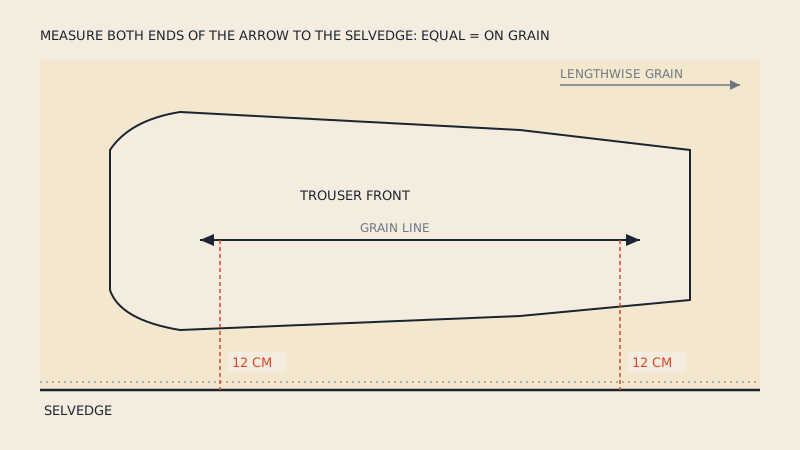
Grain lines are drafted, not decorative. On a trouser leg the grain runs down the centre of the leg, through the crease. On a bodice front it is usually parallel to centre front. On a sleeve it runs from the shoulder point down the middle of the sleeve. If you redraw or alter a piece, keep the grain line in the same relationship to those reference lines.
Before you place anything: prepare the fabric
The grain line only works if the fabric's own grain is straight.
- Pre-wash or pre-shrink the fabric the way you will wash the garment, if it can shrink.
- Find the selvedge. It is the firm, finished edge along the length of the fabric, often with small holes or printed text. Do not use the cut ends: they are rarely on grain.
- Check the crosswise grain. Snip the selvedge near one cut end and either pull a crosswise thread or tear across (only on fabrics that tear cleanly, such as many cottons). The pulled thread or tear shows the true crosswise line.
- Square it up. Fold the fabric selvedge to selvedge. If the cut end does not lie square to the fold, gently pull the fabric on the short diagonal to coax the grain back, then press. Some fabrics with a permanent finish cannot be corrected; in that case follow the threads, not the printed pattern.
- Press out the centre crease if it is off grain or will show, especially on folded bolts.
How to place the grain line, step by step
- Lay out the pieces following the cutting layout, all with the right side up or down as the instructions specify.
- Pin one end of the grain line roughly where you want it.
- Measure from the arrow to the selvedge at that end. Note the measurement, say 12 cm (4 3/4").
- Measure at the other end of the arrow. Pivot the piece until it reads the same 12 cm.
- Pin the other end, then measure both ends once more, because pinning shifts paper.
- Pin or weight the rest of the piece without moving it.
- Repeat for every piece before cutting anything, so you can still rearrange if fabric runs short.
A long grain arrow is easier to place accurately than a short one. If a piece has a short arrow, extend it across the whole piece with a ruler before you start: an error of 3 mm over a 5 cm arrow becomes almost 6 cm over a 1 m trouser leg.
When the fabric is folded, you can measure to the fold instead of the selvedge, provided the fold is exactly on grain.
Using a grid or cutting mat
If you cut on a gridded mat, align the selvedge with one grid line and then align the grain arrow with any parallel grid line. This is faster for small pieces, but check the selvedge has not drifted off the grid line partway along the table.
Using a projector
When projecting a pattern, the grain line is projected too. Align the fabric's selvedge with a straight reference on the table first, then rotate the projected image until the grain line is parallel to it. Measuring both ends still applies.
Bias and cross grain
Cutting on the bias
True bias is at 45° to the lengthwise and crosswise grain. Bias-cut pieces drape and stretch, which is why they are used for slip dresses, bias binding, cowl necklines and some collars.
- Fold the fabric diagonally so the crosswise edge lies along the selvedge; the fold is the true bias. Or measure equal distances along the selvedge and a crosswise thread and join the points.
- Place the bias grain line parallel to that fold, measuring at both ends as usual.
- Bias pieces need extra fabric and usually cannot be cut on a doubled layer with full efficiency.
- Let bias garments hang for a day before hemming; the hem drops as the fabric relaxes.
Cutting on the cross grain
Some pieces are deliberately cut with the grain line running selvedge to selvedge: waistbands to use a border print, yokes to show stripes in a different direction, or pieces that need slightly more give across their length. The cross grain has a little more stretch than the lengthwise grain in most wovens, so a cross-grain waistband may need interfacing to stay stable.
What goes wrong when pieces are cut off grain
Off-grain cutting does not always show on the cutting table. It shows after wearing and washing.
- Twisting seams. Trouser and jeans side seams spiral towards the front. This is one of the most common results of off-grain cutting, and with some twill fabrics it can happen even when cut correctly.
- Uneven hems. A skirt cut off grain hangs lower on one side because one half falls closer to the bias.
- Lopsided drape. Sleeves twist forward or back; a centre front edge flares away.
- Stretched seams. Edges that should be stable, such as a neckline or button band, grow and ripple.
- Pattern mismatch. Stripes and checks do not line up across seams even when notches match.
How far off is too far is not a fixed number; it depends on the fabric and the garment. As a practical guide, measure to the millimetre on long pieces and on anything cut from twill, satin or lightweight fabric, and be slightly more relaxed on small, interfaced pieces such as cuffs.
Grain on knits, napped and printed fabrics
- Knits: the grain line runs parallel to the wales (the vertical columns of loops). There may be no selvedge as such; follow a single column of stitches or a fold made along one.
- Napped and pile fabrics (velvet, corduroy, brushed cotton): use a with-nap layout. All pieces point the same way, and one-way arrows matter.
- Prints: a print can be printed off grain. Follow the threads for fit and accept a slightly crooked print, or follow the print and accept some twist. For most garments, threads win.
- Stripes and checks: the grain line comes first; matching comes from placing notches on the same stripe.
Grain lines in digital patterns
When a paper or PDF pattern is converted to a CAD format, the grain line goes with it. In a DXF AAMA file it is a two-point line on layer 7, and pattern CAD, marker making software and 3D programs use it to orient each piece on the fabric. In 3D software it sets the direction of the fabric's warp on the virtual piece, which changes how it drapes. That is covered in grain lines in DXF patterns, and the role of grain in nesting pieces on the fabric is part of marker making basics.
If you are converting a PDF pattern with our PDF to DXF converter, the free preview shows whether a grain line was detected on each piece.
FAQ
How do I line up the grain line on a sewing pattern?
Measure from one end of the grain line arrow to the selvedge, then from the other end, and move the piece until both distances are equal. Pin both ends, measure again, and then pin the rest of the piece.
Does the grain line have to be parallel to the selvedge?
Yes, unless the pattern says otherwise. A standard grain line is placed parallel to the selvedge (the lengthwise grain); bias and cross-grain markings tell you to place it at 45° or perpendicular to the selvedge.
What happens if I cut off grain?
The garment may twist, hang unevenly or stretch out of shape, often only after wear and washing. Trouser legs spiralling towards the front and hems that dip on one side are typical results.
What does a grain line with one arrowhead mean?
It means the piece must face a set direction, usually towards the top of the garment. It is used for napped, pile and one-way printed fabrics so that all pieces have the same shading or print direction.
Can I place the grain line using the fold of the fabric?
Yes, if the fold itself is exactly on grain. Fold the fabric selvedge to selvedge, check the selvedges lie together along the whole length, and measure from the grain line to the fold at both ends.