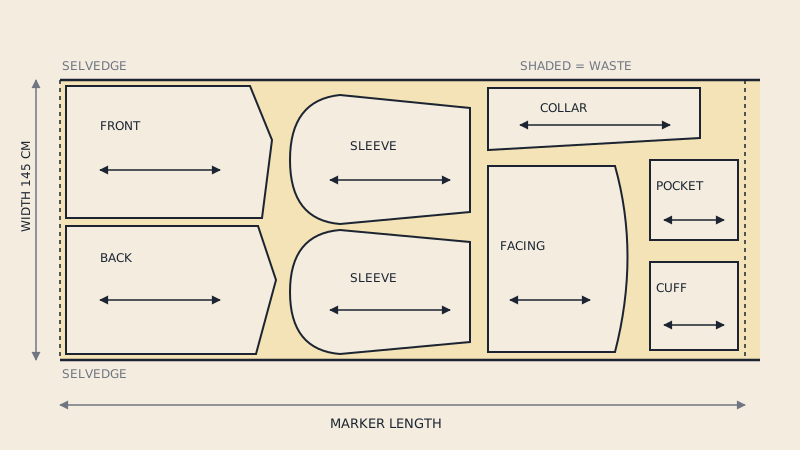
In the garment industry, a marker is the cutting plan: a full-width drawing of every pattern piece for one or more garments, arranged on a rectangle the width of the fabric so that the cutter wastes as little as possible. Marker making is the job of arranging (nesting) those pieces under the rules the fabric imposes: grain direction, nap, stripes and plaids, pairs and size ratios. Factories make markers in CAD from digital pattern files; small studios often still lay paper pieces on the fabric, which is the same task done by eye.
This article explains how a marker is built, how its efficiency is measured, which constraints matter, and why the quality of your pattern files decides how good a marker can be.
What a marker is, physically
A marker has two fixed things and one variable:
- Width: the usable width of the fabric, measured between the selvedges minus anything unusable (pin holes from the stenter, printed selvedge text, a tight edge). A fabric sold as 150 cm (59") may give 145 cm of usable marker width.
- Pieces: every piece of every garment in the marker, in the right quantities and orientations.
- Length: the result. The marker maker's goal is the shortest length that fits all the pieces.
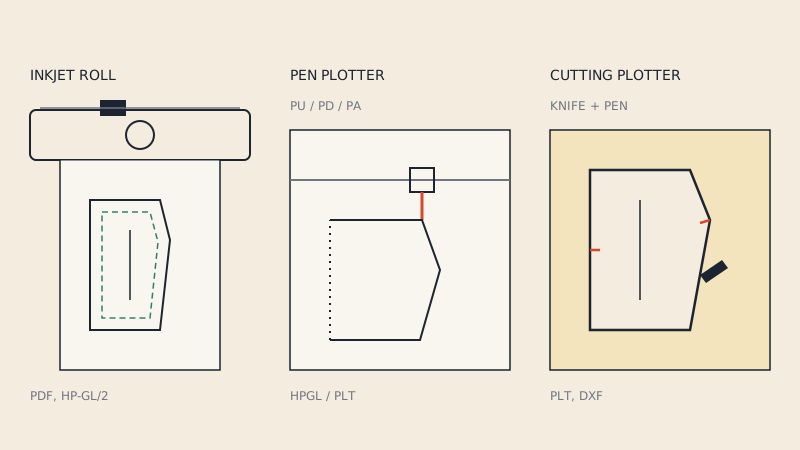
In production, the marker is plotted on paper the full width of the fabric, laid on top of a stack of fabric plies (the spread), and the cutter follows the lines through the whole stack. With automatic cutters, the marker is a file sent to the cutting table, and paper may not be needed at all. The pattern plotter guide covers how markers get onto paper.
Marker efficiency
Efficiency is the share of the marker area that is covered by pattern pieces:
efficiency = total area of pieces / (marker width x marker length) x 100 %
The rest is waste: gaps between pieces, the ends, the area around curves that no other piece fits into.
An illustrative example (made-up numbers, for the arithmetic only):
| Item | Value |
|---|---|
| Marker width | 145 cm |
| Marker length | 300 cm |
| Marker area | 43,500 cm² |
| Area of all pieces | 34,800 cm² |
| Efficiency | 80 % |
Efficiency depends heavily on the product. Many large, straight-edged pieces (trousers, simple skirts) nest better than a jacket with many small curved pieces; mixing sizes usually nests better than a single size; a one-way fabric always nests worse than a two-way one. That is why efficiency figures are only comparable for the same style on the same fabric. A change of one or two percentage points matters in production, because it is multiplied by every metre of fabric bought for the order.
The rules a marker must obey
A marker that ignores fabric rules saves fabric and ruins garments. These are the constraints marker makers work with.
Grain direction
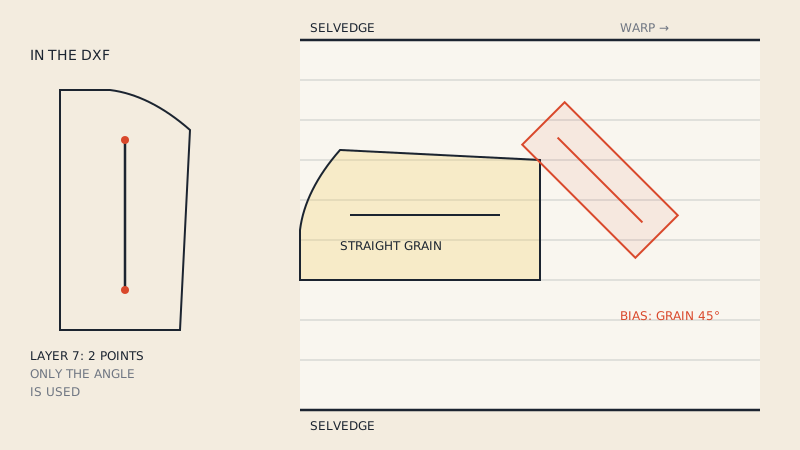
Each piece carries a grain line that must stay parallel to the selvedge, within a small tolerance. The marker maker may only rotate a piece by the amounts the fabric allows. If grain is unfamiliar, grainline vs selvage vs bias explains the terms. In a digital pattern, the grain line is a line on layer 7 of the DXF AAMA file, and the marker software reads it to know how each piece may turn; see grain lines in DXF patterns.
Nap and one-way fabrics
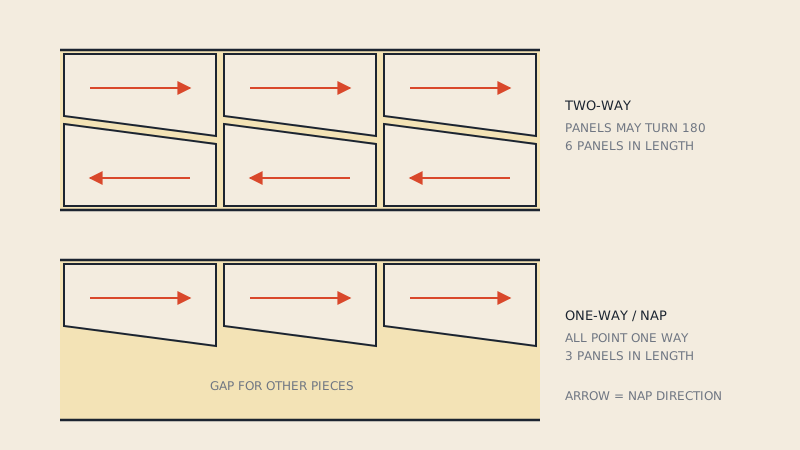
Velvet, corduroy, many knits, satins with a sheen, and one-way prints look different upside down. All pieces must then point the same way along the length (a "one-way" or "nap" marker). Fabrics without nap allow pieces to be turned 180 degrees (a "two-way" marker), which gives the nesting much more freedom.
Stripes and plaids
Striped and checked fabrics need pieces placed so that the pattern matches across seams: side seams, centre fronts, sleeves to bodice. Pieces are positioned on specific stripes rather than wherever they fit best, and extra space is left around them so the cutter can adjust (block cutting). AAMA reserves layers for stripe (9) and plaid (10) reference lines so the match points can travel in the file.
Pairs and fabric spreading
A pattern piece marked "cut 2" usually means a left and a right. How they appear in the marker depends on how the fabric is spread:
- Face-to-face spreading (plies alternate) automatically gives mirrored pairs, so each piece appears once per pair.
- Face-one-way spreading (all plies face up) needs both a piece and its mirror image in the marker.
Pieces on the fold (a back cut on fold, for example) are usually opened to full pieces for a production marker, since an industrial spread is not folded. The place on fold article covers mirror lines and how they are stored.
Size ratio
A marker is often made for several sizes at once, for example a ratio of 1 S, 2 M, 2 L, 1 XL. Combining small and large pieces fills gaps that a single size leaves empty. The ratio comes from the order quantities and the number of plies the spread can take.
Gaps and cutting allowances
Knife cutters need a small gap between pieces, and some fabrics shrink or move during cutting. Marker makers set a minimum distance between pieces and sometimes a buffer around them. Too little and pieces get nicked; too much and efficiency drops.
Making a marker by hand
Small studios and home sewists make markers without calling them that. The method:
- Measure the usable fabric width and mark it on a long table or on paper.
- Lay out all pattern pieces, including mirrored copies for pairs if you cut single-layer.
- Place the largest pieces first along the selvedges, grain lines parallel to the edge (measure from both ends of the grain line to the selvedge).
- Fill the gaps with smaller pieces, respecting nap direction.
- Check the piece count against the pattern's cutting list.
- Record the length used. That is your fabric consumption for the style.
Hand markers work fine for samples and small runs. They become slow and inconsistent once you need several sizes, several fabrics, or precise fabric consumption to buy material for an order.
Making a marker in CAD
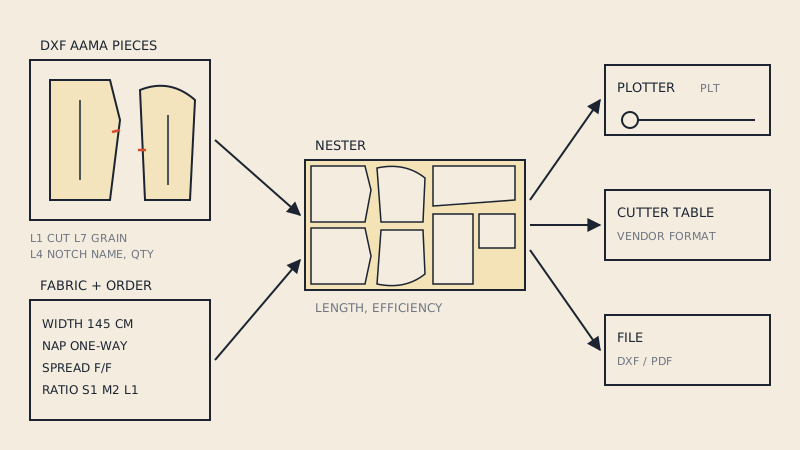
Marker software takes digital pattern pieces and either lets you place them interactively or nests them automatically. The inputs are always the same:
- Pattern pieces, with cut lines, grain lines and piece names, usually as DXF AAMA or a native CAD format.
- Fabric data: width, nap or no nap, allowed rotations, spreading mode.
- Order data: sizes and quantities in the marker.
- Rules: minimum gaps, stripe and plaid matching, pieces that may be flipped or not.
The output is a marker file for the cutter or the plotter, plus the length and efficiency. Automatic nesting can try thousands of arrangements quickly, but an experienced marker maker still often improves the result by hand. The marker making software article looks at the types of tools available to small studios.
Why your pattern files decide marker quality
Marker software is only as good as the pieces it receives. Common file problems that cost fabric or cause wrong cuts:
- Missing grain lines: the software cannot know how to orient the piece, or the marker maker has to guess.
- Open outlines: a cut line that does not close cannot be nested or cut.
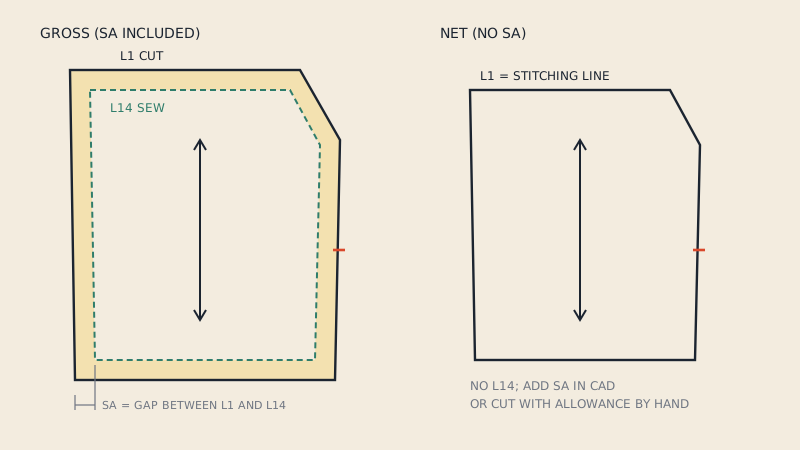
- Wrong cut line: if the file contains only the sew line (net pattern), the marker has no seam allowance. Check which line is the cut line; PDF to DXF with or without seam allowance explains layer 1 vs layer 14.
- Unlabelled pieces or wrong quantities: a piece that should be cut 4 times appears once.
- Pieces on layer 0: no layer structure means no notches, no grain, no internal lines on the marker. See the AAMA DXF layers.
If your patterns exist only as vector PDFs, a pattern-aware conversion gives the marker software what it needs: closed cut lines, grain lines on layer 7, notches on layer 4 and piece text. Our converter produces DXF AAMA files of this kind from vector PDF patterns; it does not nest or make markers itself.
A checklist before you ask for a marker
- Usable fabric width, measured on the actual roll.
- Nap or no nap, and whether pieces may be flipped face down.
- Spreading mode (face-to-face or face-one-way).
- Stripe or plaid repeat, if any, and which seams must match.
- Size ratio for the marker.
- Pattern files with closed cut lines, grain lines, piece names and quantities.
The how to send patterns to a factory guide lists the rest of what a manufacturer expects alongside the marker information.
FAQ
What is a marker in the garment industry?
A marker is the cutting plan for a fabric spread: all pattern pieces for one or more garments arranged on a rectangle as wide as the usable fabric. The cutter follows it through the stacked plies.
How is marker efficiency calculated?
Divide the total area of the pattern pieces by the marker area (width x length) and multiply by 100. The remainder is fabric waste between and around pieces.
Why does a one-way fabric use more fabric?
Pieces on a one-way or napped fabric must all point the same direction, so they cannot be turned 180 degrees to fit into each other's gaps. Fewer allowed orientations means a longer marker.
Can I make a marker without CAD?
Yes. Lay the pattern pieces on fabric or paper of the usable width, keep grain lines parallel to the selvedge, and fill gaps with small pieces. It works for samples and small runs but is slow for several sizes.
What file format does marker software need?
Most marker and nesting software accepts DXF AAMA or ASTM pattern files, or its own CAD format. The file needs closed cut lines, grain lines, and piece names with quantities.