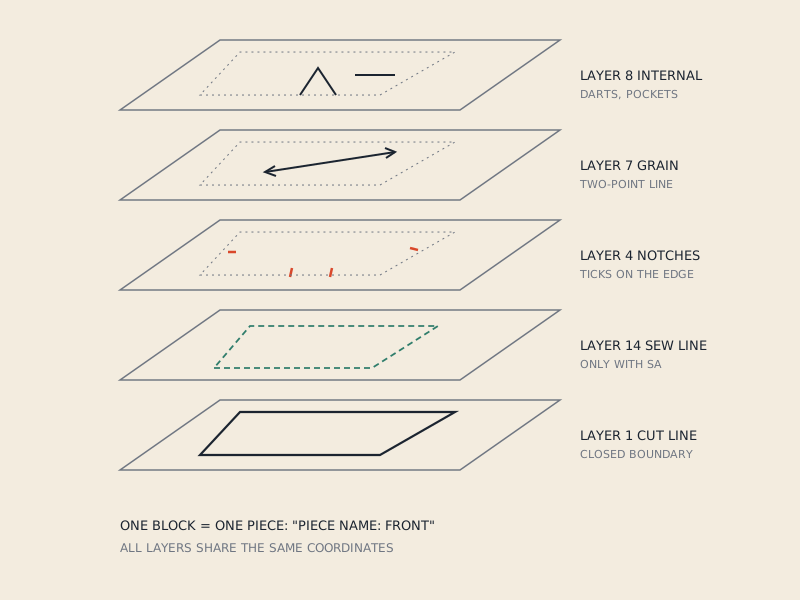
In a DXF AAMA file, seam allowance is not a setting; it is the distance between two lines. The cut line sits on layer 1 and the sew (stitching) line on layer 14. If a pattern includes seam allowance, its DXF has both. If it does not, the file has only layer 1, and that single line is the stitching line. Knowing which one you have decides how you import it into CLO3D or pattern CAD, and whether you add allowance afterwards.
Net and gross patterns
Pattern makers use two terms:
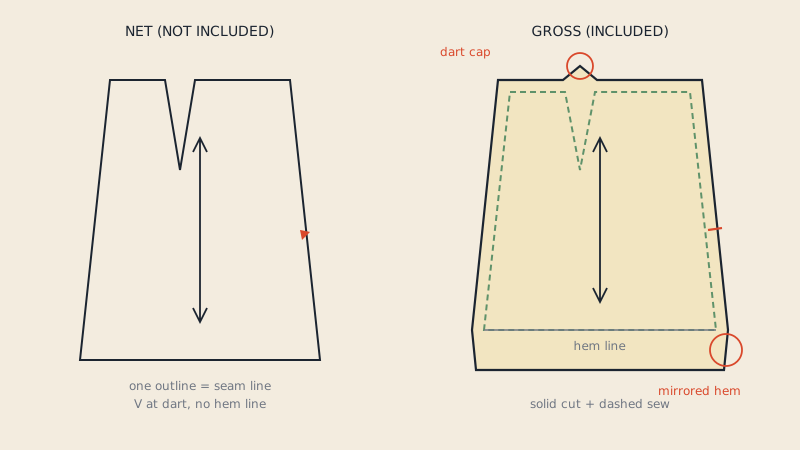
- Net pattern: no seam allowance; the outline is the stitching line. Common in pattern drafting, in many European and vintage patterns, and in 3D work.
- Gross pattern: seam allowance included; the outline is the cutting edge. Common in commercial home-sewing patterns and production patterns.
Neither is more correct. A net pattern is easier to alter and to simulate; a gross pattern is ready to cut. Allowance widths and conventions by region and garment area are covered in the seam allowance guide.
How seam allowance is drawn in a PDF
Before converting, look at how your PDF shows the allowance. There are a few common styles.
| PDF style | What you see | What it means |
|---|---|---|
| Two lines | Solid outer line, dashed inner line | Gross: outer = cut, inner = stitch |
| One line, note says "SA included" | Single solid outline | Gross, but sew line not drawn |
| One line, note says "SA not included" or "add SA" | Single outline | Net: outline = stitch line |
| Shaded band | Tinted strip along edges | Gross, allowance visualised |
| Allowance only on some edges | Two lines on seams, one on hems or folds | Mixed: check edge by edge |
The instructions usually state it plainly on the first pages. If they do not, measure: an inner line consistently 1 cm (3/8") or 1.5 cm (5/8") inside the outline is almost certainly a sew line. Seam allowance included or not? has more ways to tell.
What goes on layer 1 and layer 14
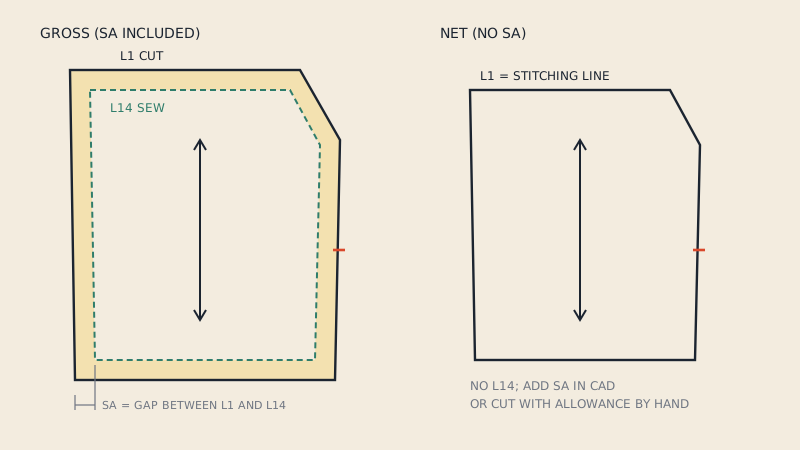
Gross pattern
- Layer 1: the outer cutting edge, closed.
- Layer 14: the stitching line, closed, inside layer 1.
- Layer 4: notches on the cut edge.
The allowance width is not stored as a number; it is simply the gap between the two lines, which can vary from edge to edge (for example 1 cm on seams, 3 cm on a hem).
Net pattern
- Layer 1: the stitching line, closed.
- Layer 14: absent.
If you only see one closed outline and no layer 14, you cannot tell from the file alone whether it is net or gross with a missing sew line. Check against the PDF instructions. The full list of layers is in the AAMA DXF layers, one by one.
What CLO3D does with each
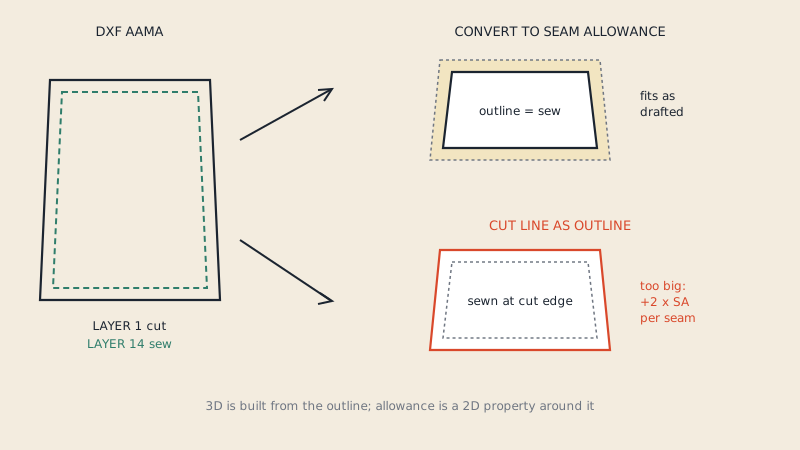
CLO3D reads the outline as the pattern boundary. For 3D simulation it sews along the pattern outline, so a gross pattern imported as-is will be sewn on the cut edge, making the garment larger by the allowance on every seam. For a typical 1 cm allowance that is 2 cm extra per seam, which on a skirt with four seams adds 8 cm to the circumference.
CLO's DXF import dialog has options for this. According to CLO's help article on 2D pattern DXF import and export, there is a Convert to Seam Allowance option (added in version 6.1) that brings the CAD seam allowance into CLO as CLO's own seam allowance, and a Swap Cutting Line and Sewing Line option for files where the two come in reversed. Option names can change between versions, so check the dialog in yours.
In practice:
- Gross DXF with layer 14: use the seam allowance conversion so the sew line becomes the pattern line and the allowance is kept as seam allowance. The garment simulates at the right size and you can still export or print with allowance.
- Net DXF: import normally. Add seam allowance in CLO with its seam allowance tool when you need it for output; see seam allowance in CLO3D.
- Gross DXF without layer 14: CLO cannot recover the sew line. Either accept the simulation is slightly large, or offset the outline inward in CAD by the allowance width before importing.
What pattern CAD does with each
Industrial pattern systems such as Optitex, Gerber AccuMark and Lectra Modaris generally treat the relationship between cut line and sew line as a piece property: a piece can have a sew line with seam allowance attached, or be net with allowance added by the system. On import, a file with both layer 1 and layer 14 typically gives a piece with seam allowance; a file with only layer 1 gives a piece whose outline is taken as is. Exactly how each system maps the two lines depends on its import settings, so import one piece first and check whether the outline you see is the cut line or the sew line.
The things to check after import, in any program:
- Which outline is the piece boundary.
- Whether the seam allowance is displayed and editable.
- Whether notches sit on the cut edge or the sew line, and whether that is what your cutting room expects.
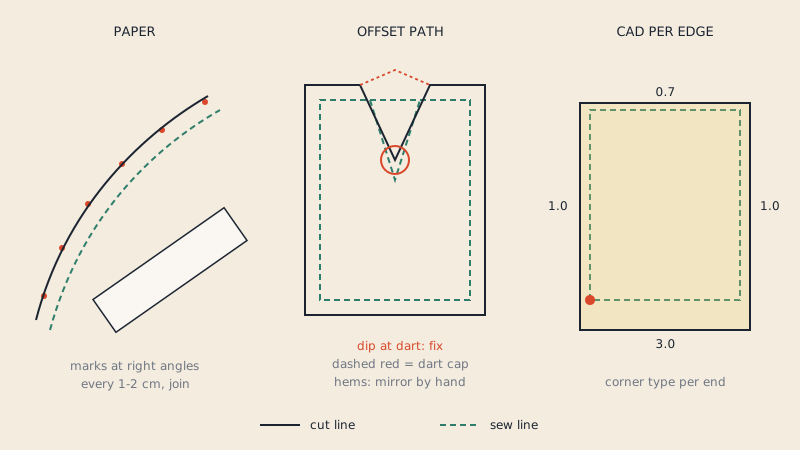
- Corner treatment: mitred, squared or mirrored allowance at corners and dart ends often changes on import.
Which do you want: with or without
| Use | Prefer |
|---|---|
| 3D simulation and fit | Net, or gross with sew line so it can be converted |
| Altering the pattern in CAD | Net, or gross with sew line |
| Cutting fabric directly from the file | Gross |
| Laser or blade cutter | Gross, cutting layer 1 |
| Sending to a factory | Whatever they ask; usually gross with sew line |
| Printing to trace and add allowance by hand | Net |
A gross DXF with a sew line on layer 14 is the most flexible: it can be used as net (sew line) or gross (cut line) without redrawing.
Adding or removing seam allowance after conversion
- Adding: use the seam allowance tool in your CAD or 3D program, or offset the outline in a vector editor. Corners and dart ends need attention; how to add seam allowance to a sewing pattern covers the methods.
- Removing: if layer 14 is present, delete or ignore layer 1 and promote layer 14 to the boundary, or use your program's swap option. If not, offset the outline inward by the allowance width.
What our converter does
Our PDF to DXF AAMA converter keeps the pattern as drawn. If the PDF pattern has seam allowance, the DXF gets the cut line on layer 1 and the sew line on layer 14; if it is net, only layer 1 is written and it is the stitching line. The free preview reports the seam allowance it found for each piece, so you know which you have before paying. It does not add seam allowance to net patterns; do that in your CAD or 3D software.
FAQ
Which layer is seam allowance on in DXF AAMA?
Seam allowance is not on its own layer. It is the space between the cut line on layer 1 and the sew line on layer 14.
How do I know if my DXF includes seam allowance?
If the file has a closed sew line on layer 14 inside each layer 1 outline, it includes seam allowance. If there is only layer 1, check the original pattern instructions to see whether the outline is the cut edge or the stitching line.
Why is my garment too big in CLO3D after importing a DXF?
The pattern probably includes seam allowance and CLO is sewing on the cut line. Re-import using the seam allowance conversion option, or use a net pattern.
Should I convert my PDF pattern with or without seam allowance?
A converter keeps what the PDF has. A gross pattern with both cut and sew lines is the most flexible, because you can use either line in CAD or 3D.
Can seam allowance be different on different edges?
Yes. Because allowance is the distance between two lines, it can vary from edge to edge, for example a narrow allowance on necklines and a wider one on hems.