To add seam allowance, draw a second line parallel to the stitching line at the allowance width, then fix the ends where seams meet so the allowance folds flat. On paper you do it with a clear grid ruler, a seam gauge or a double tracing wheel; in Illustrator or Inkscape with an offset path; and in pattern CAD or CLO3D with a seam allowance tool that stores a width per edge. The parallel line is the quick part. Corners and dart ends take the care.
How wide the allowance should be on each seam is covered in the seam allowance guide. This article is about the method.
Before you start
- Confirm the pattern really has no allowance. Some patterns that look net already include it; see seam allowance included or not.
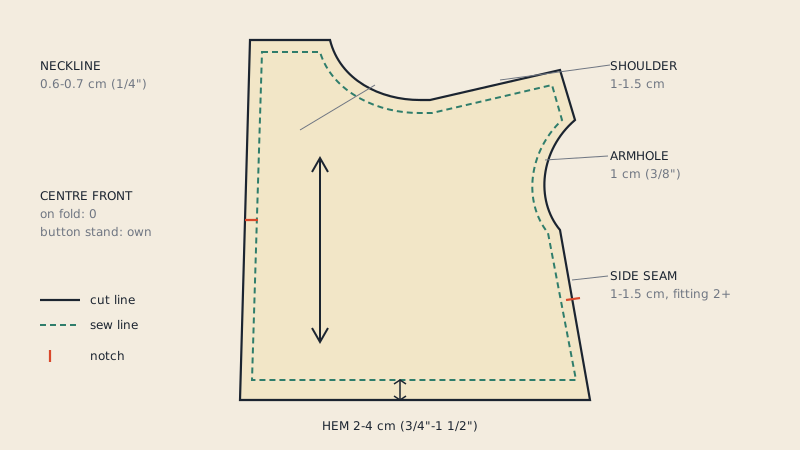
- Decide the width for each edge and write it on the piece: "1 cm sides, 0.7 cm neck, 3 cm hem", for example.
- Make sure the sew line is complete and accurate, including notches and dart legs. Any error in the sew line is copied into the cut line.
Method 1: on paper
Tools
| Tool | Best for | Notes |
|---|---|---|
| Clear grid ruler (quilting ruler) | Straight edges, gentle curves | Align a grid line with the sew line and draw along the edge |
| Seam gauge | Short checks, hems | Slide gauge, sets one width |
| Double tracing wheel | Tracing and adding in one pass | Two wheels set at the allowance width; one follows the line |
| Two pencils taped together | Quick curves | Spacing is rough; check with a ruler |
| Flexible curve or French curve | Smoothing curved cut lines | Redraw the dotted marks into one curve |
Steps
- Trace the piece onto pattern paper with plenty of space around it, if you are working from a multi-size print.
- On straight edges, place the ruler so the chosen width line sits on the sew line, and draw the cut line along the ruler edge.
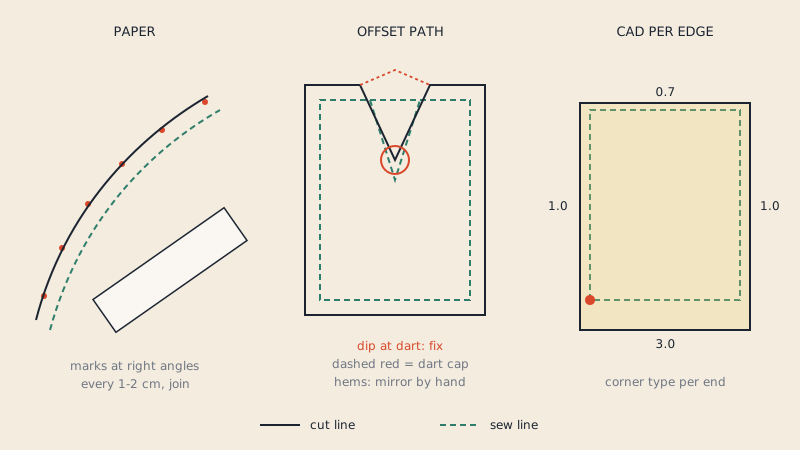
- On curves, make short marks at the allowance width every 1–2 cm, measured at right angles to the sew line. Join them with a curve ruler.
- Leave the ends of each edge long; do not join the corners yet.
- Shape the corners and dart ends (see below).
- Move the notches out to the new edge, keeping them on the same line at right angles to the seam.
- Label the piece "SA included, 1 cm" or the widths you used.
Many sewists skip drawing and add allowance when cutting: they pin the net pattern to the fabric, mark the allowance on the fabric with a gauge and chalk, and cut. It saves paper but is harder to keep consistent.
Method 2: in Illustrator or Inkscape
Vector tools make the parallel line exact. Both programs have an offset function that creates a new path at a set distance.
Adobe Illustrator
- Select the sew line. It should be one closed path; join open segments first.
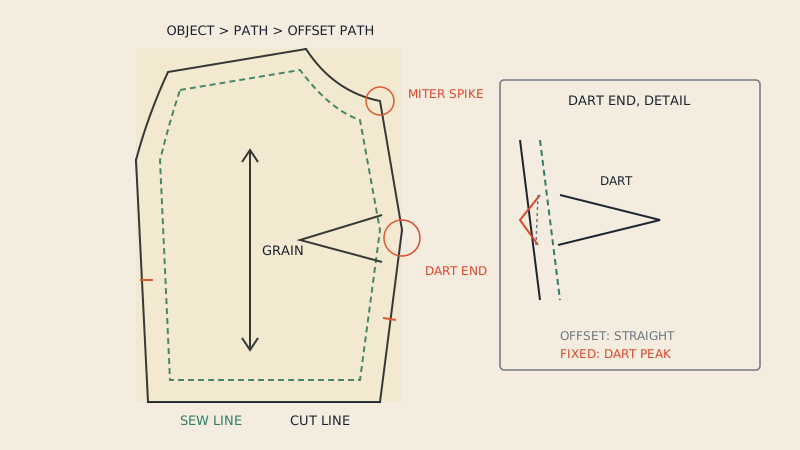
- Choose Object > Path > Offset Path.
- Enter the allowance as the offset (for example 10 mm), and choose a join type: Miter keeps sharp corners, Round rounds them, Bevel cuts them off.
- Apply. The new path is the cut line.
The offset applies one width to the whole outline. For different widths per edge, offset the whole piece at each width needed, then cut the paths apart with the Scissors tool and join the right segments, or draw the varying edges by offsetting open segments separately.
Inkscape
Inkscape offers Path > Dynamic Offset and Path > Linked Offset, which create an offset you can drag to size, and an Offset path effect in the Path Effects dialog where you type a distance. As in Illustrator, one width applies per path, so pieces with mixed widths need the edges handled separately. Tracing and tiling in Inkscape are covered in Inkscape for sewing patterns; the Illustrator side in making patterns in Illustrator.
What the offset gets wrong
An offset is mathematically correct but knows nothing about sewing:
- At a sharp corner with a miter join, the offset can shoot out into a long spike.
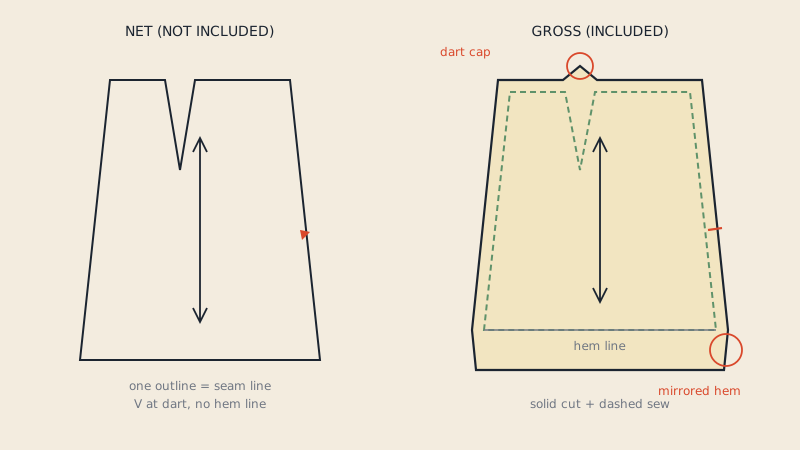
- At a hem on a tapered or flared edge, the offset is parallel to the side seam, but the hem needs a mirrored shape so it folds flat.
- At a dart, the offset follows the open dart legs and gives a V-shaped dip instead of a dart cap.
So treat the offset as a draft, and correct those places by hand.
Method 3: in pattern CAD and CLO3D
Pattern CAD systems treat seam allowance as a property of each edge, not as a separate drawing. You select an edge, give it a width, and the program draws the cut line and recalculates it if the sew line changes. Corner types can usually be chosen at each end: extended to meet, mirrored, squared off, or set at an angle.
In CLO3D, the Seam Allowance tool in the 2D window adds allowance to selected segments, and the width and corner types appear in the Property Editor. The full workflow, including what happens to allowance in imported DXF files, is in seam allowance in CLO3D.
Exact menus differ between AccuMark, Lectra Modaris, Optitex and other systems, so follow the documentation of your version. The principle is the same: net shape plus per-edge allowance, exported as cut line plus sew line.
Fixing corners
Leave the cut lines long at each corner, then use one of these approaches.
Fold method for hems and turned edges
- Draw the hem allowance as a line parallel to the hem.
- Fold the paper along the hem line, turning the allowance up as it will be sewn.
- With the paper folded, cut along the side seam's cut line through both layers.
- Unfold. The hem allowance now widens or narrows at the side exactly as it must to lie flat.
This mirrors the side cut line across the hem line. In vector software, you can do the same with a Reflect tool across the hem line.
Seam junctions
Where two seams meet at an angle, such as shoulder and armhole, extend both cut lines until they cross. That gives a crisp corner that matches the corresponding corner on the joining piece. For very sharp points, trim the tip square to reduce bulk; mark the sew-line corner with a small drill hole or dot if accuracy there matters.
Waistband and facing ends
Ends that fold back on themselves, such as a waistband extension, get allowance on the end as well as on the long edges. Treat them like a hem: fold and cut.
Fixing dart ends
- Fold the dart closed along its legs, in the direction it will be pressed (vertical darts usually towards the centre, horizontal darts usually downwards).
- With the dart folded, draw or cut the cut line straight across it.
- Unfold. The edge now has a small peak, the dart cap, over the dart.
In CAD, many systems do this automatically when the dart is defined as a dart rather than as a notch in the outline.
Moving the notches and markings
- Notches: extend each notch outwards to the new cut edge, at right angles to the seam.
- Grain line, buttonholes, pocket placements and dots stay where they are; they are positioned relative to the sew line.
- Piece labels: add "SA included" and the widths.
Check your work
- Measure the allowance at three points on each edge.
- Walk the seam: lay matching pieces together on the sew line and check the cut edges and notches line up.
- Fold the hem allowance up and check it lies flat against the side seam allowance.
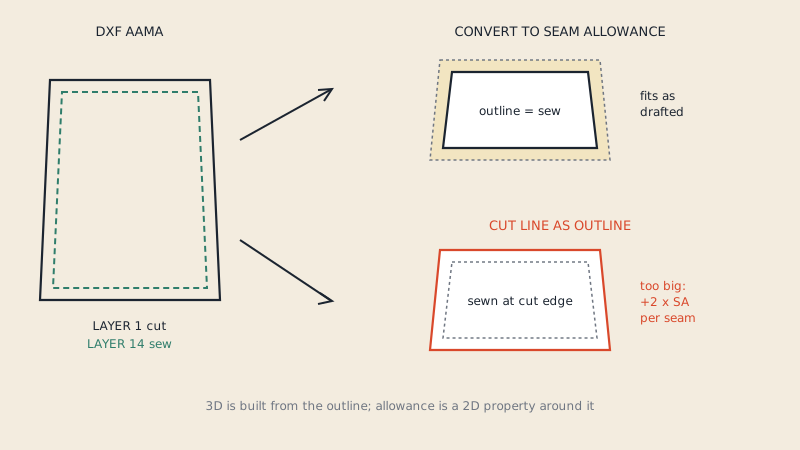
- If you converted or exported the pattern, check that both outlines are present. A DXF AAMA file with allowance has the cut line on layer 1 and the sew line on layer 14.
Our converter does not add seam allowance: it reads the cut line and sew line already drawn in a PDF and shows in the preview whether allowance was detected. If your PDF is net, add allowance in your CAD after converting to DXF, or on paper before cutting.
FAQ
What is the easiest way to add seam allowance to a pattern?
On paper, a clear grid ruler or a double tracing wheel set to the allowance width is fastest. In software, use an offset path in Illustrator or Inkscape, or the seam allowance tool in pattern CAD.
How do I add seam allowance in Illustrator?
Select the closed sew line, choose Object > Path > Offset Path, and enter the allowance width. Then correct corners and dart ends by hand, because the offset does not mirror hems or create dart caps.
Why does my hem allowance not fold flat?
The hem allowance at the side seam must be mirrored across the hem line. Fold the paper along the hem line and cut along the side seam through both layers to get the correct shape.
Do I add seam allowance before or after tracing?
Trace the net shape first, then add the allowance on the tracing. Adding it on the original multi-size print makes it easy to follow the wrong size line.