The quickest answer is on the instruction page or the cover: most patterns state "seam allowance included" with a width, or "add seam allowance". If there is no note, look at the pieces: two parallel outlines (one solid, one dashed) mean it is included; shaped hem corners and dart caps at the edges also point to included allowance. When the clues disagree, measure a piece against the finished garment measurement, which settles it.
Getting this wrong is one of the costliest pattern mistakes, because it shows up only after cutting. Adding 1.5 cm to a pattern that already has it makes each seam 1.5 cm wider on both sides, which on a bodice with four vertical seams adds about 12 cm around the body.
Step 1: read the pattern information
Check these places, in this order:
- The instructions, first pages. Look for a section called "Seam allowance", "Before you start", "Cutting" or "Notes". It usually gives a width such as 1 cm (3/8") or 1.5 cm (5/8").
- The pattern pieces. Many designers print "SA included", "1 cm SA" or "no seam allowance" on every piece or on the first page of the print file.
- The product page or envelope. Indie designers often list it with the file formats.
- The cutting layout. A note like "add 1.5 cm to all edges, 4 cm to the hem" means net pattern.
If the notes say "seam allowance included" but give no width, look for it in the sewing steps: "sew at 1 cm" tells you the width.
Step 2: look at the lines
Without a written note, the drawing itself usually gives the answer.
| What you see | What it usually means |
|---|---|
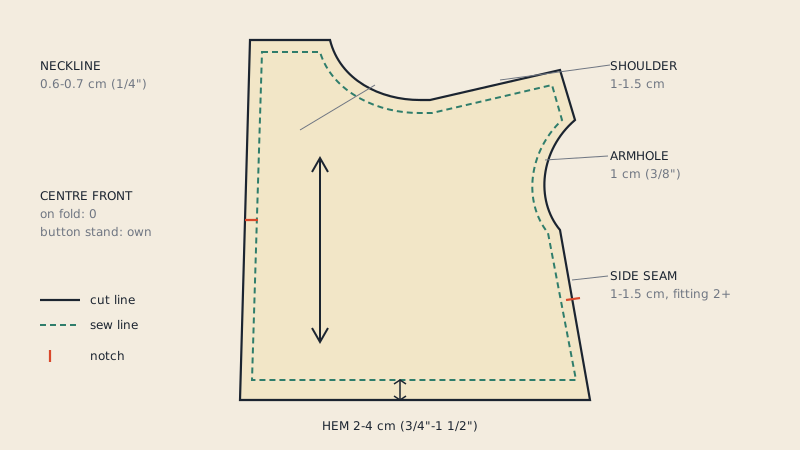
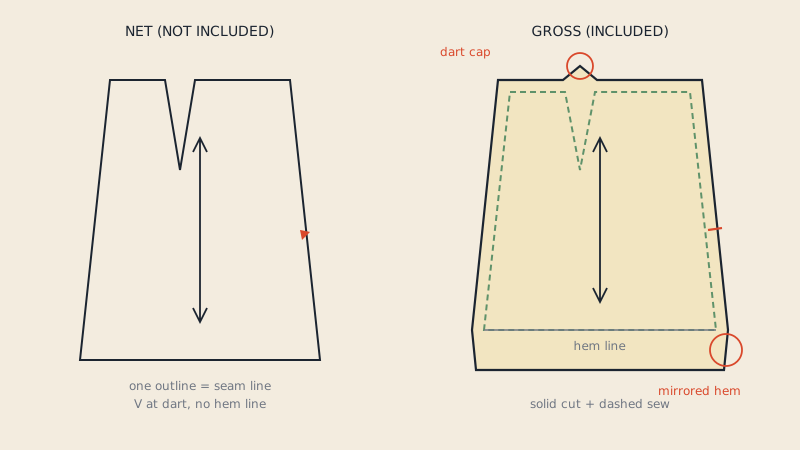
| Solid outer line plus a dashed line inside it | Included: solid is cut line, dashed is sew line |
| One outline, labelled "cut line" | Included |
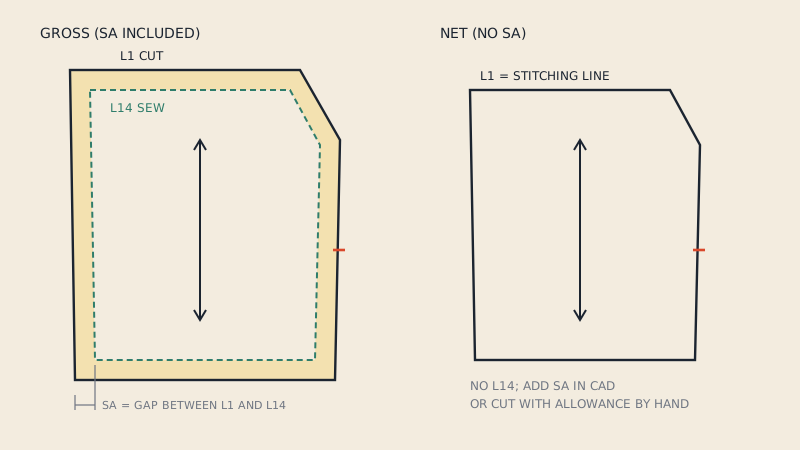
| One outline, labelled "stitching line" or "seam line" | Not included |
| A single line per size in a multi-size nest | Usually included, check notes |
| Hem line drawn inside the piece, a few cm from the edge | Included at least at the hem |
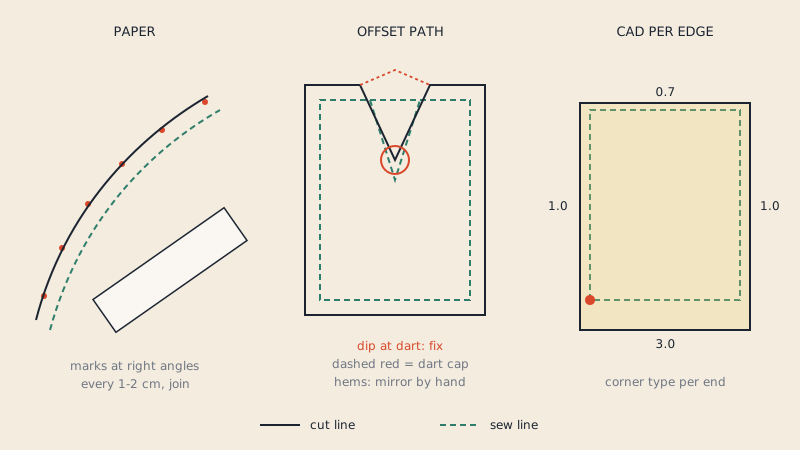
| Small peak in the edge over each dart (dart cap) | Included |
| Dart legs meeting the outline in a clean V | Possibly net, or the dart was not shaped |
| Hem corners mirrored out at tapered side seams | Included |
| Notches very short or drawn as small triangles outside the outline | Often net; check notes |
Not every clue is decisive alone. A pattern can include allowance and still have unshaped corners, and some net patterns have a hem line drawn in. Look for two or three clues pointing the same way.
Step 3: measure
If the notes are missing and the lines are ambiguous, measure. Two methods work.
Compare with the finished measurements
Most patterns publish a finished-garment chart: finished bust, waist, hip, length.
- Pick a measurement that crosses several pieces, such as finished waist.
- Measure the waist across each pattern piece along the seam line, edge to edge.
- Add up the pieces (doubling those cut twice or on the fold).
- Compare with the chart.
If your total is larger than the finished measurement by roughly the number of seams times twice the allowance, the allowance is included. For a skirt with front and back on the fold and two side seams, a 1 cm allowance adds about 4 cm. If your total is close to the finished measurement, the pattern is net.
Subtract darts and pleats from the measurement before comparing; they take up width too.
Walk two matching seams
Lay the front and back pieces together along the side seam with the edges aligned. If the notches match with the edges aligned, the pattern is consistent either way; that does not tell you much. But if there is a dashed line, align the dashed lines instead and see whether the edges also align. If the edges match only when the dashed lines match, the dashed line is the sew line and the outline includes the allowance. Walking seams is described in more detail in how to walk the seams of a pattern.
Conventions by pattern type
Conventions are a good first guess but never a substitute for the notes:
- Commercial US home patterns: traditionally include 1.5 cm (5/8"), printed on the instructions.
- Indie PDF patterns: most include allowance, often 1 cm (3/8") or 1.25 cm (1/2"); some use different widths per seam and say so.
- Sewing magazines with pattern sheets: many print net patterns and tell you how much to add.
- Japanese pattern books: commonly net, with the allowance listed in the cutting diagram.
- Vintage patterns: varies; older patterns sometimes have no printed lines at all, just perforations.
- Industry patterns and DXF files from CAD: usually include allowance; DXF AAMA files often carry both cut and sew line.
- Patterns drafted for 3D simulation: often net, because the garment is sewn along the sew line in the software.
Widths and the reasoning behind them are in the seam allowance guide.
Digital files: PDF and DXF clues
Digital patterns give some extra clues:
- PDF layers: some designers put seam allowance on its own layer, sometimes switchable. Open the layers panel and look for a layer named "seam allowance", "SA" or "cut line".
- Line styles: zoom in. A dashed or thinner line just inside the outline is usually the sew line.
- DXF AAMA: a file with allowance has the cut line on layer 1 and the sew line on layer 14. A file with only layer 1 is either net or gross with no sew line recorded; check the piece size. See PDF to DXF with or without seam allowance for how CAD treats each.
When you upload a PDF pattern to our converter, the free preview shows each detected piece with its seam allowance, so you can see whether allowance was found before you convert to DXF.
What to do once you know
- Included: cut on the outer line. Sew at the stated width. If you want a different width (for example 1.5 cm for fitting room), add only the difference.
- Not included: add allowance before cutting, either on the paper or directly on the fabric. Methods are in how to add seam allowance to a pattern.
- Mixed: some patterns include allowance on seams but not on hems, or the reverse. Mark each edge on the piece so you do not have to work it out again.
Then write it on the pieces: "SA 1 cm included" or "net, add 1.5 cm". Your future self will thank you when you reuse the pattern.
FAQ
How do I know if seam allowance is included in a pattern?
Check the instructions and the pattern pieces for a note such as "seam allowance included". If there is none, look for a dashed sew line inside a solid cut line, dart caps or shaped hem corners, or measure a piece against the finished measurements.
Does a dashed line on a pattern mean seam allowance?
A dashed line just inside a solid outline usually marks the stitching line, which means the outline includes seam allowance. Check the pattern legend, because some designers use dashed lines for other markings.
Do PDF sewing patterns include seam allowance?
Most indie PDF patterns include it, commonly 1 cm (3/8") or 1.25 cm (1/2"), but some do not. Always check the instructions of the specific pattern.
What happens if I add seam allowance to a pattern that already has it?
Every seam gets wider by the extra allowance on both pieces, so the garment ends up larger. On a bodice with four vertical seams and 1.5 cm added, that is about 12 cm extra around the body.