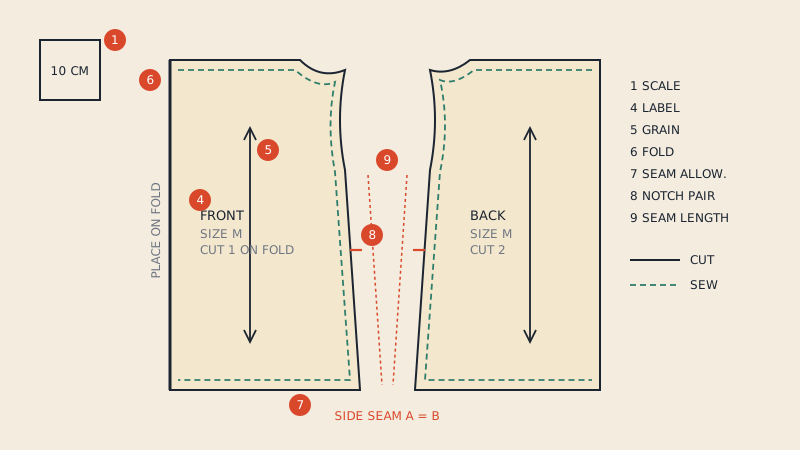
Walking the seams of a pattern means laying two pieces that will be sewn together along their shared seam line and "walking" one along the other, point by point, to check that the lengths match and the notches line up. On paper you do it with a pin, an awl or a tape measure on its edge; in CAD you measure both seam lines and compare the numbers. It is the single check that tells you whether a pattern will actually go together before you cut fabric.
What walking a seam proves
A pattern can look right piece by piece and still fail when sewn. Walking a seam answers three questions:
- Are the two seam lines the same length? Or, where ease is intended, is the difference the right amount?
- Do the notches meet? A notch 1 cm off on one side means a twisted seam or a pucker at that point.
- Do the seam ends meet cleanly? After sewing, the cut edges should continue into each other without a step at the corners, for example at the underarm or the waist seam.
Walking is one item on a broader pattern check before cutting, but it is the one that takes skill and deserves its own method.
Measure on the sew line, not the cut line
Always compare seam lines, not cut edges. Two pieces with matching sew lines can have cut edges of different lengths, because seam allowance on a concave curve is longer than the seam line and on a convex curve it is shorter.
If the pattern includes seam allowance, mark the sew line first with a seam gauge, or work with the stitching line already drawn. If the pattern is net (no seam allowance), the outline is the seam line and you can walk it directly.
Walking seams on paper
Tools
- a sharp pencil and a fine awl or pin
- a flexible tape measure that can stand on its edge
- a clear ruler for straight sections
- weights, so the bottom piece does not slide
Step by step
- Lay the first piece flat, right side up, and weight it.
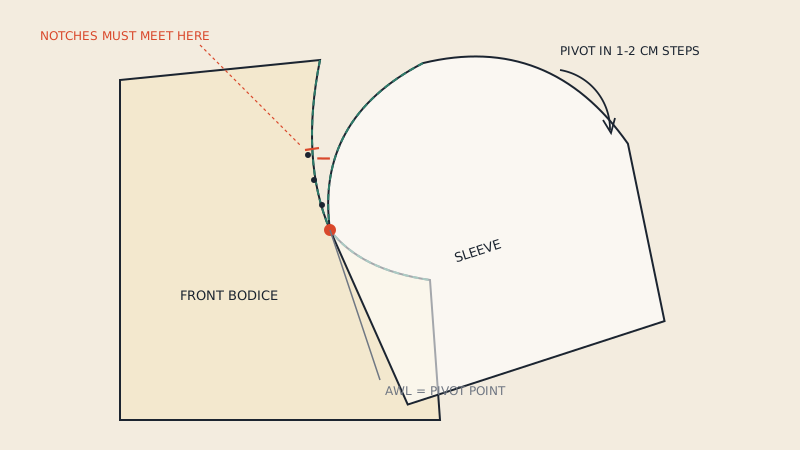
- Place the second piece on top, aligning the seam lines at the starting end (for example, the side seams at the underarm).
- Put the awl point on the seam line at the start, through both layers.
- Pivot the top piece slowly so the seam lines stay touching, moving the awl along in short steps of 1–2 cm. On a curve, take smaller steps.
- At each notch, check that the notches on both pieces coincide. Mark any difference with a pencil tick on both pieces.
- At the far end, measure how much one seam line overshoots the other.
- Note the result on the pattern: "side seam +2 mm back" or "OK".
Walking straight seams is quick: two side seams can simply be laid together. Curves such as an armhole against a sleeve cap, or a princess seam, need the awl-and-pivot method, because a tape measure on a tight curve reads differently each time.
Measuring with a tape on edge
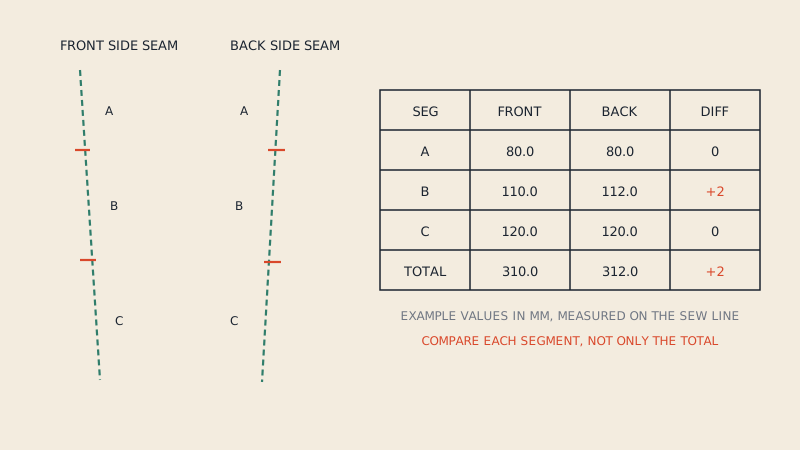
For a quick comparison without overlaying pieces, stand the tape measure on its edge and follow the seam line. Read each segment between notches, not just the total. A seam can match in total length while one notch is 5 mm off, which shifts the fullness to the wrong place.
Which seams to walk
| Seam pair | Usually | What to watch |
|---|---|---|
| Front and back side seams | Equal length | Dart or pocket intake changing length |
| Front and back shoulders | Equal, or back slightly longer | Back shoulder ease, often a few mm |
| Sleeve cap to armhole | Cap longer | Ease amount and its distribution between notches |
| Underarm sleeve seam | Equal | Elbow ease on two-piece sleeves |
| Princess seams | Equal between notches | Bust area ease |
| Collar to neckline | Equal at the sew line | Centre-back notch and shoulder notch |
| Facing to garment edge | Equal | Facings traced in the wrong size |
| Waistband to waist seam | Equal, plus overlap | Darts and pleats closed before measuring |
| Yoke to body | Equal or eased | Gathers |
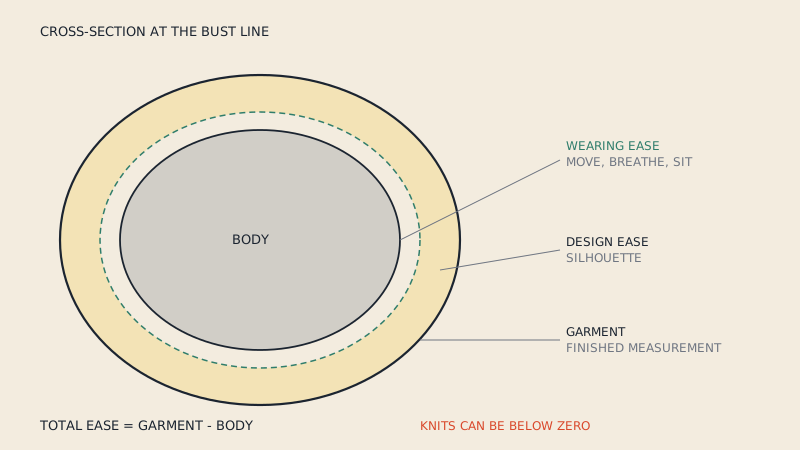
Ease amounts vary with style and fabric, so the table describes what is typical rather than a rule. The article on ease in pattern making explains why some seams are deliberately unequal.
Close darts and pleats before measuring
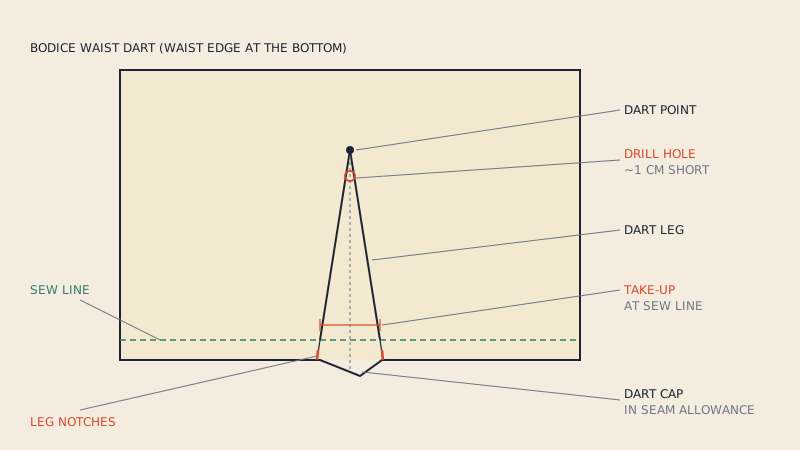
A dart takes length out of a seam. If you measure a skirt waist with the darts open, it will look too long against the waistband.
Fold the dart closed on paper, pin it, and then walk the waist seam. While the dart is closed, check that the seam edge runs smoothly across it; if not, true the edge so the dart gets the small extension it needs at the seam. The darts guide covers truing in more detail.
The same applies to pleats and tucks: close them, then measure.
Checking the corners
Walking includes the ends. When two seams meet, for example the shoulder seam and the armhole, the joined pieces should form a smooth line across the seam.
- Pin the front and back together along the shoulder seam line.
- Look at the armhole curve where it crosses the shoulder.
- It should be close to a right angle to the seam and continuous, without a point or a dip.
Repeat at the underarm (side seam into armhole), the neckline at the shoulder and the hem at the side seams. A step of 2–3 mm here becomes a visible point or notch in the finished garment.
Walking seams in CAD
In pattern CAD, the same check is mostly numeric. The exact tools differ between programs, but the method is the same.
The method
- Make sure the pieces are at the correct scale. Measure one known dimension first.
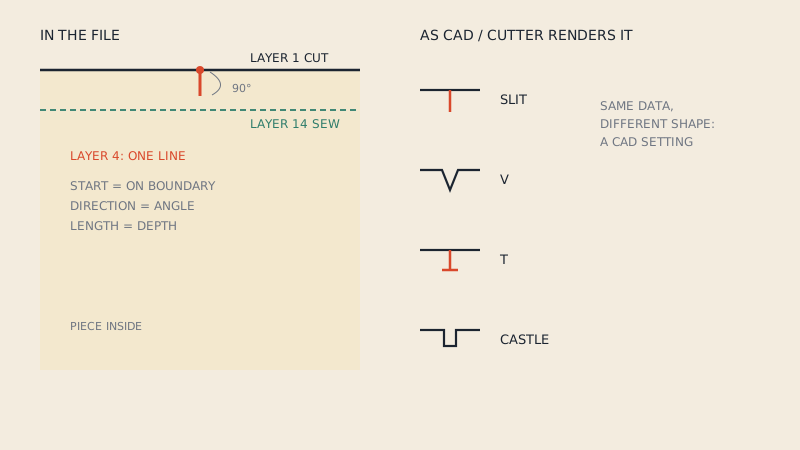
- Identify the sew line. If the piece has seam allowance, use the sew line (in DXF AAMA files this is commonly layer 14) rather than the cut line on layer 1.
- Measure each seam line segment between notches. Most pattern CAD has a tool that measures length along a line between two points.
- Do the same on the joining piece and compare the segments in a small table.
- Where the program offers it, use a "walk" or seam-matching function that moves one piece along the other on screen, which is the digital version of the awl.
What changes when the pattern came from a PDF
If the pieces were converted from a PDF, check that notches came across as notches rather than as stray lines. In DXF AAMA files notches are stored on layer 4; the article on AAMA notches explains how. If a notch is missing on one side, walking the seam numerically still works, but you lose the intermediate check points.
Our converter turns vector PDF patterns into DXF AAMA with cut line, sew line where the pattern has seam allowance, and notches on their own layers, which is a convenient starting point for this kind of numeric check. It does not adjust or true seams; that remains the pattern maker's job.
3D programs
In CLO3D and similar programs, unequal seams show up when you sew them: the program either eases the longer side in or flags a length difference. That is useful, but it is still worth walking the seams in 2D first, because a 3D simulation can hide a 5 mm difference in drape. See importing a DXF into CLO3D for the setup.
Fixing what you find
When a seam does not match:
- Small difference on a straight seam (1–3 mm). Usually split it: add half to the short side and take half from the long side, keeping the seam end on its original line where it meets another seam.
- Notch off. Move the notch on the piece that is wrong. If you cannot tell which one, check a third piece that joins at the same point.
- Ease larger or smaller than intended. Adjust the cap height or the curve, then walk again. Do not just move notches to hide it.
- Corner step. Redraw the curve across the joined seam so it flows, then separate the pieces again.
After every change, walk the seam again. Fixing one seam can affect the ones next to it.
FAQ
What does walking a seam mean in pattern making?
It means checking two seams that will be sewn together by moving one along the other on the seam line, comparing their length and notch positions. It shows whether the pieces will join cleanly before any fabric is cut.
Do I measure the cut line or the seam line?
The seam line. Seam allowance changes length on curves, so cut edges can differ even when the seam lines match.
How much difference between two seams is acceptable?
On seams meant to be equal, home sewists often accept 1–2 mm; production patterns aim for less. Seams with intended ease, such as a sleeve cap, should differ by the planned amount.
Can CAD walk seams automatically?
Many pattern CAD programs have tools to measure seam lengths and move one piece along another on screen. You still need to choose the seams, close darts and judge the result.