A pattern pieces check is a short, systematic review of every piece before scissors touch fabric: are all the pieces there, are they the right size and scale, do the seams and notches agree, and is every piece marked clearly enough to cut correctly. It takes ten to twenty minutes for a typical garment and catches the mistakes that are expensive later, when the fabric is already cut. The checklist below works for printed PDF patterns, traced paper patterns and pieces you are about to send to CAD or a factory.
Why check before cutting
Most cutting mistakes are not sewing mistakes. They come from the pattern stage: a missing facing, a sleeve traced in the wrong size, a back piece that was supposed to be cut on the fold, a tile printed at 97 %. None of these show up until you try to join two pieces that do not fit.
A check also protects time. Re-cutting one piece costs fabric you may not be able to buy again; discovering an error after fusing interfacing costs more. Running the same ten points every time turns the check into a habit rather than a hunt.
The 10-point checklist at a glance
| # | Check | What you are looking for | Tools |
|---|---|---|---|
| 1 | Scale | Test square measures exactly | Ruler |
| 2 | Piece count | Every piece on the cutting list is present | Instruction sheet |
| 3 | Size | All pieces traced or printed in the same size | Size label, layers |
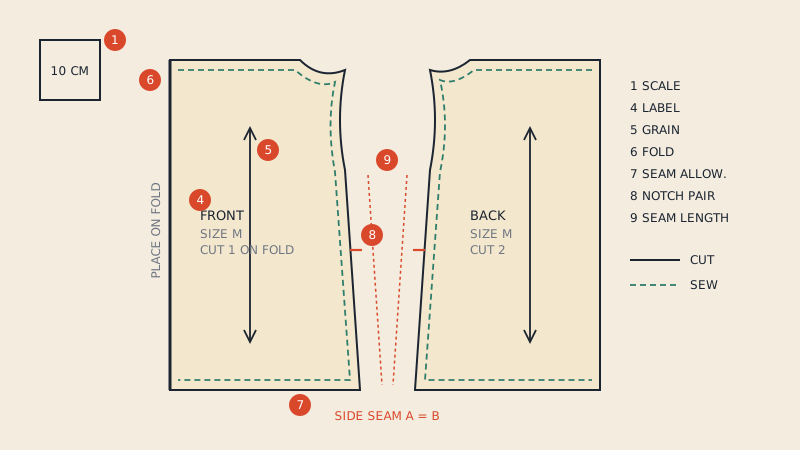
| 4 | Labels | Name, size, cut quantity on every piece | Pencil |
| 5 | Grain line | Present, long enough, correct direction | Ruler |
| 6 | Fold and mirror lines | Marked on pieces cut on the fold | Pencil |
| 7 | Seam allowance | Known width, consistent, included or not | Seam gauge |
| 8 | Notches | Present at both sides of every matching seam | Eye, pattern notcher |
| 9 | Seam lengths | Joining seams have matching lengths | Tape measure |
| 10 | Internal marks | Darts, pockets, buttonholes transferred | Tracing wheel, awl |
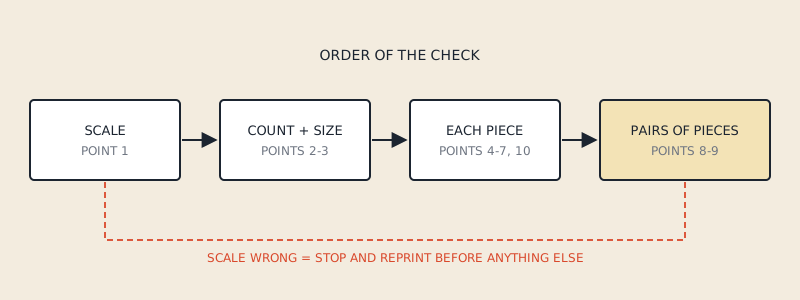
Work through the list in this order. The first three points tell you whether the rest are worth checking at all: if the scale is off, every measurement after it is meaningless.
1. Scale: measure the test square first
On a printed PDF pattern, find the test square and measure it in both directions. A 10 cm (about 4") square should be 10 cm wide and 10 cm tall, and a 3" square should measure 3". A difference of 1 mm on 10 cm is usually acceptable for home sewing; more than that means the printer scaled the page.
Measure both directions, because some printers scale only one axis. If the square is wrong, stop and reprint rather than trying to compensate. The test square guide explains tolerances and what a small error does to a full garment.
For traced or hand-drafted pieces there is no test square, so measure one known dimension instead, for example the finished length given on the envelope.
2. Piece count against the cutting list
Lay out every piece and tick it off against the cutting list or instruction sheet. Count pieces, not page numbers: a single piece may span several tiles, and one sheet may hold five small pieces.
Pieces that commonly go missing:
- facings and linings printed on a separate page or layer
- small pieces such as belt loops, tabs and pocket bags
- interfacing pieces that are "cut from" the main piece and have no separate pattern
- rectangles given only as measurements in the instructions
If the pattern gives a rectangle as dimensions, draft it now and label it, so it does not get forgotten at the cutting table.
3. One size everywhere
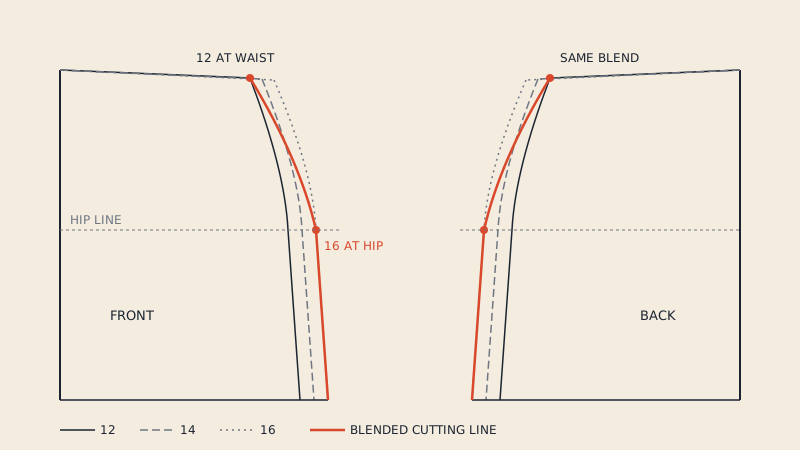
Multi-size patterns make it easy to trace the bodice in one size and the skirt in the next. Check the size label or line style on each piece. If you blended deliberately between sizes, mark the blend points so you can tell intent from accident.
When printing PDF patterns with size layers, confirm that only your size layer was active on every page. The guide to multi-size patterns covers blending between sizes properly.
4. Labels on every piece
Each piece should carry at least:
- piece name (front, back, sleeve, collar stand)
- size
- cut quantity and how: "cut 2", "cut 1 on fold", "cut 2 + 2 lining"
- pattern or style name, if you keep several patterns in one drawer
Write on the piece itself, not only on a pinned note. In CAD and in DXF AAMA files this same information lives in the piece text, which is why missing labels on paper usually become missing labels in the file.
5. Grain line
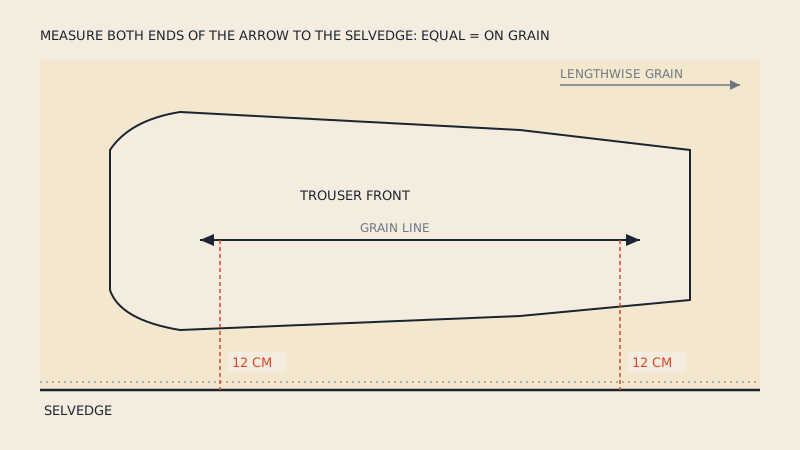
Every piece needs a grain line, and it should be long enough to measure from the selvedge accurately. A 3 cm stub is hard to align; extend it across most of the piece with a ruler.
Check direction as well. A collar cut on the bias, a cuff cut on the cross grain and a skirt panel on the straight grain all look similar on paper. If the pattern shows an arrow at one end only, it may indicate a napped fabric layout. The grain line guide covers placing it on fabric.
6. Fold lines and mirror lines
Pieces cut on the fold are drawn as halves. Make sure the fold edge is marked with the fold symbol or a bracketed arrow, and that it is a straight line. A curved or angled fold edge is a drafting error.
If you are cutting a single layer, you will need the full piece. Trace the mirror half now rather than flipping the paper on fabric, which is where centre-front shifts happen.
7. Seam allowance: width and whether it is included
Find out whether seam allowance is included and how wide it is. Check it on at least three edges with a seam gauge: a straight seam, a curve such as the armhole, and a hem. Hems and zip seams often have a different width from the rest.
If the pattern shows two parallel lines, the outer one is usually the cut line and the inner one the sew line. If it shows one line and the instructions say "seam allowance not included", you have to add it before cutting. The article on telling whether seam allowance is included walks through the clues.
8. Notches on both sides of each seam
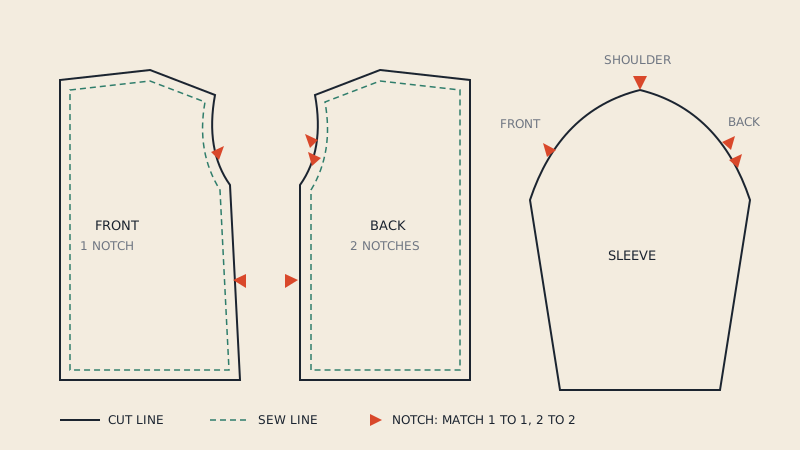
Notches only work in pairs. For every seam, the notch on one piece needs a partner on the piece it joins. Go seam by seam:
- Pick a seam, for example the side seam.
- Count notches on the front side seam.
- Count notches on the back side seam.
- Compare position: they should sit the same distance from the same end.
Single notches usually mark the front and double notches the back, especially on sleeves. If a sleeve cap has double notches at the back but the armhole has single notches there, one of the pieces is wrong or mislabelled. See notches in sewing patterns for the conventions.
9. Seam lengths match
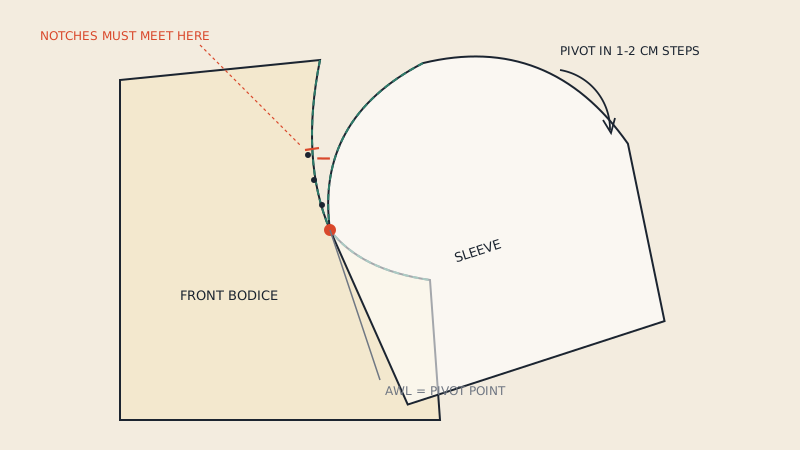
Pieces that are sewn together should have matching seam lengths, apart from intentional ease such as a sleeve cap or a back shoulder. Measure along the sew line, not the cut line, with a tape measure standing on its edge around curves.
This is the most valuable check on the list and the one most people skip. It deserves its own procedure, covered in how to walk the seams of a pattern. As a quick version: measure the side seams, shoulders, and sleeve cap against armhole, and note any difference larger than 3 mm (1/8") that the instructions do not explain.
10. Internal markings
Darts, pocket placements, button and buttonhole positions, pleat lines and drill holes all need to reach the fabric. Check that each one is drawn on the pattern and that you have a way to transfer it: tailor's tacks, chalk, a tracing wheel or an awl for dart points.
Dart legs should be the same length (unless the dart is intentionally shaped), and the dart should fold closed without leaving a step at the seam edge. If you fold the dart on paper and true the seam line, the cut edge gets the small "dart peak" it needs.
Extra checks for digital patterns
If the pattern is heading into CAD or a 3D program, a few more points matter:
- Closed outlines. Each piece should be one closed shape. Gaps of a fraction of a millimetre break seam tools in 3D software.
- Units. A piece that imports at 25.4 times its size was saved in inches and read as millimetres, or the reverse.
- Text and layers. Piece names and grain lines should be separate entities, not merged into the outline.
When you start from a vector PDF, our converter shows a free preview of every detected piece with its size, seam allowance, grain line and notch count before you pay, which doubles as a quick version of points 2, 5, 7 and 8. It does not replace walking the seams or checking the cutting list yourself.
Record what you checked
Write the date and "checked" on the pattern, or keep a short note in the envelope: scale OK, seams walked, notches matched, SA 1 cm, hem 3 cm. The next time you use the pattern, you will know which version is reliable.
If you fixed something, such as a missing notch or a re-trued dart, mark the change on the piece so you remember that it differs from the original.
FAQ
How long does a pattern pieces check take?
For a simple top or skirt, ten to fifteen minutes. A lined jacket with twenty or more pieces can take an hour, mostly spent walking the seams and matching notches.
What is the most important point to check before cutting?
Scale comes first, because every other measurement depends on it. After that, matching seam lengths and notches catch the errors that are hardest to fix once fabric is cut.
Should I check a commercial pattern or only my own drafts?
Check both. Commercial patterns are usually tested, but tracing, printing and size blending introduce errors that the pattern company never sees.
Do sleeve cap and armhole seams have to match exactly?
No. A set-in sleeve cap is usually longer than the armhole to give ease; the amount depends on the fabric and style. What matters is that the difference matches what the pattern intends and that the notches line up.