Notches on a sewing pattern are small marks on the cutting line that tell you which edges are sewn together and exactly where they line up. When you cut, you transfer each notch to the fabric, either as a tiny snip into the seam allowance or as a small triangle cut outward. When you sew, you match notch to notch, and the seam comes out the right length with any fullness in the right place.
They look trivial, and they are the first thing people skip. They are also the reason a sleeve sets in without puckers on one try and with three rounds of unpicking on the next.
What a notch actually tells you
A notch is a matching point. It says: this point on this edge meets that point on another edge. That one piece of information does several jobs at once.
- Which pieces join. A front side seam with one notch joins the back side seam with one notch at the same height, not the facing edge that also happens to be the same length.
- Which way round. A sleeve is nearly symmetrical. Notches stop you sewing it in backwards or into the wrong armhole.
- How far to sew. Notches often mark the end of an opening: the bottom of a zip, the top of a vent, the start of a pleat.
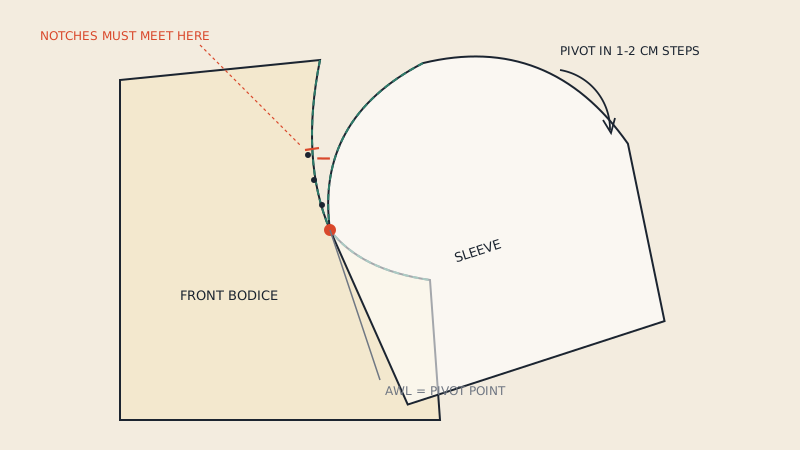
- Where to distribute fullness. Between two notches on a sleeve cap there may be 1–3 cm (3/8"–1 1/8") more length than on the matching armhole. The notches show where that extra must be eased in.
- Where a seam changes. Notches mark the waistline on a long side seam, the centre front on a collar, or the point where a seam allowance changes width.
In a factory, notches are also the main quality reference for sewing operators. They sew from notch to notch without measuring, so the notch has to be accurate to about a millimetre. In home sewing you have more time, but the logic is the same: if every notch matches, the pattern pieces were drafted to fit each other, and the garment will be as the designer intended.
Single, double and triple notches
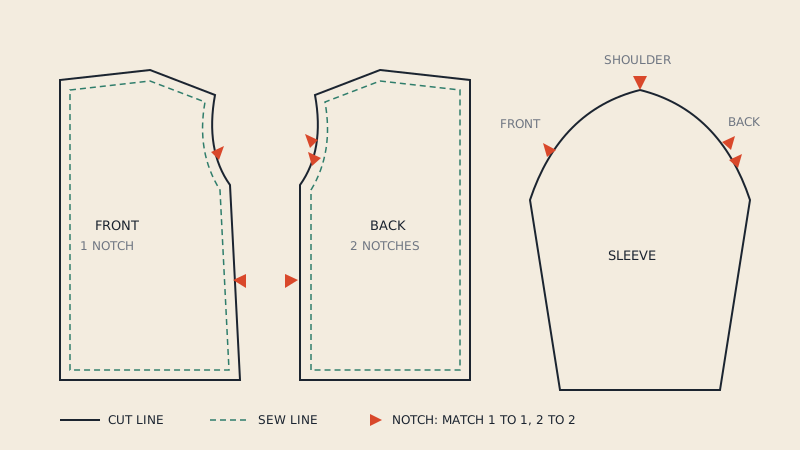
Home sewing patterns usually draw notches as small triangles or diamonds on the cutting line, and group them to make each seam unmistakable.
| Mark | Common meaning | Typical location |
|---|---|---|
| Single notch | Front of the garment | Front armhole, front side seam, front of sleeve cap |
| Double notch | Back of the garment | Back armhole, back of sleeve cap, back crotch seam |
| Triple notch | A third seam that must not be confused with the other two | Collar to neckline, waistband joins, complex panel seams |
| Numbered notch | Notch identified by a printed number, matched to the same number | Older home patterns, multi-panel skirts |
| Single notch at top of sleeve | Shoulder point, matched to the shoulder seam | Sleeve cap |
The front-single, back-double convention is very common, especially on sleeves, but it is a convention, not a rule. Read the notches as pairs: a double notch on one piece always meets a double notch on another. If a pattern uses something else, the instruction sheet will say so.
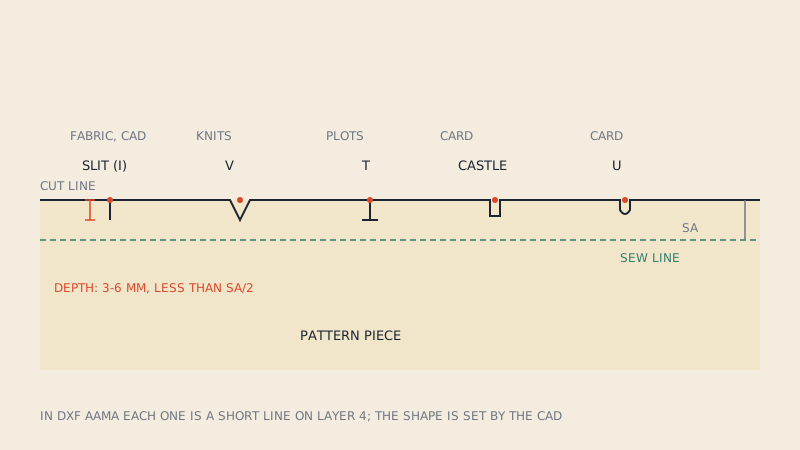
Industrial patterns rarely group notches like this. Each notch is a single slit, and the pieces are told apart by the piece name and notch spacing instead. If you buy a pattern drafted for production, or a file that came out of pattern CAD, expect single slits everywhere. The shapes used in industry are covered in types of notches in pattern making.
Cut in or cut out: two ways to transfer a notch
There are two common ways to put a notch on fabric. Both are correct; they suit different fabrics and seam allowances.
Cutting the notch outward
You cut around the printed triangle, so it sticks out of the cut edge as a small point. This is the method many home patterns expect, because the triangles are printed that way.
- Works on any seam allowance width, including narrow 6 mm (1/4") ones.
- Does not weaken the fabric, because nothing is cut into the seam allowance.
- Easy to see on loosely woven or fraying fabric.
- Slower to cut, and points can catch or fold when you stack layers.
Snipping the notch inward
You cut straight across the triangle line and then make a short snip into the seam allowance at the notch point, square to the edge.
- Fast and precise: the snip is a single point, not a triangle with a 5 mm wide base.
- Standard in industry, where notches are cut with a notcher or a straight knife.
- The snip must be shallower than the seam allowance. A common depth is 3–6 mm (1/8"–1/4"), and never more than half the seam allowance width.
- Not suitable for narrow seam allowances, fraying fabric or seams that will be pressed open and shown, such as on unlined jackets.
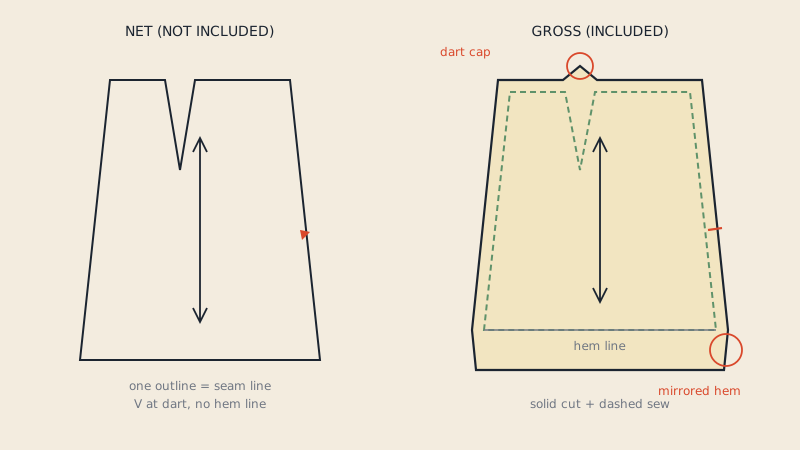
If you do not know whether the seam allowance is included in your pattern, check that before you snip anything. A snip in a pattern without seam allowance cuts into the garment itself. The guide seam allowance included or not shows how to tell.
Other ways to mark
On very fine, sheer or loosely woven fabric, neither method is reliable. Mark the notch with a short chalk line, a fabric pen or a tailor's tack instead. On leather and vinyl, a snip is permanent and can tear, so use a mark on the wrong side or a very short snip only within the seam allowance.
How to cut notches step by step
- Check the notch is on the cutting line. On multi-size patterns, each size has its own notch where its cutting line crosses the notch mark. Use the one on your size line.
- Cut the main outline first, leaving a little extra around each notch if you will cut them outward.
- Cut each notch with the tips of sharp scissors. For snips, hold the scissors square to the edge and close them only as far as the depth you want.
- Cut both layers at once when the fabric is folded or stacked, so the notches on the left and right pieces match exactly.
- Count before you remove the paper. Count notches on every edge and compare with the paper. A missing notch is much easier to add now than when the piece is already in the machine.
Matching notches when you sew
Pin or clip at each notch first, before pinning anything in between. If both edges are the same length, the fabric will lie flat between the notches. If one edge is longer, you will see a bubble of fabric between two notches: that is intended ease, and it goes on the bottom against the feed dogs, which help gather it in.
When notches do not meet and the difference is more than ease, stop and check:
- Are the pieces the right way up and the right side out?
- Did you match single to single and double to double?
- Did you cut the same size on both pieces?
- Has the fabric stretched? Bias-cut edges and knits grow if they are handled a lot.
If the difference is still there, the problem is in the pattern itself. Measuring the two seam lines against each other is called walking the seams; how to walk the seams of a pattern explains how pattern makers do it on paper and in CAD.
Notches that are easy to overlook
Some notches are not on the main seams, and these get missed most often.
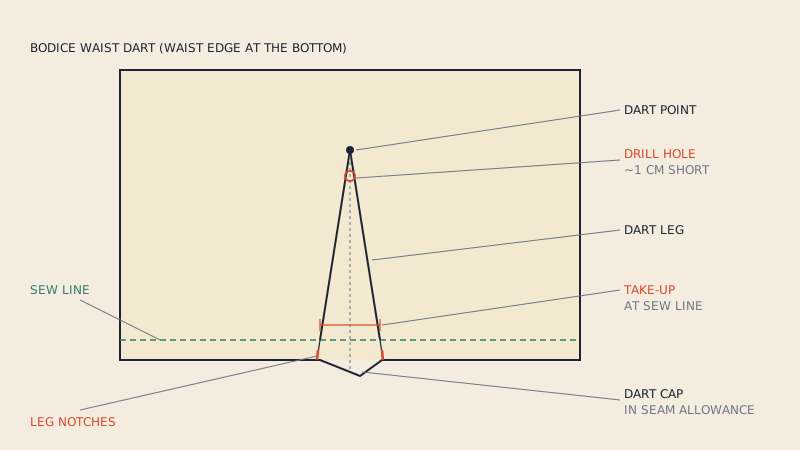
- Dart notches. Two notches on the cut edge mark the dart legs. Without them you only have the dart point, and the dart will be the wrong width. See darts in pattern making.
- Fold and hem notches. A notch at the edge where a hem or facing folds back shows the fold line.
- Pleat and tuck notches. Pairs of notches mark each fold of a pleat at the waist edge.
- Centre notches. A notch at centre front or centre back on a collar, neckline or waistband lets you align them without measuring.
- Seam allowance change notches. Some patterns notch where the seam allowance changes width, for example where a zip needs a wider allowance.
Notches in digital pattern files
In a PDF pattern a notch is just part of the drawing, so it prints wherever the line goes. Once a pattern is converted to CAD format, it becomes data. In a DXF AAMA file, notches are short lines on their own layer, layer 4, starting at the cut line. Pattern CAD and 3D programs read that layer to show notches, to match seams and to place cut marks on a plotter or automatic cutter.
That is also why notches are the first thing to go missing in a poor conversion: a generic converter sees a few millimetres of line and either merges it into the outline or drops it. If you work with DXF files, how notches are stored in DXF AAMA covers what to check after import. Our PDF to DXF converter shows the notch count for every detected piece in the free preview, so you can compare it with the paper before you pay.
FAQ
What do notches mean on a sewing pattern?
Notches are matching points on the cutting line. They show which edges are sewn together and exactly where those edges line up, and they also mark openings, folds, darts and places where fullness is eased in.
What is the difference between a single and a double notch?
On most home patterns a single notch marks the front of the garment and a double notch marks the back, most visibly on armholes and sleeves. In every case a notch group is matched to the same group on the joining piece.
Should I cut notches in or out?
Both are correct. Cutting the triangle outward is safest for narrow seam allowances and fraying fabric; snipping 3–6 mm into the seam allowance is faster and more precise, and is standard in industry. Never snip deeper than half the seam allowance.
Why don't my notches match when I sew?
Check that the pieces are the same size, the right way up and matched single to single and double to double. A small bubble between notches on one edge is usually intended ease; a larger mismatch means a fabric stretched in handling or a pattern error.
Do I need notches if I'm an experienced sewist?
Yes. Notches carry information that cannot be seen from the outline, such as where a sleeve cap's ease belongs or where a zip opening ends. Skipping them saves seconds when cutting and often costs much more time when sewing.