A multi-size sewing pattern prints several sizes on one sheet as nested outlines, one inside the other, each with its own line style. To use it, find your size line and follow it around every piece; if your bust, waist and hip fall in different sizes, draw a smooth transition from one size line to another between those points, and make the same change on every piece that joins that seam. Trace the result rather than cutting the master, and you keep every size for later.
How nested sizes are drawn
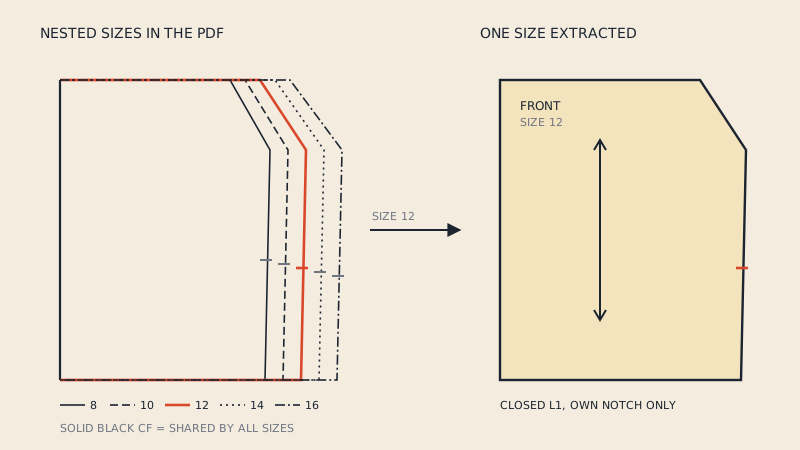
Most multi-size patterns share a few conventions:
- One line style per size. Sizes are told apart by colour, dash pattern (solid, long dash, dot-dash), line weight, or a combination. A legend on the instruction sheet or the first page shows which is which.
- Size labels on the lines. Small numbers printed along each line, especially where lines cross or run close together.
- Shared lines. Where all sizes coincide, such as a centre front fold or a straight grain edge, only one line is drawn.
- Notches per size. Each size has its notch where its own cutting line crosses the notch mark. On some patterns a single notch mark crosses all the lines.
- Internal marks per size. Dart points, pocket placements and buttonholes may move between sizes, each labelled or styled like its outline.
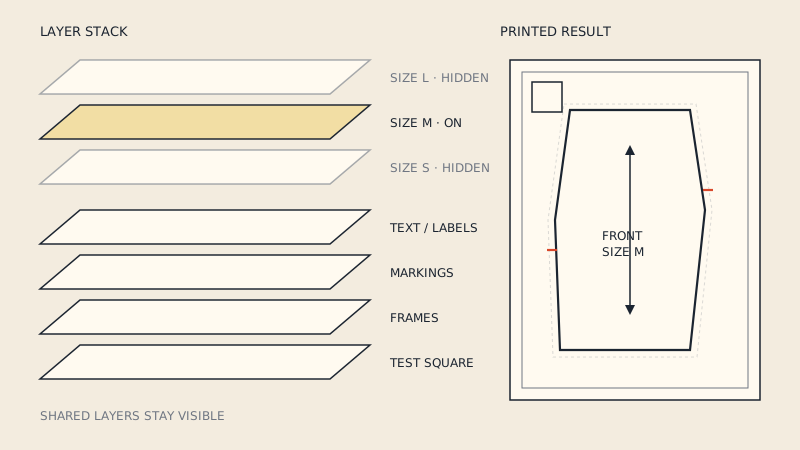
In a PDF pattern, sizes are often also on separate layers, so you can switch off the sizes you do not need before printing. That makes tracing much easier; see PDF pattern layers.
The spacing between nested lines is the grade, the amount the pattern grows from one size to the next at each point. It is usually larger at the side seams than at the centre front, and larger at the hip than at the shoulder. How those increments are chosen is the subject of pattern grading basics.
Choosing your size
- Measure yourself at full bust (and high bust for tops), natural waist and full hip. Use a tape that is not stretched, snug but not tight.
- Compare with the body measurement chart, not with your shop size.
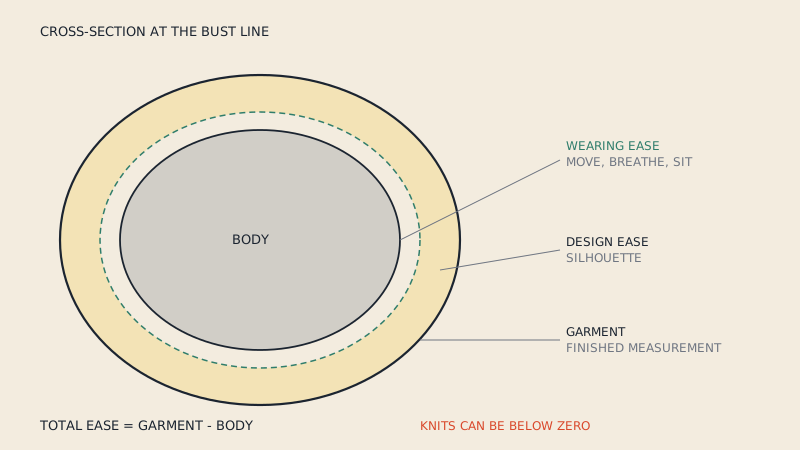
- Check the finished garment measurements at the same points. The difference between body and finished measurement is the ease; a fitted dress might have little, an oversized shirt a lot. Read more in ease in pattern making.
- Decide per area. Write down a size for bust, waist and hip separately. For example: bust 12, waist 14, hip 16.
- Choose the base size by the area that is hardest to alter. For tops and dresses this is usually the shoulders and upper chest, so many sewists pick by high bust and do a bust adjustment if needed. For skirts and trousers it is usually the hip.
If all three measurements fall in one size, you are done: follow that line everywhere. Most people, however, fall in two or three sizes, and that is what multi-size patterns are good for.
Blending between sizes
Blending (also called grading between sizes) means drawing a new cutting line that moves gradually from one size outline to another.
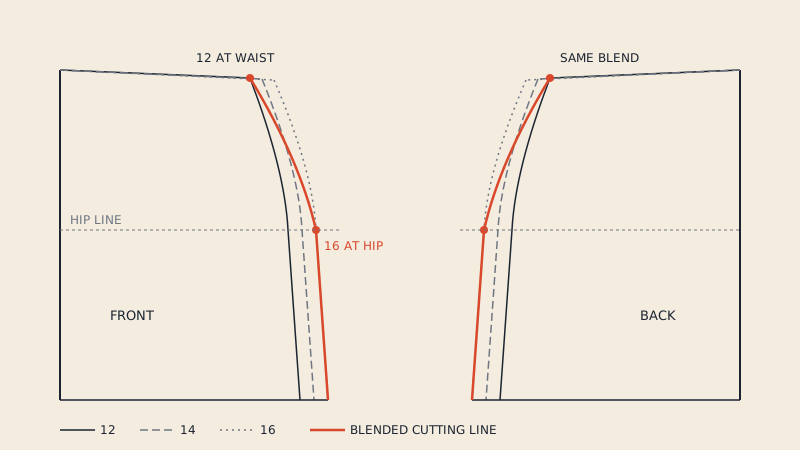
Blending at the side seam, step by step
Example: a skirt with size 12 at the waist and size 16 at the hip.
- Mark your size at each key point. On the side seam, put a dot on the size 12 line at the waist and on the size 16 line at the full hip level. The hip level is often marked on the pattern; if not, measure down from the waist to your own hip depth.
- Connect with a smooth curve. Use a hip curve or French curve. The new line should leave the size 12 line tangentially and arrive at the size 16 line tangentially, without a corner.
- Follow the size 16 line below the hip down to the hem.
- Blend over enough length. Moving across several sizes in a few centimetres creates a sharp bulge. As a rule of thumb, spread the change over the whole distance between the two body points.
- Repeat on the matching piece. Make the identical change on the back side seam. The two side seams must be the same length and the same shape where they meet.
- Correct the notches. Move each notch along the edge to where the new line crosses the notch position, or redraw it square to the new line at the same height.
What else changes when you blend
Blending one seam often affects others. Check these before cutting:
- Waistbands and facings. If you blended the waist, the waistband and any waist facing must match the new waist length. Measure the blended waist seam and adjust the band.
- Darts. If the waist changes size but the hip does not, the dart intake may need to change too. Use the darts of the size closest to your waist.
- Pockets. Side seam pockets must follow the new side seam line.
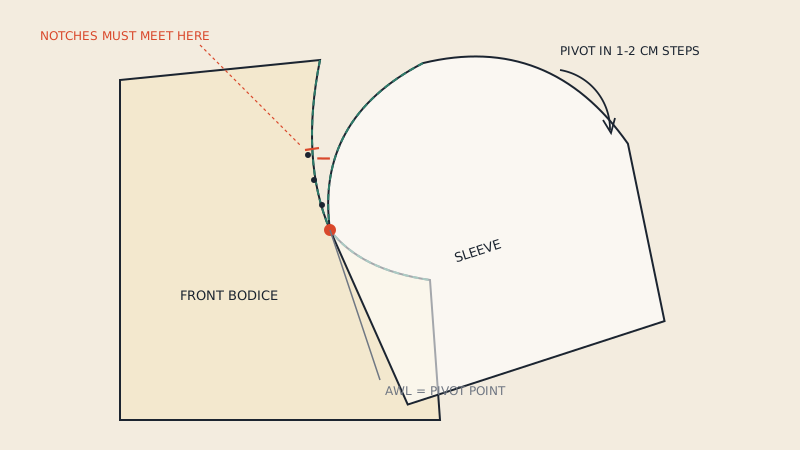
- Armholes and sleeves. If you blend at the armhole on a bodice, the sleeve cap must match the new armhole length. It is usually simpler to keep the armhole and sleeve in one size and blend below the underarm.
- Necklines and collars. Keep neckline, collar and facings in the same size, or adjust all of them together.
- Length. Height is a separate question from width. Use the lengthen and shorten lines rather than switching sizes to change length.
Blending on tops and dresses
For a top with bust 12 and waist 14:
- Keep the shoulder, neckline, armhole and sleeve in size 12.
- From the underarm point, follow the size 12 side seam a short way, then blend gradually to size 14 at the waist.
- Apply the same blend to the back side seam.
- If the bust is much larger than the pattern's size 12 at the same high-bust measurement, consider a full bust adjustment instead of blending; blending only adds width at the side seam, not length over the bust.
Matching pieces after blending
After blending, walk each changed seam. Lay the two pieces sewn together on top of each other along the sew line and check that the seam lengths and notches match. If they do not, adjust the line on one piece. The procedure for doing this on paper and in CAD is in how to walk the seams of a pattern.
A quick summary of what to keep in mind:
| Situation | What to do |
|---|---|
| Bust, waist and hip all in one size | Follow that line everywhere |
| Two sizes, one or two sizes apart | Blend at the side seams over the full distance between the body points |
| Three or more sizes apart | Blend, then check the fit with a test garment; consider a fit adjustment instead |
| Upper body smaller than lower | Keep armhole, sleeve, neckline in the smaller size, blend at the side |
| Waist different from hip on trousers | Blend at the side seam and adjust darts or yoke; check the crotch curve is unchanged |
| Length differs from the pattern | Use lengthen and shorten lines, not a different size |
Trace, do not cut
Cutting out your size from the master sheet destroys the smaller sizes nested inside, and the larger sizes around it. Tracing keeps the original intact for a later size, a gift or a version blended differently.
- Trace onto pattern paper, Swedish tracing paper or plain plotter paper.
- Transfer every mark: grain line, notches of your size, dots, darts, piece label and the size you used.
- Write the blend on the piece, for example "12 waist / 16 hip".
How to trace a sewing pattern covers tools and how to transfer markings accurately.
Multi-size patterns in CAD and 3D
In a PDF, all sizes are drawn on top of each other. Pattern CAD and 3D programs need each piece as one closed outline, so a nested multi-size pattern has to be reduced to one size before it is useful there. When you convert a multi-size PDF with our PDF to DXF converter, you pick one size and only that size's lines are extracted; switching to another size later is free. A blended size is not one of the printed lines, so for a blended pattern you would convert the nearest size and adjust the outline in your CAD. The wider question of one size vs all sizes in DXF is covered in converting a multi-size PDF pattern to DXF.
FAQ
How do I choose my size on a multi-size pattern?
Measure bust, waist and hip and compare them with the pattern's body measurement chart, not your shop size. Choose a base size by the area hardest to alter, usually bust or high bust for tops and hip for skirts and trousers, and blend elsewhere.
How do I blend between two sizes?
Mark your size line at each body point, such as size 12 at the waist and size 16 at the hip, then connect them with a smooth curve that leaves and joins the lines without corners. Make exactly the same change on every piece that shares the seam.
Do I need to adjust the matching pieces when I blend?
Yes. The front and back side seams must stay the same length and shape, and waistbands, facings, pockets and sleeves that join a blended edge must be adjusted to the new length.
Should I cut or trace a multi-size pattern?
Trace it. Cutting your size out of the master destroys the neighbouring sizes, while a traced copy keeps the original intact for future sizes or different blends.
How far can I blend between sizes?
Blending one or two sizes is routine. Across three or more sizes, the pattern's proportions start to change, so make a test garment and consider a specific fit adjustment instead.