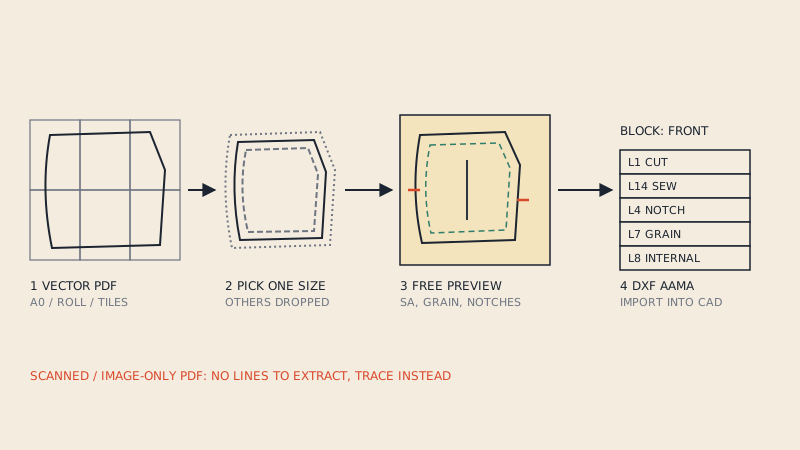
When you convert a multi-size PDF pattern to DXF, convert one size at a time. A multi-size PDF draws all sizes as nested outlines on the same sheet, told apart only by colour or dash style. Kept together in a DXF, those outlines become a tangle that 3D software and cutters cannot use, and that pattern CAD does not recognise as a graded pattern. Extracting a single size gives you clean pieces; if you need several sizes, convert each one separately.
How sizes are drawn in a multi-size PDF
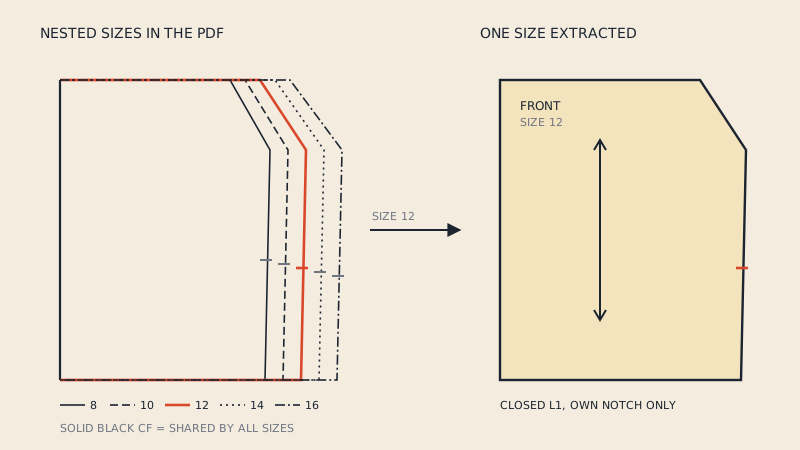
A multi-size (nested) pattern overlays every size on one drawing. Where sizes share a line, such as a centre front or a straight grain edge, there is one line. Where they differ, such as side seams, armholes and hems, each size has its own outline, spaced by the grade increment.
Designers use one or more of these cues to tell sizes apart:
| Coding | How it looks | Notes for conversion |
|---|---|---|
| Colour | Each size a different colour | Survives in vector PDFs; lost if printed in greyscale |
| Dash pattern | Solid, dashed, dotted, dash-dot | Most robust; works in black and white |
| Line weight | Thicker for some sizes | Weak cue on its own |
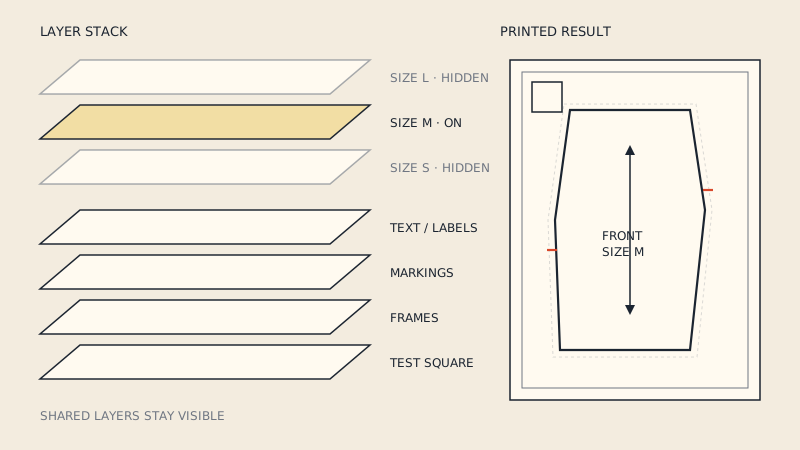
| PDF layers | Each size on its own optional-content layer | Easiest to separate, when present |
| Labels | Size number printed near the line | Helps people more than software |
Many patterns combine two or three of these, for example colour plus dash pattern, with PDF layers on top. How sewists use the layers for printing is in PDF pattern layers: how to print only your size.
Why "all sizes in one DXF" rarely works
It seems natural to want a single DXF with every size, the way the PDF has it. In practice that file is hard to use.
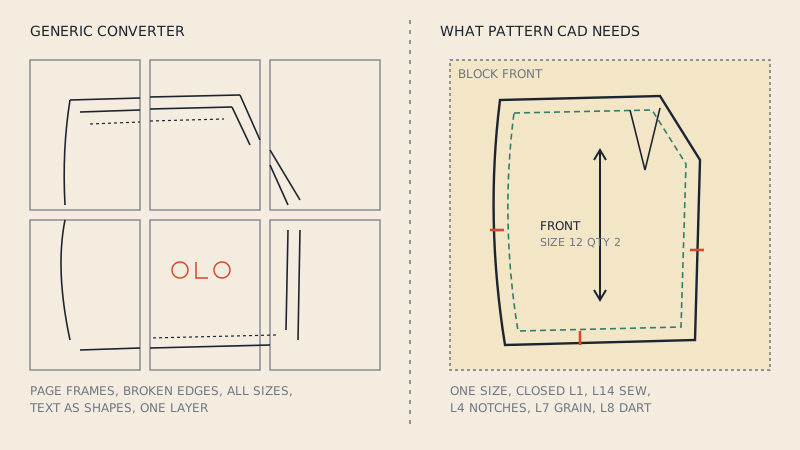
3D software needs one closed outline per piece
CLO3D and Marvelous Designer build a piece from a closed boundary. With eight nested outlines in one piece, the importer either fails, picks one outline at random, or creates eight overlapping pieces. Either way, you cannot sew them.
Cutters cut every line
A laser or blade cutter given a nested piece will try to cut every size. Even if you could select one, the shared segments belong to all sizes at once and do not form a closed path for any single size until they are combined with that size's own segments.
A drawn nest is not a graded pattern
In pattern CAD, a graded pattern is one base size plus grade rules: at each grade point the CAD knows how far the point moves for every other size. A nest in a PDF is only the visual result of grading, the outlines with no rules behind them. Imported as DXF, it is a set of unrelated outlines. You cannot change the base size and have the other sizes follow, and the CAD will not recognise it as graded. Rebuilding grade rules from a drawn nest is possible but is real pattern work; the concepts are covered in pattern grading basics.
Notches and internal lines multiply
Each size often has its own notches and dart positions. In a nested DXF you get every size's notches on the same edge, close together, and no way for software to know which belongs to which outline.
How extracting one size works
To extract a single size, every line in the PDF has to be classified: belongs to this size only, belongs to other sizes only, or is shared. The size's outline is then assembled from its own segments plus the shared ones.
The steps, whether done by hand or by a converter:
- Identify the coding. Work out which colour, dash pattern or layer belongs to your size. The legend on the first pattern page usually shows it.
- Isolate your size's lines. If there are PDF layers, switching off the other sizes does most of the work. Otherwise select by colour or dash.
- Keep shared lines. Lines common to all sizes (often solid black) belong to your size too. Do not delete them along with the other sizes.
- Close the outline. Join your size's segments and the shared segments into one closed boundary per piece.
- Pick the right notches and internal lines. Keep only those that sit on your size's outline or are marked for your size.
- Check against the pattern. Measure one or two finished-garment dimensions from the size chart against the extracted piece.
By hand in a vector editor, step 4 is where most time goes; at tile joins in an A4 pattern it is easy to connect to a neighbouring size's line by mistake.
Choosing a size before converting
Pick the size you would cut in fabric, using the pattern's own size chart and finished-garment measurements, not your ready-to-wear size. Which size to choose, and how to blend between sizes, is explained in how to use multi-size sewing patterns.
What about blending sizes?
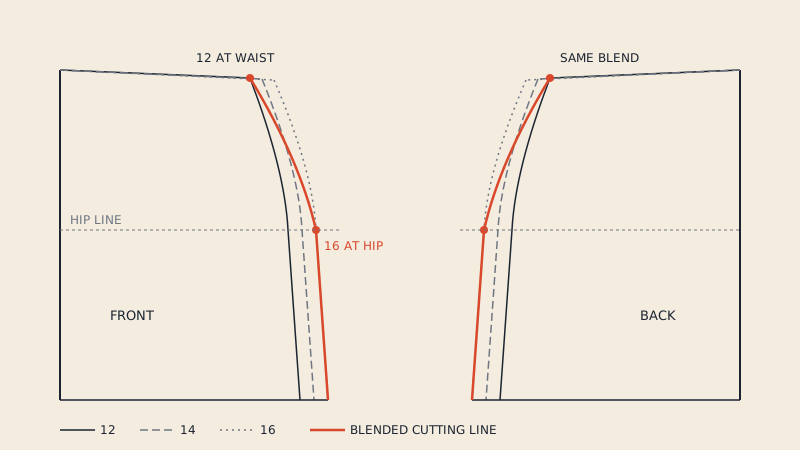
If you normally blend, say size 12 at the bust to 14 at the hip, there are two reasonable approaches:
- Convert both sizes and blend in CAD, drawing the new side seam between the two outlines.
- Convert the size that fits the largest area and alter it in CAD.
The first gives the closest match to blending on paper, because you have both outlines at full accuracy.
Converting several sizes
If you need several sizes, for a small production run or to test fit in 3D on different avatars, convert each size to its own DXF. Each file contains clean pieces with the size in the piece text. In pattern CAD you can keep them as separate patterns or use them as a reference to set up proper grading from a base size.
How our converter handles multi-size patterns
With Apparel Pattern Service you choose one size after uploading the PDF, and only that size's lines are extracted; shared lines are kept. The preview shows every detected piece for that size with its seam allowance, grain line and notch count, so you can check that the right outline was picked before paying. The DXF AAMA file is €15 per pattern file, and you can switch the size for free after paying, which is handy when you are deciding between two sizes or want to blend.
The converter does not grade and does not keep all sizes in one file. For the overall conversion process, see how to convert a PDF sewing pattern to DXF; for what usually happens when a general-purpose tool meets a nested pattern, see why generic PDF to DXF converters fail on sewing patterns.
FAQ
Can I convert all sizes of a PDF pattern into one DXF?
You can copy all the outlines into one file, but 3D software and cutters need one closed outline per piece, and pattern CAD will not treat a drawn nest as a graded pattern. Converting one size per file gives usable pieces.
How do I know which line is my size?
Check the size legend on the pattern, usually on the first page, which shows the colour or dash style for each size. If the PDF has layers, switching off the other sizes shows yours alone.
Will a converted multi-size pattern be graded in CAD?
No. A nested PDF shows the outlines of each size but not the grade rules behind them. To have a graded pattern in CAD, grade rules must be set up from a base size.
How do I blend between two sizes in DXF?
Convert both sizes, overlay them in CAD and draw a new seam line that moves from one outline to the other, then true the seams. This matches blending on paper but at CAD accuracy.
Do shared lines belong to every size?
Yes. Lines drawn once because all sizes share them, such as a centre front or a fold line, are part of every size's outline and must be kept when you extract one size.