You can convert a PDF sewing pattern to DXF without redrawing it if the PDF is vector, meaning the lines are stored as geometry rather than as a picture. There are three routes: redraw the pieces in CAD (slow but always possible), run a generic PDF-to-DXF converter and clean up the result, or use a pattern-aware converter that rebuilds the file as DXF AAMA with pieces, notches and grain lines. Which one fits depends on how many patterns you have and what software the DXF is for.
The procedure below works for any of the three routes; the steps that differ are marked.
Before you start: vector or raster
Everything depends on what is inside the PDF.
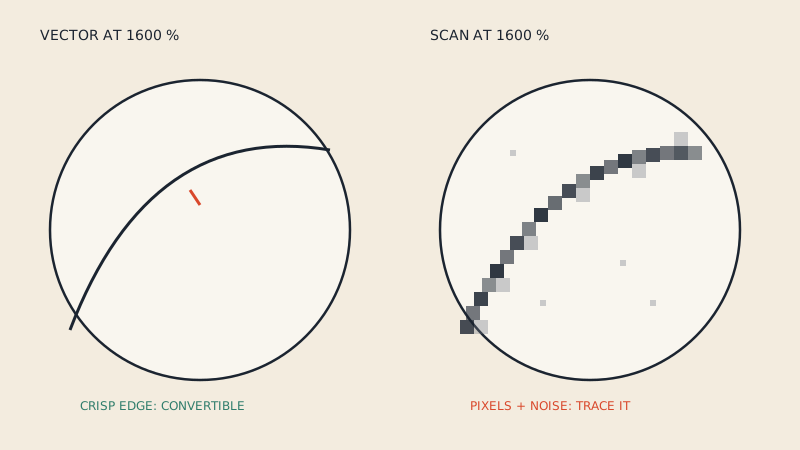
- Vector PDF. The pattern lines are paths with coordinates. Almost all PDF patterns sold online today are made this way, exported from Illustrator, Inkscape or pattern CAD. These can be converted.
- Raster PDF. Each page is a picture: a scan, a photo, or a pattern that was flattened to an image when it was saved. There are no lines to extract, only pixels. These cannot be converted directly; they have to be traced or digitised.
Checking takes half a minute: zoom in very far on a line and see whether it stays sharp or turns into pixels, and try selecting text. The full set of checks is in is my PDF pattern vector or scanned?.
The three routes
| Route | What you do | Time per pattern | Result | Best for |
|---|---|---|---|---|
| Redraw | Trace each piece in CAD over the PDF | Hours | Clean pieces, as accurate as your tracing | One pattern you will edit heavily anyway |
| Generic converter | Upload to a PDF-to-DXF tool, then clean up in CAD | Fast to convert, slow to clean | Loose lines on few layers | Simple, single-piece shapes |
| Pattern-aware converter | Upload, pick a size, check preview, download DXF AAMA | Minutes | Closed pieces, AAMA layers, piece text | Patterns going into CLO3D or pattern CAD |
Route 1: redraw
Import the PDF page as an underlay into your CAD or vector program, scale it using the test square, and trace each piece with the pen or digitising tool. Then add notches, grain lines and names by hand and export.
It is reliable and needs no extra tools, but it is slow, and every traced curve is a small chance for error. It also means scaling every tile correctly if the pattern is A4 or US Letter.
Route 2: generic converter
Online and desktop PDF-to-DXF tools copy every path from every page into a DXF. They do not know what a pattern piece is. You typically get tile borders, page numbers, legends and all the size lines together, often on a single layer, with text converted to outlines. You then delete what you do not need, join segments into closed outlines and assign layers yourself. The specific problems are listed in why generic PDF to DXF converters fail on sewing patterns.
Route 3: pattern-aware converter
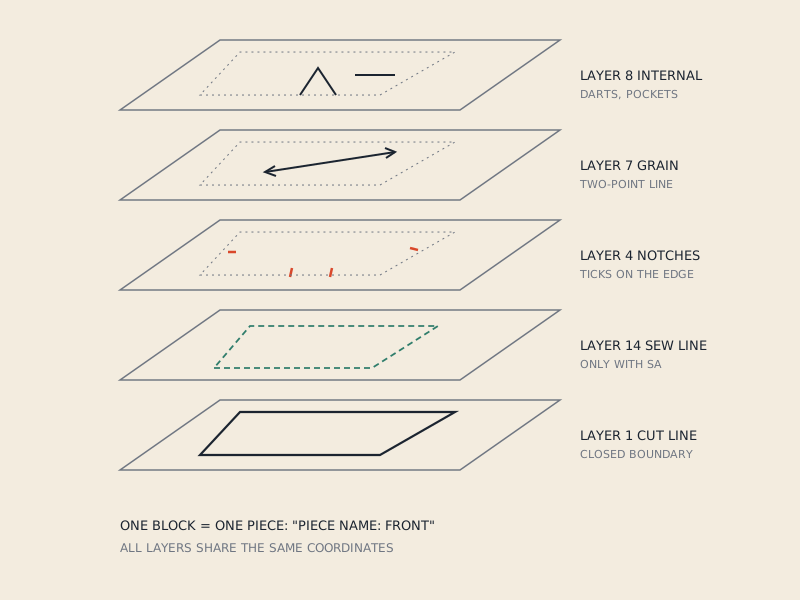
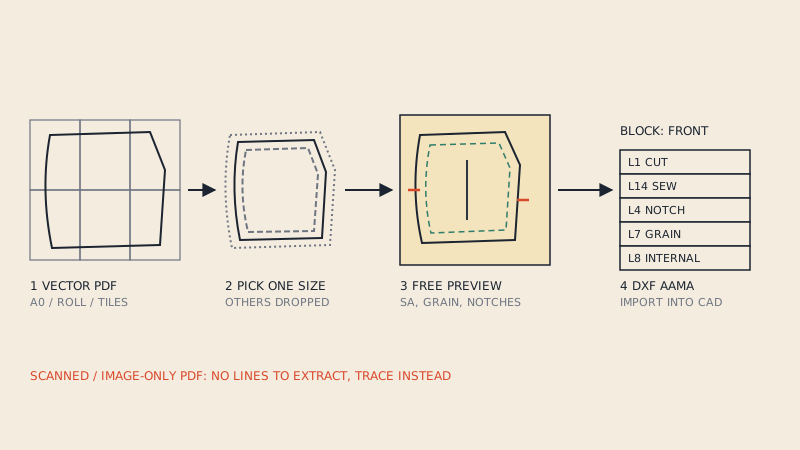
A converter built for sewing patterns reads the vector lines and rebuilds the pattern rather than the drawing: it joins print-at-home tiles, separates pieces, keeps only the size you choose, recognises notches and grain lines, and writes everything to the AAMA DXF layers in one block per piece.
Step by step
1. Check what you have
Open the PDF and note:
- Paper format: A0 or copy-shop sheets, a single large-format sheet (36" / 91 cm roll or projector file), or A4 / US Letter tiles.
- Whether it is multi-size, and which size you want.
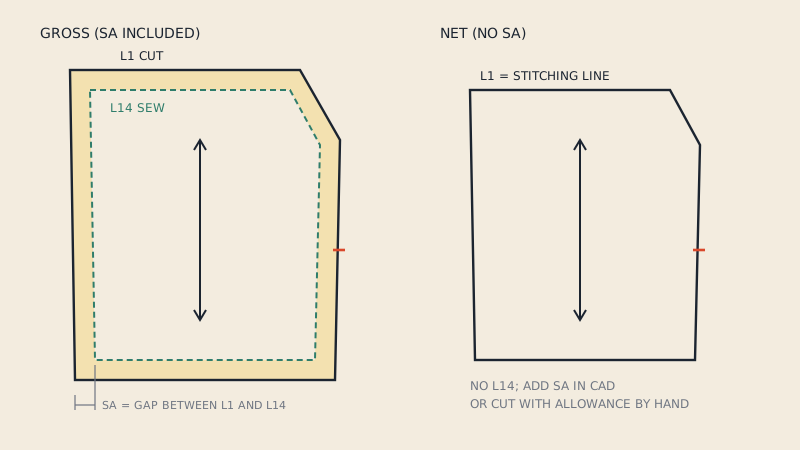
- Whether seam allowance is included (look at the instructions or for a second line around each piece).
- Whether the file is password-protected (the reader will show a lock or ask for a password to edit).
If the pattern comes in several formats, the A0 or projector file is usually the easiest to convert because there are no tiles to join.
2. Make sure you have the right to convert it
Converting a pattern you bought for your own use is different from sharing or selling the result. Check the licence that came with the pattern; sewing pattern copyright covers the general principles (it is not legal advice).
3. Convert
- Redraw route: trace each piece as described above.
- Generic converter route: convert, then open the DXF in a CAD editor, delete page furniture, join each outline into one closed polyline and move notches, grain and internal lines to their own layers.
- Pattern-aware route: upload the PDF, choose the size, and review the detected pieces.
4. Check every piece before you use it
Whatever route you took, check the result against the PDF:
- Piece count. Compare with the cutting layout in the instructions. Facings and small pieces like pocket bags are the ones most often missed.
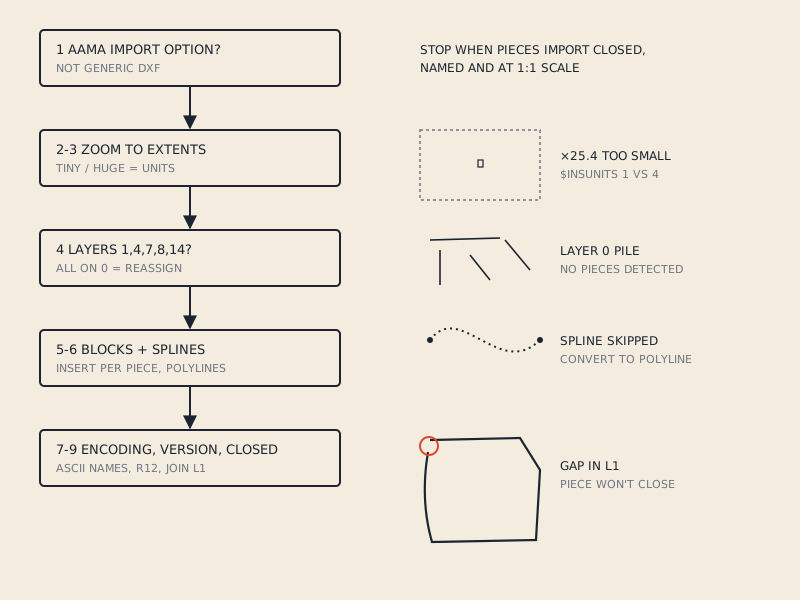
- Size. Measure one known dimension, such as the width of a cuff or the length of a straight seam, in your CAD. A pattern that is 25.4 times too big or small has a units problem.
- Closed outlines. Each piece should be a single closed shape.
- Notches. Count them on one seam and compare with the PDF.
- Grain line. One per piece, in the right direction.
- Seam allowance. Know whether layer 1 is the cut edge with allowance or the net stitching line. See PDF to DXF with or without seam allowance.
5. Import into your software
In CLO3D and Marvelous Designer, use File > Import > DXF (AAMA/ASTM) and check the scale and unit options in the import dialog. Industrial 2D CAD systems have their own DXF or AAMA import tools; the pieces should arrive as named pattern pieces you can edit, grade or nest. If something arrives broken or empty, go through DXF pattern won't open (or opens empty)? 9 fixes.
What to expect from a converted DXF
A good conversion gives you the pattern as the designer drew it, in one size, ready for CAD. It does not change the pattern.
- The pieces have the same shape and size as the PDF.
- Seam allowance is included only if it was in the PDF.
- It is a single size unless you convert again for another size.
- Construction details such as topstitching notes or written instructions stay in the PDF.
Using our converter
Apparel Pattern Service is a pattern-aware converter. It accepts vector PDFs on A0 or copy-shop sheets, large-format single sheets and A4 / US Letter tiles, which it assembles automatically, up to 60 MB. For multi-size patterns you pick one size and only that size's lines are extracted.
Before paying you get a free preview of every detected piece with its size, seam allowance, grain line and notch count. The DXF AAMA file costs €15 per pattern file, and you can switch to another size for free after paying. Scanned or photographed patterns and password-protected PDFs are not supported. If the file does not open in your CAD and cannot be fixed, you get a refund.
FAQ
Can any PDF sewing pattern be converted to DXF?
Only vector PDFs can be converted directly, because their lines are stored as geometry. Scanned or photographed patterns contain only pixels and must be traced or digitised instead.
Do I need to tape the A4 pages together first?
Not with a converter that assembles tiles. If you redraw or use a generic converter, you have to align the tiles yourself, which is slow and introduces small errors at every join.
Will the DXF include seam allowance?
A converted DXF includes seam allowance only if the PDF pattern included it. In that case the cut line is on layer 1 and the stitching line on layer 14.
What software can open the converted DXF?
A DXF AAMA file opens in CLO3D, Marvelous Designer, Browzwear VStitcher and industrial pattern systems such as Gerber AccuMark, Lectra Modaris and Optitex. Generic CAD programs can display it as a drawing.
How long does conversion take?
Redrawing a pattern takes hours. Cleaning up a generic conversion often takes about as long. A pattern-aware converter produces the DXF in minutes, plus the time you spend checking the preview.