To import a DXF pattern into CLO3D, use File > Import > DXF (AAMA/ASTM), choose the file, set the scale (unit) the pattern was drafted in, and decide whether to open it as a new project or add it to the current one. The pieces appear in the 2D Pattern window, ready to arrange around the avatar and sew. Most problems after import come from three settings: scale, how the cut and sew lines are interpreted, and whether internal lines are traced.
CLO's menus shift a little between versions, so treat the names below as a guide and check against your own version's dialog.
Before you import
A few minutes spent on the file saves an hour in CLO.
- Use DXF AAMA or ASTM, not a generic DXF. An AAMA file stores each piece as a block with its outline, notches, grain line and name on known layers, which is what CLO's importer expects. A generic DXF of loose lines may import as nothing useful.
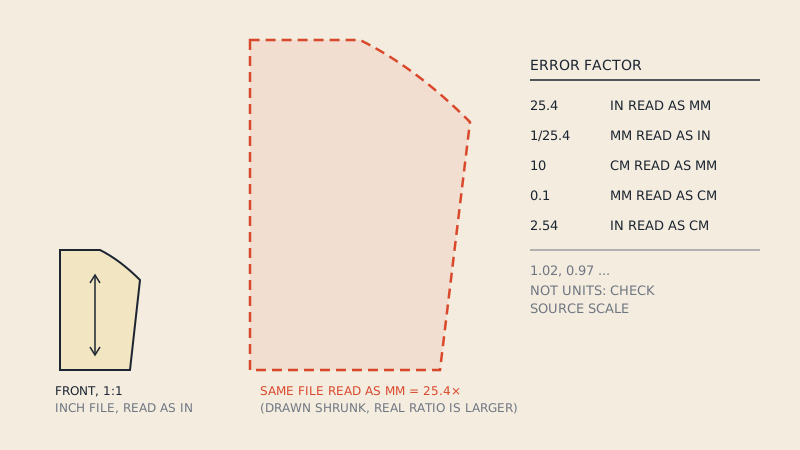
- Know the unit. Ask whoever made the file, or check its header. A wrong unit gives a pattern 25.4 or 10 times off; see DXF units.
- Know whether it has seam allowance. If it does, it should carry both a cut line and a sew line. CLO prefers to work with the sew line as the piece and the allowance as a property of it.
- One size per file is easiest for a first import. Graded files can be imported, but you will want to know which size you are sewing.
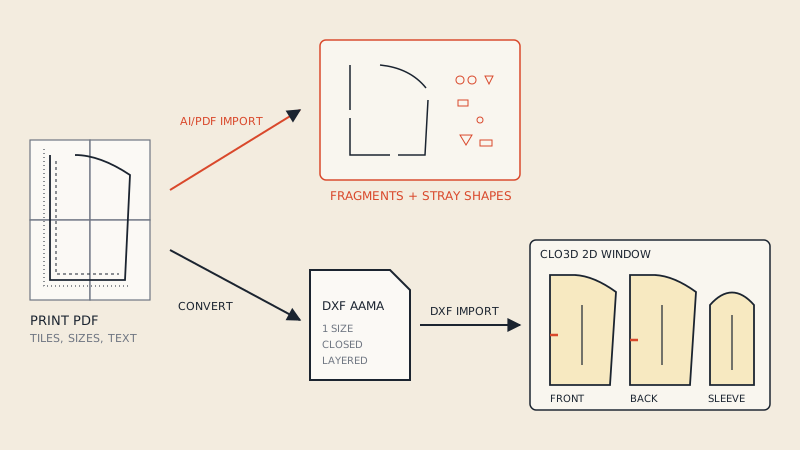
If you only have a PDF pattern, CLO cannot use it this way; read importing a PDF pattern into CLO3D first.
Step by step
- Open the import. File > Import > DXF (AAMA/ASTM) opens the file as a new project. To bring pieces into a project you already have open, recent versions also offer File > Import (Add) > DXF, or a Load Type choice inside the dialog.
- Pick the file and confirm. The import options dialog opens.
- Set Load Type: Open (replace the current workspace) or Add (keep what is there and add the pieces).
- Set Scale. Choose the unit the file was drafted in (millimetres, centimetres, inches). An Auto Scale option tries to detect it; if your pieces come in at the wrong size, switch Auto Scale off and choose the unit yourself.
- Choose the options described below, then confirm.
- Check the 2D window. Pieces should appear at plausible size, closed, named and with grain lines and notches.
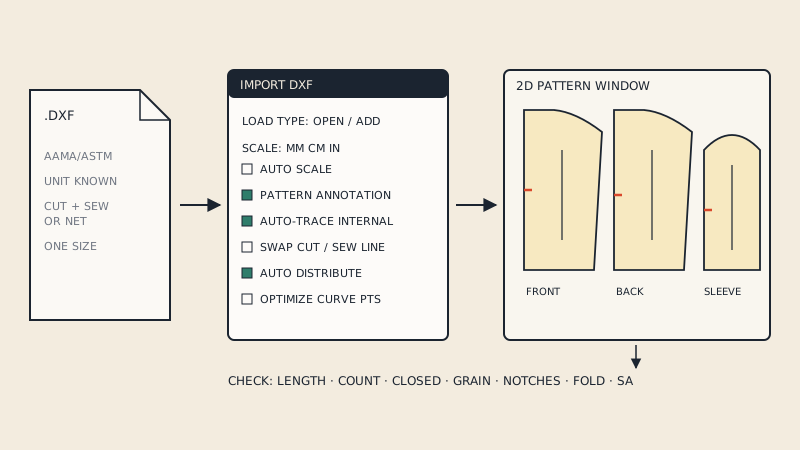
The import options, one by one
Option names below follow CLO's import dialog in recent versions; your version may show more, fewer or slightly differently worded options.
| Option | What it does | When to use it |
|---|---|---|
| Load Type: Open / Add | New project, or add to the current one | Add when bringing extra pieces into an existing garment |
| Scale / Auto Scale | Sets the drafting unit | Set manually if Auto Scale guesses wrong |
| Import Pattern Annotation | Brings piece text (name, size, notes) in as annotation | On, if the file has meaningful piece text |
| Auto-Trace as Internal Lines | Turns internal geometry (darts, pocket placements, buttonholes) into CLO internal lines | On for most garments; off if the file has messy internal geometry you do not want |
| Swap Cutting Line and Sewing Line | Exchanges the outline and the sew line | When pieces import with the allowance inside out, or as cut line with SA treated as net |
| Auto Distribute | Spreads pieces out in the 2D window | On, if pieces arrive stacked on each other |
| Optimize All Curve Points | Simplifies dense point data on curves | For files where curves are made of very many short segments |
Seam allowance: cut line and sew line
A DXF AAMA with seam allowance has the cut line on layer 1 and the sew line on layer 14. CLO can use the sew line as the piece's outline (which is what it sews on in 3D) and attach the distance to the cut line as seam allowance. If the result is wrong, typically pieces that look too big when sewn, or an allowance that appears on the inside, try the Swap Cutting Line and Sewing Line option and re-import.
If the file has only one line and it includes allowance, CLO will treat it as the sewing line and the garment will simulate one allowance-width too big on every seam. Either use a file without allowance (net) or with both lines. Seam allowance in CLO3D covers adding and removing it in CLO itself.
Annotation and piece names
With annotation import switched on, piece text from the file shows up in CLO. Named pieces make the next steps much quicker: you arrange and sew "FRONT" and "SLEEVE" rather than numbered patterns. If names are missing, the problem is usually in the file, not in CLO: the piece text is absent, outside the piece blocks, or converted to curves.
What to check right after import
Do these checks in the 2D window before you start arranging and sewing. Errors are cheaper to fix here than after a simulation.
- Measure one known straight line with CLO's measuring tools. If it is off by a clean factor (25.4, 10, 2.54), re-import with a different scale.
- Count the pieces against the pattern's piece list.
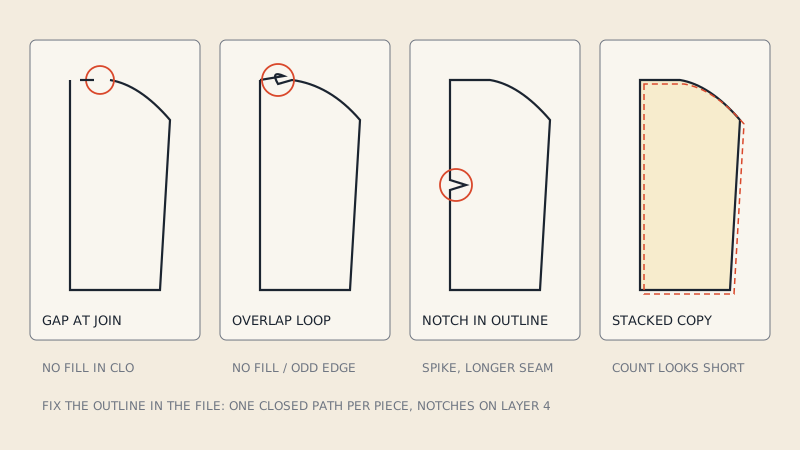
- Check each piece is closed and filled. An open outline shows as lines without a piece fill and cannot be simulated.
- Check grain lines. Each piece should have one, in the direction of the paper pattern. CLO uses it to orient the fabric; see grain lines in DXF.
- Check notches at seam ends, armholes and sleeve caps. They help a lot when you sew seams.
- Check mirrored and fold pieces. A half piece "cut on fold" needs unfolding or a symmetric copy before it makes a full front or back.
- Check seam allowance on a few pieces: present where expected, the right width, on the outside.
If anything fails, the CLO3D import troubleshooting list maps each symptom to its cause in the file.
After the check: arranging and sewing
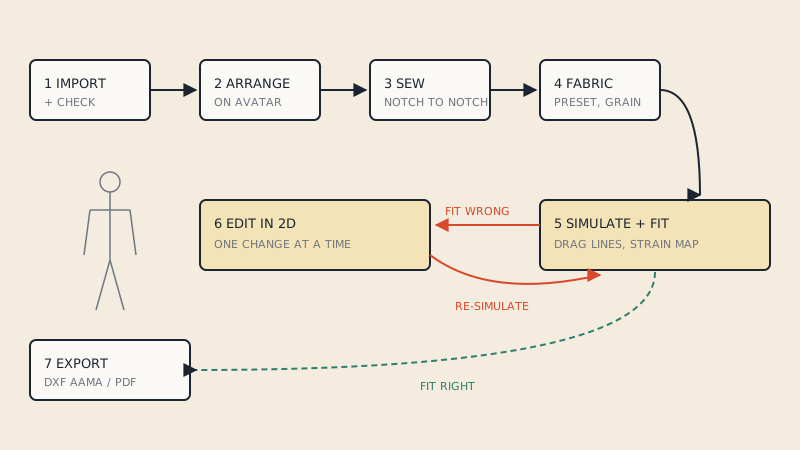
Once the pieces are right in 2D, the work moves to 3D: placing pieces on arrangement points around the avatar, sewing seams, assigning fabric and simulating. That workflow is its own topic, covered in from flat pattern to 3D sample in CLO3D.
Getting a CLO-ready DXF from a PDF pattern
If your pattern exists only as a vector PDF, it first has to become a DXF AAMA with real pieces. Our converter extracts one size, closes the outlines, and writes cut line, sew line (when the pattern has seam allowance), grain line, notches, internal lines and piece text into an AAMA file for €15 per pattern file, with a free preview of each piece first. If the file does not open in your CAD and cannot be fixed, you get a refund.
FAQ
Where is the DXF import in CLO3D?
In recent versions it is under File > Import > DXF (AAMA/ASTM), with an Add variant for adding pieces to an open project. Menu wording varies slightly between versions.
What scale should I choose when importing a DXF into CLO3D?
Choose the unit the file was drafted in: millimetres, centimetres or inches. If Auto Scale gives the wrong size, switch it off and pick the unit manually, then measure a known line to confirm.
Why does my imported pattern have the seam allowance on the inside?
CLO has interpreted the cut and sew lines the wrong way round. Re-import with the Swap Cutting Line and Sewing Line option, or check that the file has the cut line on layer 1 and the sew line on layer 14.
Can CLO3D import notches and grain lines from a DXF?
Yes, from a DXF AAMA or ASTM file that stores them on the expected layers. Generic DXFs with everything on one layer usually lose them.
Should I import a DXF with or without seam allowance into CLO3D?
Either works if the file is clear about it. A net pattern (no allowance) or a pattern with both a cut and a sew line both simulate correctly; a single line that already includes allowance makes the garment too big.