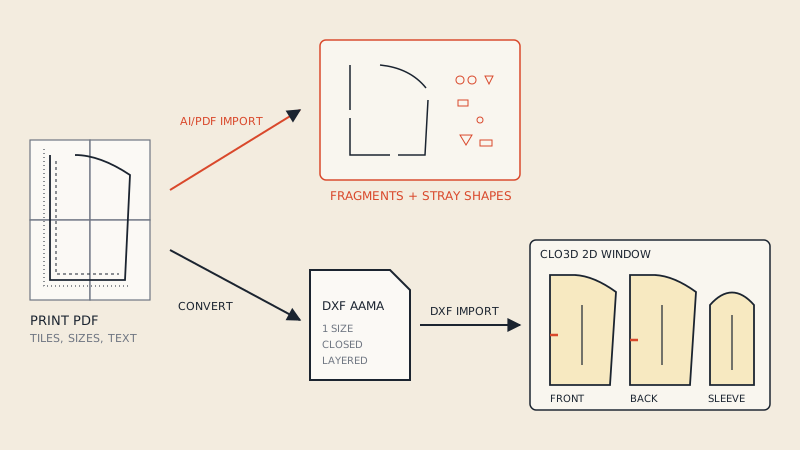
Not in a way that gives you a sewable garment. CLO3D has an Adobe Illustrator (AI/PDF) import meant for clean vector artwork, where each closed shape can become a pattern piece, but a sewing pattern PDF made for printing is not that kind of file. Its tiles, labels, nested sizes and loose notch marks either fail to import or turn into a tangle of shapes. The practical route is to convert the PDF to DXF AAMA first, then import the DXF.
The rest of this article explains why the direct route struggles, when tracing is worth it, and what the convert-first workflow looks like.
What CLO3D actually imports
CLO builds garments from closed 2D pattern pieces. Everything it imports has to end up as that: a closed outline, with optional internal lines, notches, a grain line and seam allowance.
The main ways to get pieces in:
| Route | What it expects | Good for |
|---|---|---|
| DXF (AAMA/ASTM) import | One block per piece, layered lines | Patterns from pattern CAD, converted patterns |
| Adobe Illustrator (AI/PDF) import | Clean vector file, each piece a closed shape | Patterns drafted in Illustrator for CLO |
| Image as reference, then trace | A picture of a pattern at known scale | One-off pieces, no vector source |
| Drafting in CLO | Nothing | New designs |
The AI/PDF import exists, and CLO's own help describes it: shapes inside a piece's outline can be brought in as base lines, internal shapes or graphics. But CLO's support also notes that pieces must be closed shapes for the import to work, and that files often fail when points are disconnected or too close together. That is exactly where print PDFs fall down. Menu names vary between CLO versions, so look for it under File > Import in yours.
Why a printable PDF pattern does not import cleanly
A sewing pattern PDF is designed for a printer and a person with scissors, not for software. Look at a typical print-at-home file through CLO's eyes:
- Tiles. Each piece is cut into A4 or Letter pages with frames, page numbers and match marks. The outline exists only as fragments that stop at every page edge.
- Nested sizes. Eight or twelve size lines run side by side, close together, often as dashed lines. Dashes are not closed shapes; neighbouring sizes touch and cross.
- Text everywhere. Piece names, cutting instructions, size labels, logos. Text set as outlines becomes hundreds of tiny closed shapes.
- Marks as shapes. Notches as triangles, grain lines as arrows, buttons as circles: each one a separate object CLO cannot place on an edge.
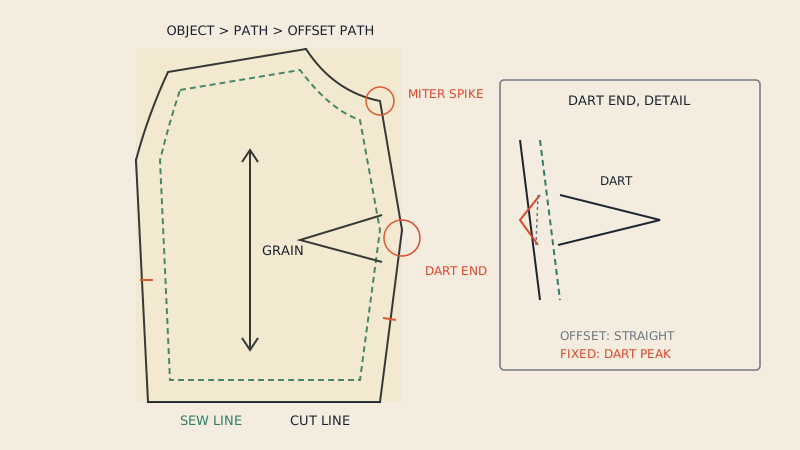
- Seam allowance as a second outline. CLO sees two nested closed shapes and does not know which is the piece.
- Layers for print. PDF layers for sizes are a reader feature; they are not pattern structure.
Even a one-page copy-shop PDF, with no tiles, still has the nested sizes, text and marks. The is my PDF vector check tells you whether you have vector lines at all; a scanned PDF has none and cannot be imported as anything but an image.
Route 1: trace it in CLO
Tracing means bringing an image of the pattern into CLO, scaling it against a known measurement and redrawing each piece with CLO's pattern tools.
It works, and for one or two simple pieces it is reasonable. For a full garment it has costs:
- You need an accurate reference: a 1:1 image or a known measurement on every sheet.
- Every curve is redrawn by hand, so accuracy depends on your patience and the zoom level.
- Notches, grain lines and internal lines are added manually.
- If the pattern changes or you need another size, you trace again.
Treat tracing as the route for patterns with no vector source, and as practice in CLO's drafting tools, which is valuable in itself.
Route 2: clean the PDF in a vector editor
If you work in Illustrator or Inkscape, you can open the PDF, delete everything except one size's outlines, join the fragments into closed paths, and import that through CLO's AI/PDF route.
This is the right choice if you already draft patterns in Illustrator. For a bought pattern it is slow: assembling tiles, separating nested sizes, joining dozens of segments per piece and rebuilding notches takes hours for a typical dress. The tools for it are covered in using Illustrator for sewing patterns and using Inkscape for sewing patterns.
Route 3: convert to DXF AAMA, then import
Converting puts the pattern into the format CLO's pattern import is built for. A pattern-aware conversion does the cleaning work for you:
- Check the PDF is vector and not password-protected.
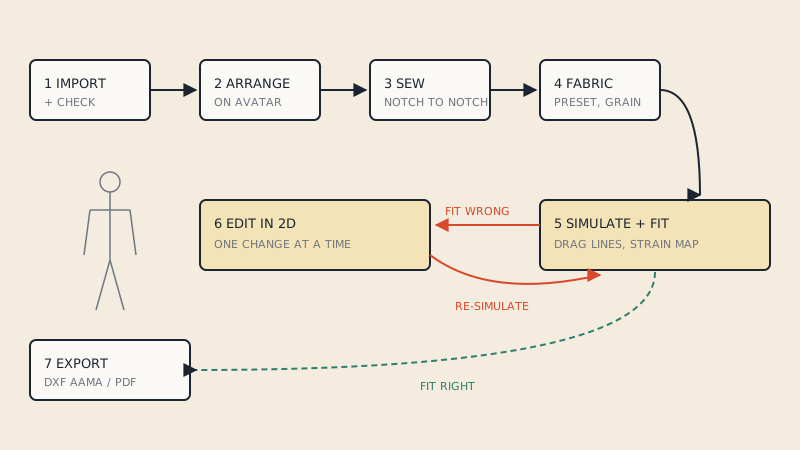
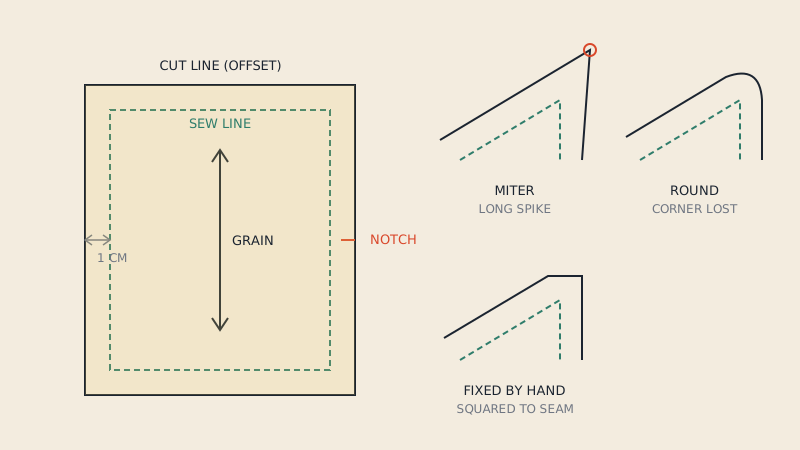
- Convert it to DXF AAMA, choosing one size. The converter assembles tiles, isolates that size's lines, closes each outline and writes the notches, grain line, internal lines and piece names on the AAMA layers. If the pattern includes seam allowance, both a cut line and a sew line are written.
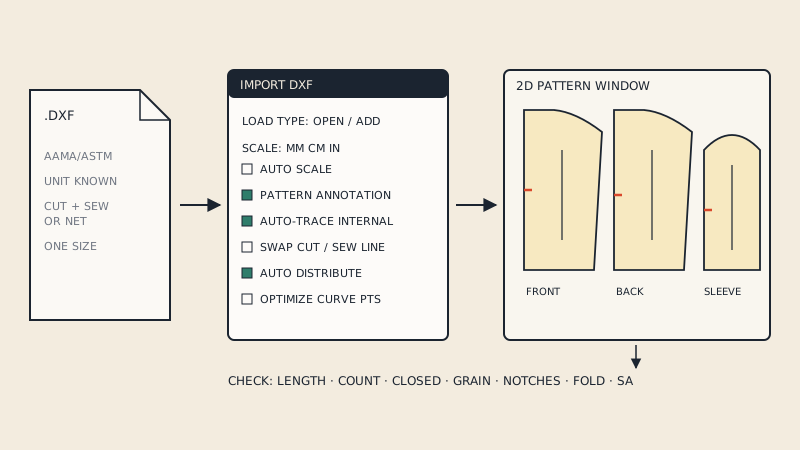
- Import into CLO with File > Import > DXF (AAMA/ASTM), setting the scale. The CLO3D DXF import guide goes through the dialog.
- Check the pieces in the 2D window: count, closed outlines, grain, notches, fold pieces.
- Arrange, sew and simulate. See from flat pattern to 3D sample.
Our converter handles A0 and copy-shop sheets, large single-sheet and projector files, and A4 or US Letter tiles, which are assembled automatically. You see every detected piece, its size, seam allowance, grain line and notch count in a free preview, and pay €15 per pattern file only if it looks right. You can switch to another size for free afterwards.
Comparing the routes
| Trace in CLO | Clean in vector editor | Convert to DXF AAMA | |
|---|---|---|---|
| Needs vector PDF | No | Yes | Yes |
| Time for a typical dress | Hours | Hours | Minutes plus checking |
| Accuracy | Depends on tracing | Exact lines | Exact lines |
| Notches and grain | Added by hand | Rebuilt by hand | Written as AAMA layers |
| Another size later | Trace again | Clean again | Re-convert |
| Works on scans | Yes | No | No |
Things to settle before you start
- Rights. Converting a pattern you bought for your own use is a different matter from sharing the result. Our service asks you to confirm you own the pattern or have the right to convert it, and converted files must not be shared. For general background, not legal advice, see sewing pattern copyright.
- Size. Pick the size you will actually simulate; a graded nest is rarely what you want in 3D.
- Seam allowance. Know whether the pattern includes it, so you can check that CLO treats the cut and sew lines correctly.
FAQ
Can CLO3D open a PDF sewing pattern?
CLO3D has an AI/PDF import for clean vector files where each piece is a closed shape. A printable sewing pattern PDF, with tiles, nested sizes, text and marks, does not import as usable pieces, so it needs cleaning or converting first.
What is the best way to get a PDF pattern into CLO3D?
Convert the vector PDF to DXF AAMA with one size extracted, then import the DXF with File > Import > DXF (AAMA/ASTM). The pieces arrive closed, with grain lines, notches and names.
Can I trace a pattern in CLO3D?
Yes. You can bring in an image of the pattern, scale it to a known measurement and redraw the pieces with CLO's drafting tools. It is practical for a few pieces, slow for a whole garment.
Can I import a scanned pattern into CLO3D?
Only as an image to trace over. A scan contains pixels, not lines, so it cannot be converted to DXF or imported as pieces without redrawing.
Why do my pieces fall apart when I import a PDF into CLO3D?
Print PDFs store outlines as fragments split at tile edges, as dashed size lines, or alongside many small shapes for text and marks. CLO needs each piece as one closed shape, which a print file rarely has.