Adobe Illustrator is the tool many indie pattern designers already use to make their PDF patterns: it handles precise curves, layers for sizes, artboards for print sheets and clean PDF output. To make an Adobe Illustrator sewing pattern you draw each piece as a closed path, add seam allowance with Offset Path, and arrange artboards for each print format. Getting that pattern into pattern CAD or 3D is the weak spot, because Illustrator's DXF export does not produce DXF AAMA pieces.
This guide covers the Illustrator-specific parts: document setup, Offset Path behaviour on pattern corners, artboards as print sheets, and what happens when you export DXF. For the same workflow in free software, see using Inkscape for sewing patterns.
Document setup for patterns
Set units before drawing: Edit > Preferences > Units (on macOS, under the Illustrator menu: Settings or Preferences, then Units, depending on version) to millimetres or inches. Create the document at real size, never scaled down "to fit the screen". Illustrator's canvas is large enough for a full A0 sheet and much longer roll sheets, so there is no reason to draw at 1:2 and scale later.
Two habits that prevent most problems:
- Turn off "Scale Strokes & Effects" when you resize pattern pieces, or line weights change along with the geometry.
- Keep a 10 cm (4") test square on its own layer from the first day, locked, and include it on every artboard you export.
Drawing pieces
Draw each piece as a single closed path with the Pen tool. Fewer anchor points give smoother curves and easier edits. For each piece keep, on separate layers or sublayers:
- the cut line (closed),
- the sew line, if you draft net and add allowance,
- the grain line with arrowheads,
- notches as short strokes perpendicular to the edge,
- internal lines: darts, pocket and buttonhole placements, fold line,
- text: piece name, size, cut quantity.
Name sublayers by piece (FRONT, BACK, SLEEVE) rather than by line type only. When you later export or hand the file to someone, a piece-based structure is far easier to work with.
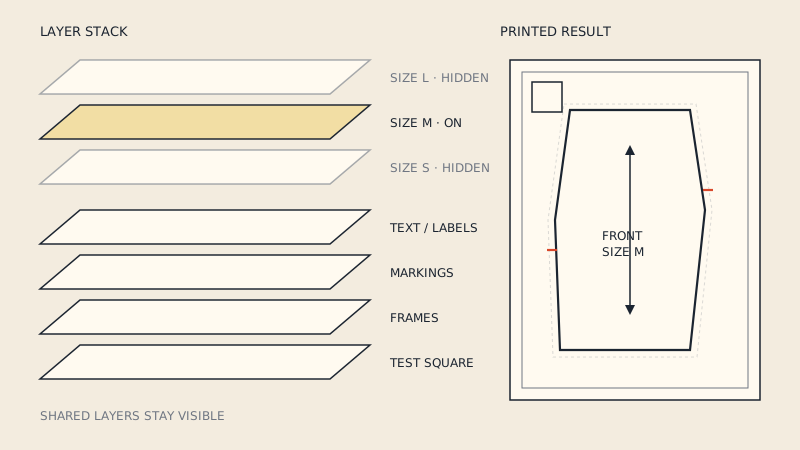
For a multi-size pattern, a layer per size is standard practice for PDF patterns, so buyers can switch off the sizes they do not need. The PDF pattern layers article explains how buyers use those layers when printing.
Seam allowance with Offset Path
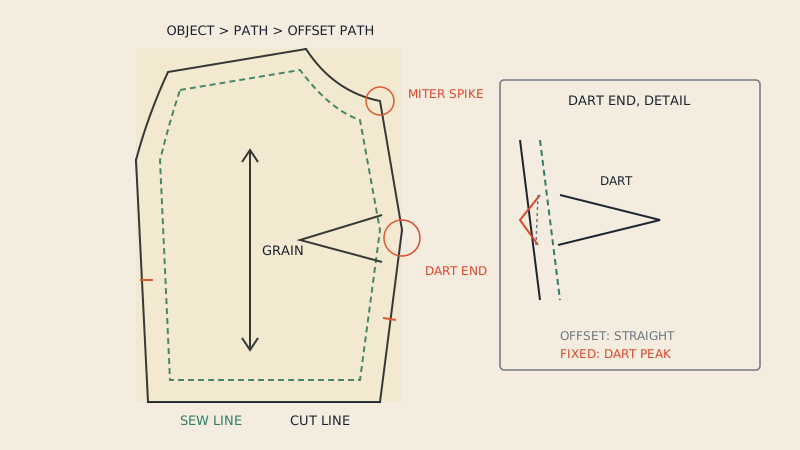
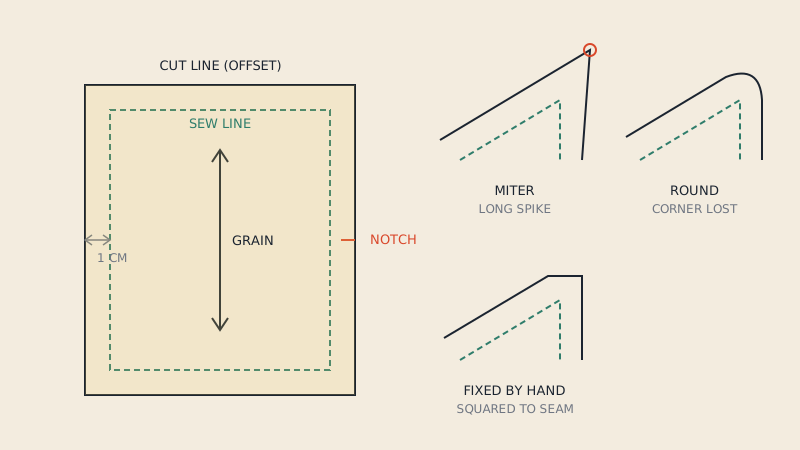
Illustrator's command is Object > Path > Offset Path. It asks for an offset distance, a join type (Miter, Round or Bevel) and a miter limit. It creates a new path and leaves the original untouched, which is what you want: keep the sew line, add the cut line.
How it behaves on pattern shapes:
- Sharp corners (shoulder point, underarm, collar points) with Miter joins extend into spikes when the angle is acute. Lowering the miter limit turns them into bevels, which is closer but still not how a pattern maker shapes the allowance.
- Dart ends on the edge need the allowance folded as if the dart were closed, so the cut line follows the pressed dart. Offset Path cannot know this; draw it by hand.
- Hems and sleeve hems need the allowance mirrored from the hem line so it lies flat when turned. Again a manual step.
- Different widths on one piece (1 cm side seam, 4 cm hem) mean offsetting segments separately or editing the result.
- Open paths offset on both sides. Make sure the sew line is closed first.
A reliable method: offset the closed sew line by the main allowance, then fix the specific corners with the Direct Selection tool, using the Pen tool to redraw dart and hem sections. If the PDF will be converted later, keep the cut line closed and on one layer; split cut lines are the most common reason pieces fail to be recognised. The general rules for widths and corner shapes are in how to add seam allowance.
Artboards as print sheets
Artboards are where Illustrator is stronger than most tools for pattern work. You can set up one document with:
- one large artboard for the copy-shop version, for example A0 (841 × 1189 mm) or a 914 mm (36") wide sheet,
- a set of A4 (210 × 297 mm) artboards and a set of US Letter (8.5 × 11", 216 × 279 mm) artboards for home printing,
- a cover or instruction artboard if you want them in the same file.
For the tiled versions, lay out artboards in a grid over the pattern with a small overlap or with butted edges plus trim marks, and add a page label (row and column) and alignment marks to each. Save as PDF with the chosen artboard range. Illustrator also has tiling in the print dialog (the Tile Full Pages and Tile Imageable Areas scaling options with an overlap value), but that tiles at print time on your printer, which is fine for proofing and not a substitute for a distributable tiled PDF.
Keep in mind that every format you add is another set of artboards to update whenever the pattern changes. That maintenance is the main reason designers look for ways to generate tiled and large-format files from one master. If you are building a pattern business, how to make PDF sewing patterns to sell covers the full set of files buyers expect.
DXF export: what Illustrator actually writes
Illustrator exports DXF through File > Export > Export As, choosing AutoCAD Interchange File (DXF). The options include the AutoCAD version, scale units and ratio, scale lineweights, and whether to export only selected art. The result is a geometric DXF that general CAD opens.
Why it is not a pattern file:
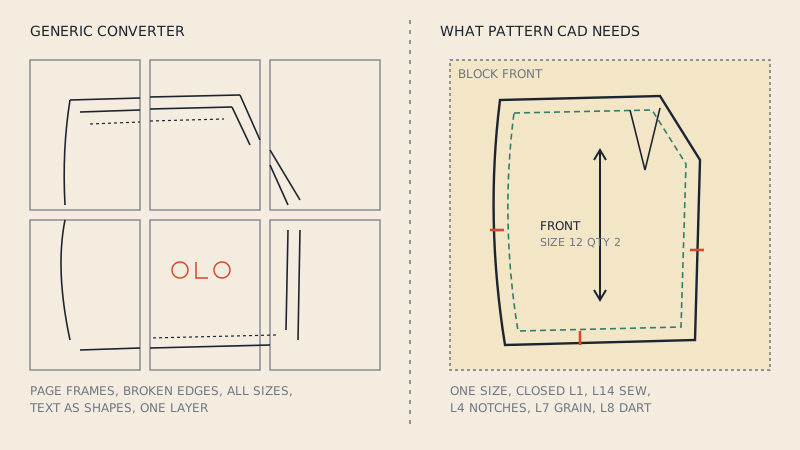
| What pattern CAD expects | What Illustrator's DXF contains |
|---|---|
| Each piece as its own DXF block | Paths as loose entities in one drawing |
| Cut line on layer 1, notches on 4, grain on 7, internal lines on 8, sew line on 14 | Your Illustrator layer names, if layers are kept at all |
| Grain line as a two-point line inside the piece | Grain arrow as a path with arrowheads |
| Piece name, size and quantity as annotation text | Text as text entities or outlined shapes, not attached to a piece |
| Real-world units | Units depending on the scale settings you chose |
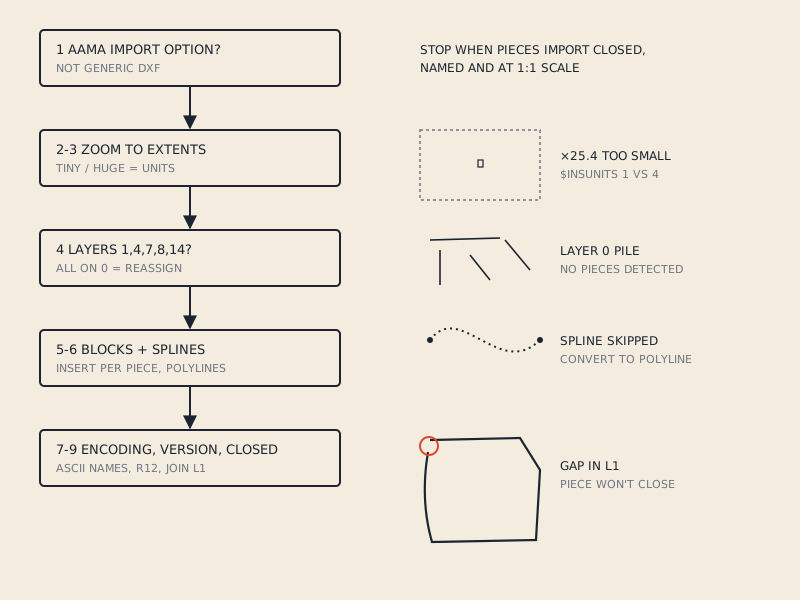
The consequences show up on import. CLO3D or Marvelous Designer may open the file but see one large shape or hundreds of fragments instead of twelve pieces; grain lines become stray lines; notches are ignored because they are not on layer 4. Pattern systems such as AccuMark or Optitex may refuse the file or bring in geometry without piece information. The checklist in DXF pattern won't open maps these symptoms to their causes.
You can try to bend Illustrator's export toward AAMA by naming layers "1", "4", "7" and so on, but pieces still are not written as blocks, and that is the part CAD relies on to know where one piece ends and the next begins.
Getting an Illustrator pattern into CAD
Three practical routes:
- Redraw in pattern CAD using the PDF as a backdrop. Accurate, slow, and you end up maintaining two masters.
- Hand-build the DXF in a scripting tool or CAD program, placing each piece in a block with the right layers. Possible if you have a programmer and many patterns.
- Export a vector PDF and convert it. Save the pattern at 1:1 as a PDF (one large artboard works best; tiled A4 also works) and convert it with a pattern-aware converter. Our PDF to DXF AAMA converter reads the vector paths, assembles tiles if needed, and writes each piece as a block with cut line, sew line (when the pattern has seam allowance), grain line, notches, internal lines and piece text on their AAMA layers. You see a free preview of each detected piece with its size and notch count before paying.
For route 3, a little preparation in Illustrator improves results:
- Keep cut lines closed and solid, not broken into pieces by tile edges or dashes.
- Draw notches as short strokes crossing or touching the cut line.
- Draw grain lines as straight lines with arrowheads inside the piece.
- Put piece names inside the pieces as live text.
- For multi-size files, keep each size distinguishable by colour or dash so a single size can be picked.
Why generic online converters struggle with this kind of file is explained in why generic PDF to DXF converters fail.
FAQ
Can you make sewing patterns in Adobe Illustrator?
Yes. Many independent pattern companies draft or finalise their patterns in Illustrator because of its precise curves, layers for sizes and artboards for print formats. It lacks pattern-specific tools such as seam walking and grading, which are done by hand or in pattern CAD.
How do I add seam allowance in Illustrator?
Select the closed sew line and use Object > Path > Offset Path with your allowance, for example 1 cm or 5/8". Then correct corners, dart ends and hems by hand, because the automatic joins do not follow pattern-making rules.
Does Illustrator export DXF AAMA?
No. Illustrator exports a general AutoCAD DXF with loose paths. Pattern CAD and 3D software expect DXF AAMA, where every piece is a block and lines are on numbered layers, so the file needs converting or rebuilding.
What is the best way to get an Illustrator pattern into CLO3D?
Export the pattern as a vector PDF at 1:1, convert it to DXF AAMA with a pattern-aware converter, then import the DXF into CLO3D with File > Import > DXF (AAMA/ASTM). Check a measured seam after import.
Should I use artboards or print tiling for a PDF pattern?
Use artboards for a PDF you distribute, so every buyer gets the same pages with labels and alignment marks. Print-dialog tiling depends on the printer in use and suits only your own proofing.