Inkscape is a free vector editor, and it works well for drawing and editing sewing patterns: you trace or draft each piece as a path, add seam allowance with an offset, lay out pages for printing and save a PDF. Where it falls short is pattern CAD exchange. Inkscape's DXF export writes plain geometry, not DXF AAMA pieces with grain lines and notches on their own layers, so files meant for CLO3D or a factory need more than a "Save As".
This guide covers the parts of Inkscape that matter for patterns, in the order you meet them, and what to do when you need a real pattern file at the end.
Set up the document before you draw
Most scale problems in Inkscape patterns start in the first minute. Open File > Document Properties and set:
- Display units to mm (or inches if you work in imperial).
- Scale so that one user unit equals one display unit. When user units and display units disagree, the file looks right on screen and exports at the wrong size.
- Page size to whatever you will print first. You can change it later.
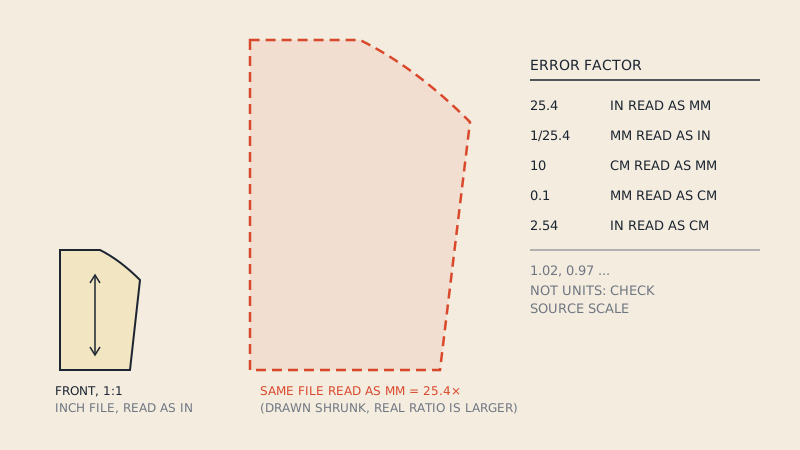
A note for old files: Inkscape changed its internal resolution from 90 to 96 pixels per inch with version 0.92. Patterns drawn in older versions, or files written by tools that still assume 90, can come out about 6.7 % off when measured in mm. If a file from a friend or an old project prints slightly too small or too large, measure a known line before anything else.
Draw a 10 cm (4") test square in a corner of the first page now. You will measure it after printing, and it tells you immediately whether the scale survived.
Tracing or opening a pattern
Opening a vector PDF
Inkscape opens PDFs directly (File > Open, then choose the page and import settings in the dialog). A vector PDF pattern arrives as paths, often grouped and clipped many levels deep, with text either as text or as outlines. Expect to:
- Ungroup repeatedly (Object > Ungroup) until pieces are selectable on their own.
- Release clip masks the PDF used to cut the pattern into pages.
- Delete tile frames, page numbers and alignment marks.
- Find that a single piece outline is several path segments that meet at the old page edges.
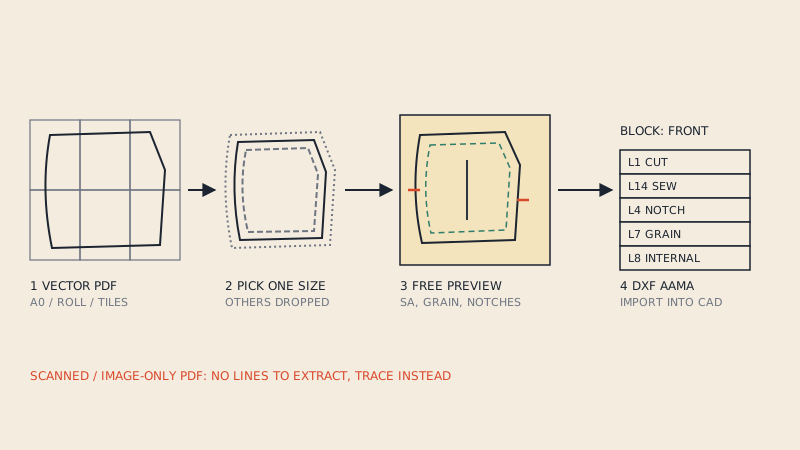
That last point is the real cost. A piece split across nine A4 tiles becomes nine fragments that must be joined (Path > Combine, then join end nodes with the Node tool) into one closed path. For a jacket with twenty pieces this is an afternoon of careful work. If the goal is a DXF, a pattern-aware converter does the tile assembly for you; if the goal is editing the shape, the manual route is fine.
Before any of this, check the file is vector at all. A scanned pattern opens as one image, and nothing in this guide applies to it except tracing by hand.
Tracing from an image
For a photo or scan of a paper pattern, place the image on its own locked layer, scale it using a known measurement (a ruler in the photo, or a printed test square), then draw over it with the Bezier tool on a layer above. Use few nodes: a smooth curve with four nodes is more accurate and easier to edit than one with forty. Path > Trace Bitmap produces outlines automatically, but on patterns it traces both sides of every printed line and picks up text and shading, so it rarely saves time.
Keep one piece per group, one purpose per layer
Use Inkscape layers to separate line types, mirroring the logic of pattern CAD:
| Inkscape layer | Contents | Why separate |
|---|---|---|
| CUT | Closed outline of each piece | This is what you cut and what CAD needs |
| SEW | Stitching line, if drawn | Needed for 3D and for checking seam lengths |
| GRAIN | Grain line arrows | Must stay attached to the piece's orientation |
| NOTCH | Short ticks on the outline | Easy to lose when offsetting |
| INTERNAL | Darts, pocket and button placements | Printed but not cut |
| TEXT | Piece name, size, quantity | Visible on print, editable |
Then group the parts of each piece across layers by naming them consistently (FRONT, BACK, SLEEVE) so you can find them later. Inkscape groups cannot span layers, which is one reason its files do not map one-to-one onto AAMA blocks.
Adding seam allowance with offsets
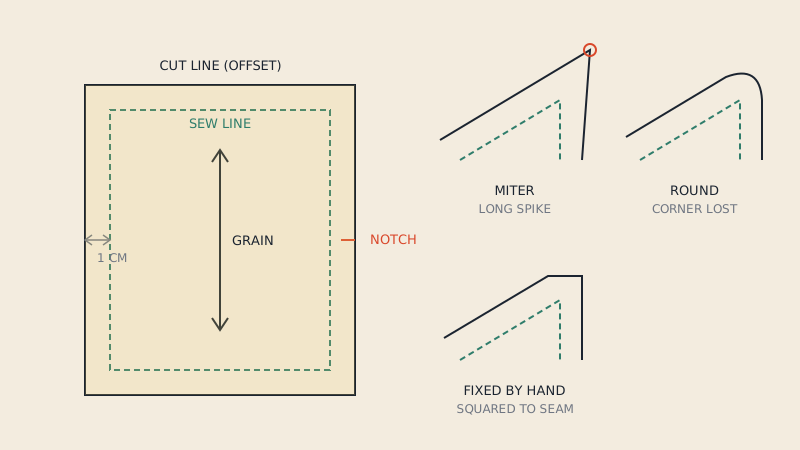
Inkscape has several offset commands, and they behave differently:
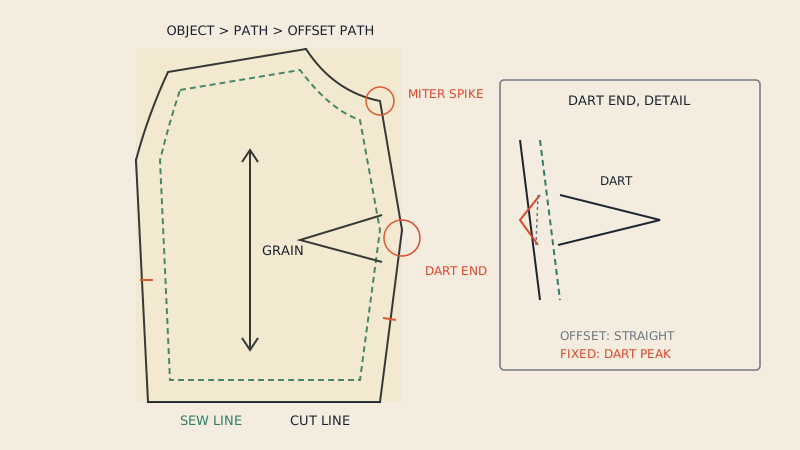
- Path > Outset and Inset move a path outward or inward by a fixed step set in Preferences (Behavior > Steps). Quick, but destructive and the step is in px by default, so check the preference before trusting it.
- Path > Dynamic Offset turns the path into an offset object you drag with a handle. Not precise enough for a measured allowance.
- Path > Linked Offset creates a copy that follows the original. Edit the sew line and the cut line updates.
- The Offset path effect (Path > Path Effects, then add Offset) lets you type the distance and unit and choose the corner join. This is the most useful for patterns because the value is exact and stays editable.
A workable method:
- Draw the piece on the sew line (net pattern), closed.
- Duplicate it, move the copy to the CUT layer.
- Apply the Offset path effect with your allowance, for example 1 cm (3/8") or 1.5 cm (5/8").
- Inspect every corner. Mitered joins on sharp corners shoot out into long points; rounded joins cut the corner off. Neither matches how pattern makers usually finish corners at dart ends, hems and sleeve heads, so correct them by hand.
- When you are happy, Path > Object to Path to freeze the result before exporting.
Seam allowance that differs along one piece (1 cm on side seams, 4 cm at the hem) needs separate offset segments joined together, or a hand-drawn cut line. The general rules for widths and corner shapes are in how to add seam allowance to a pattern.
Notches drawn as ticks on the sew line do not move with the offset. Redraw them on the cut line, or draw them crossing both lines from the start.
Tiling pages for printing
Since version 1.2 Inkscape supports several pages in one document (the Pages tool). For a print-at-home pattern you can create a grid of A4 or US Letter pages that covers the pattern, with a small overlap or with trim marks, and save as PDF. Check the output carefully: confirm each page shows the right part of the pattern, the test square prints at size, and nothing important falls in your printer's unprintable margin.
For a copy-shop file, set a single page the size of the sheet: A0 (841 × 1189 mm) or a 36" (914 mm) wide roll at whatever length the pattern needs. Large pages are where Inkscape is easier than tiling, because nothing has to be split.
Always print at 100 % (actual size) and measure the test square.
DXF export and its limits
Inkscape writes DXF through File > Save As, choosing Desktop Cutting Plotter (AutoCAD DXF R14) (there is also an R12 option). The dialog asks for a base unit, character encoding, whether to output LWPOLYLINE, and whether to use ROBO-Master spline output. For pattern use, set the base unit to mm, keep LWPOLYLINE on, and leave ROBO-Master off unless the receiving software specifically asks for it.
What you get is a valid DXF for laser cutters, CNC and general CAD. What you do not get:
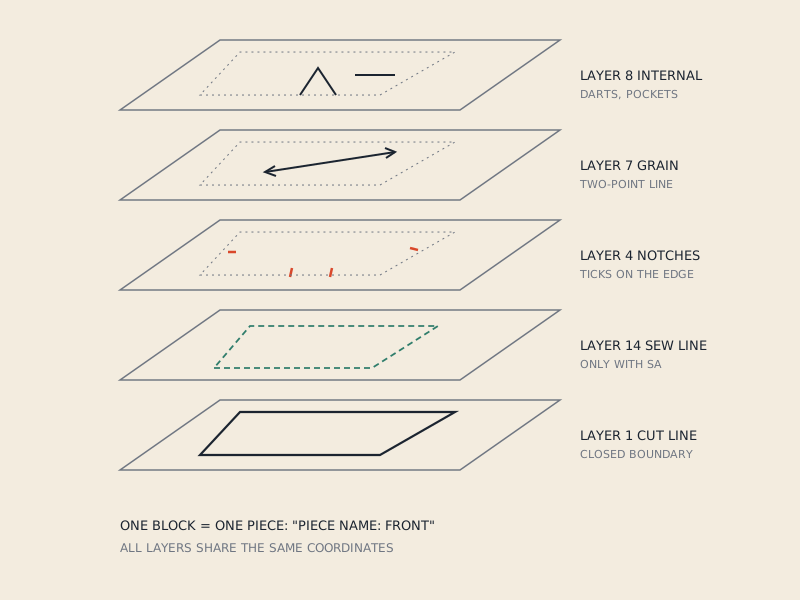
- No piece blocks. Pattern CAD expects each piece as a DXF block. Inkscape writes loose entities, so the receiving program sees one drawing, not twenty pieces.
- No AAMA layer numbers. Your layer names may come through, but CLO3D, AccuMark or Optitex look for layer 1 for the cut line, 4 for notches, 7 for grain, 14 for sew line. A layer called GRAIN is just a layer.
- Text as geometry or lost. Piece names and quantities are not written as AAMA annotation text.
- Unit surprises. If the base unit or document scale is off, the file imports 25.4 times too big or 3.78 times too small. The article on DXF units in pattern files explains how to spot which.
For a single piece going to a laser cutter, Inkscape's DXF is enough. For 3D or production, you need the AAMA structure described in the AAMA DXF layers, one by one. One practical route is to save the finished pattern from Inkscape as a vector PDF at 1:1 (one large page) and run that through our PDF to DXF AAMA converter, which separates pieces into blocks and writes cut, sew, grain, notch and internal lines to their AAMA layers. Preview the detected pieces before paying, and compare a measured length with your Inkscape drawing.
If you mainly want to keep working in SVG, our piece on SVG sewing patterns covers where SVG is the right format. Illustrator users will find the same workflow with Adobe's tools in making sewing patterns in Illustrator.
FAQ
Is Inkscape good for making sewing patterns?
Yes, for drawing, editing, adding seam allowance and producing print PDFs. It is a general vector editor, so it lacks pattern tools such as seam walking, grading and AAMA export, but many independent designers use it successfully for print patterns.
How do I add seam allowance in Inkscape?
Draw the piece on the sew line, duplicate it, and apply the Offset path effect with the allowance distance in mm or inches. Then fix corners by hand and convert the result to a path before exporting.
Can Inkscape export DXF AAMA?
No. Inkscape exports plain DXF (R12 or R14) with loose lines and polylines. Pattern CAD and 3D software expect DXF AAMA, with each piece as a block and lines on numbered layers, so the file needs converting or rebuilding.
Why is my Inkscape pattern the wrong size when printed?
Usually because document scale and display units disagree, or because the file comes from an older version that used 90 pixels per inch. Check Document Properties, then print at 100 % and measure a 10 cm test square.
Can I open a PDF sewing pattern in Inkscape?
Yes, if it is a vector PDF. Expect nested groups, clip masks and outlines split at tile edges that you will need to release and join. Scanned PDFs open as a single image.