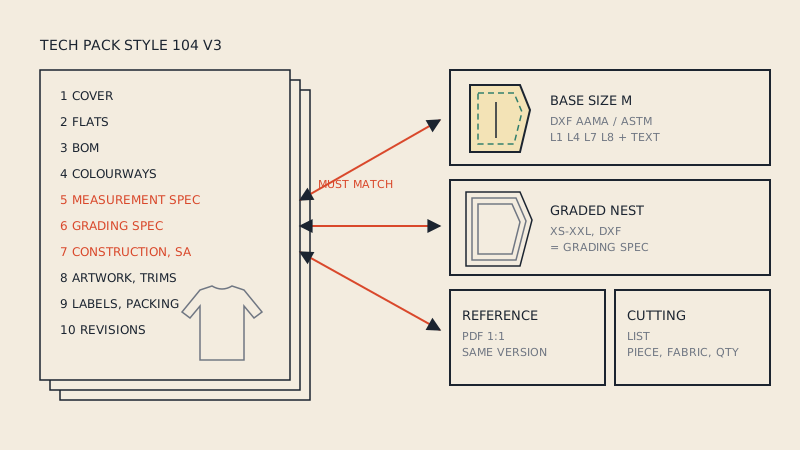
Send a factory a DXF AAMA (or ASTM) file per style with all sizes, a 1:1 reference PDF of the same pieces, a piece list with cut quantities, and the tech pack, named consistently and checked for units before it leaves your computer. Ask the factory first which CAD they use, which format and which units they want. Most problems with pattern files for a manufacturer come from skipping that one question.
This guide is about the hand-off itself. Whether the pattern is good enough to hand off is a separate question, answered in what makes a pattern production-ready.
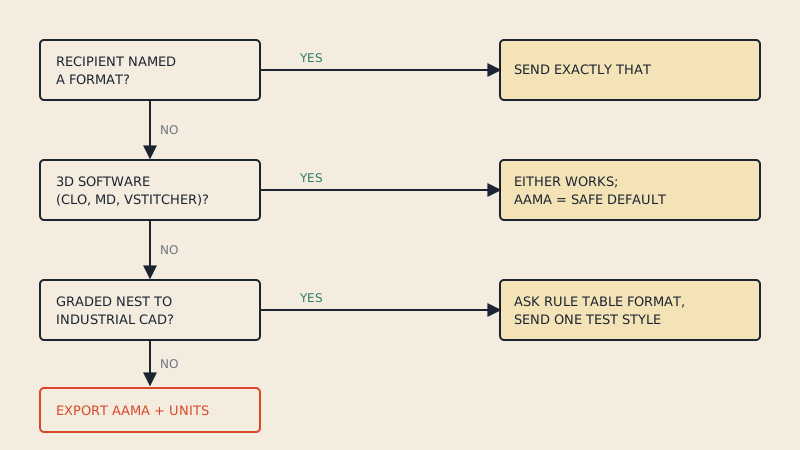
Ask before you export
Factories differ more than designers expect. Before you prepare anything, send a short message asking:
- Which pattern CAD do you use, and which file formats can you import?
- DXF AAMA or DXF ASTM? Any preferred version?
- Millimetres or inches?
- Do you want seam allowance included, and do you want the sew line as well?
- Graded nest in one file, or one file per size?
- Do you also need a marker, or will you make your own?
The answers decide your export settings. A factory that runs one CAD system may import AAMA flawlessly and struggle with ASTM from another vendor, or the other way round. The background to that choice is in DXF AAMA vs ASTM.
The package
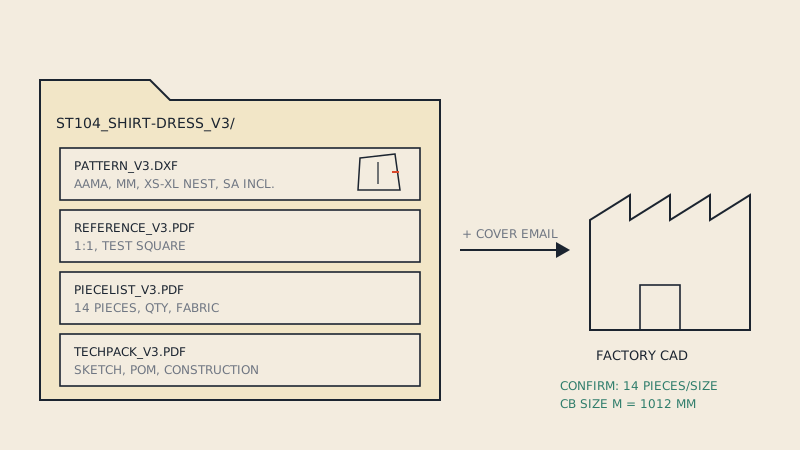
A complete pattern package for one style usually looks like this:
| File | Format | Purpose |
|---|---|---|
| Pattern, all sizes | DXF AAMA or ASTM | The working file the factory imports into CAD |
| Reference PDF | PDF at 1:1 | Lets anyone check the pattern without CAD, and confirms scale |
| Piece list | PDF or spreadsheet | Piece names, cut quantities, fabric per piece |
| Tech pack | Sketches, measurements, construction, materials | |
| Size chart / grade spec | PDF or spreadsheet | Points of measure per size, tolerances |
| Marker (optional) | As agreed | Only if you, not the factory, are making markers |
The DXF
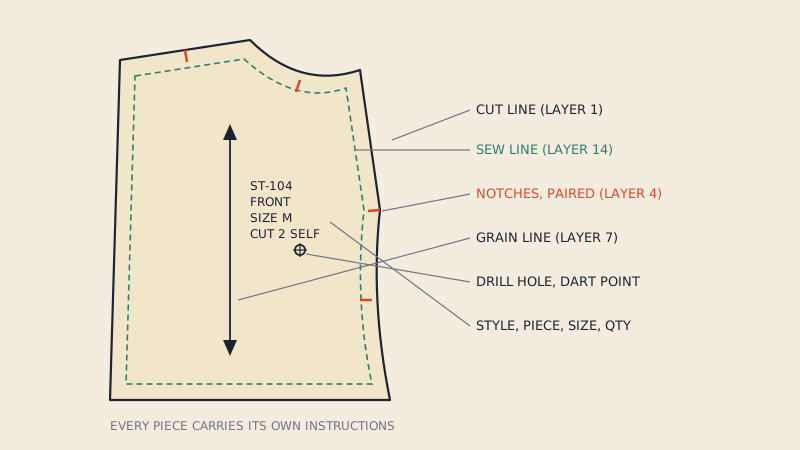
The DXF is the file the factory works from. It should contain each piece as its own block, with a closed cut line, notches, grain line, internal markings and piece text (name, size, quantity). If the pattern is graded, agree whether you send a nest or separate files.
If your pattern currently exists only as a vector PDF, for example drafted in an illustration program, you can convert it to DXF AAMA and check every detected piece in the free preview before paying. Note that one size is extracted per file; a graded set from CAD is still the cleaner route for production.
The reference PDF
The PDF is your safety net. It shows the same pieces at 1:1 with a test square, so the factory can verify the DXF imported at the right size and see what you intended if something is lost in translation. Make sure it matches the DXF exactly: same version, same piece names, same sizes.
The piece list
A piece list is a plain table: piece name, cut quantity per garment, fabric (self, lining, interfacing, contrast), and whether the piece is cut in pairs. It sounds redundant when the same text is on the pieces, but it is what the factory checks against when counting pieces in the CAD import.
Naming that survives email threads
Patterns travel through inboxes, chat apps and shared drives, and file names are the only thing that survives every hop. A workable convention:
ST104_shirt-dress_pattern_v3_2026-11-02.dxf
ST104_shirt-dress_reference_v3_2026-11-02.pdf
ST104_shirt-dress_piecelist_v3.pdf
ST104_shirt-dress_techpack_v3.pdf
The rules behind it:
- start with the style number so files sort together;
- include a version number, and raise it every time anything changes;
- add the date for humans, but rely on the version number;
- never send "final", "final2" or "new" in a file name;
- use the same piece names inside the DXF as in the piece list and tech pack.
Piece names inside the file matter as much as the file name. The factory's CAD reads them from the piece text; what that text looks like and how to check it after export is covered in piece names and text in DXF.
Pre-send checks
Run these on the exported file, not on your working file. Exports change things.
- Re-import the DXF into your own CAD or a viewer. Count the pieces against the piece list.
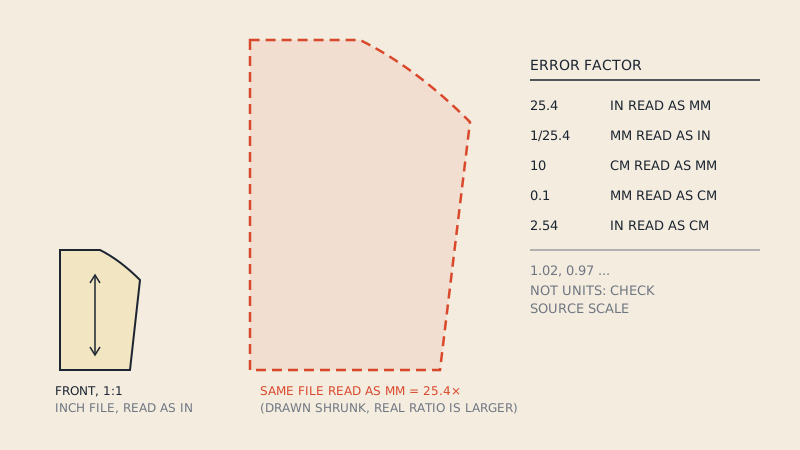
- Measure a known distance. Pick a straight edge you know (a centre front, a waistband) and measure it in the imported file. If it is 25.4 times off, the units are wrong; see DXF units in pattern files.
- Check outlines are closed. An open cut line may import as loose lines rather than a piece.
- Check notches and grain lines are present on every piece after import, not just in your source file.
- Check sizes. If you send a nest, confirm every size is there and labelled; if separate files, confirm each file's size label matches its name.
- Open the reference PDF and print one page at 100 %. Measure the test square.
- Compare versions. The DXF, PDF, piece list and tech pack all carry the same version number.
The cover email
The email that carries the files is part of the package. Keep it short and specific:
Style ST104, shirt dress, pattern version 3. Attached: DXF AAMA (mm, sizes XS–XL nested, seam allowance included, 1 cm unless marked), reference PDF at 1:1, piece list (14 pieces), tech pack v3. Changes from v2: collar stand lengthened 4 mm, pocket moved 1 cm down. Please confirm the DXF imports with 14 pieces per size and the centre back measures 1012 mm in size M.
That last line is the most useful one. It gives the factory a concrete check and gives you a clear answer that the import worked.
Large files and shared drives
DXF files for graded patterns can be large, and some email systems strip or block attachments. A shared folder (with access you control) avoids that, but keep the version-numbered file names; a shared folder with "pattern.dxf" overwritten five times is worse than five emails. When you replace a version, keep the old one in an archive folder rather than deleting it, so you can answer "which version did you cut from?" later.
After you send
The hand-off is not finished until the factory confirms the import. Expect and welcome questions; each one is a gap in the package that you can close for the next style. Keep a short log per style: what was sent, when, which version, and what the factory confirmed.
If the factory edits the pattern (they often true up seams or adjust notches for their machines), ask for their version back as DXF so your master stays in sync with what is actually being cut. The wider question of what a factory needs beyond patterns is covered in tech packs and pattern files.
FAQ
What pattern files does a manufacturer need?
Usually a DXF AAMA or ASTM file with all sizes, a 1:1 reference PDF, a piece list with cut quantities, and the tech pack. Ask the factory which format and units they prefer before exporting.
Should I send a PDF or a DXF to my factory?
Send both. The DXF is the working file for their pattern CAD; the PDF is a reference at 1:1 that lets anyone check scale and see your intent if something is lost on import.
Should seam allowance be included in factory pattern files?
In most cases, yes, because factories cut directly from the pattern. Agree the widths in advance and state them in the email and tech pack.
How do I name pattern files for a factory?
Start with the style number, add a short description, the file type, a version number and optionally the date. Raise the version on every change and never use words like "final" in file names.
How can I check my DXF before sending it?
Re-import it into CAD or a viewer, count pieces, measure a known edge to confirm units, and check that notches, grain lines and labels survived the export.