A production-ready pattern is one a factory can cut and sew from without calling you. Every seam matches its partner, every notch has a mate, every piece is labelled with name, size and quantity, the seam allowance is consistent and stated, the sizes are graded, and the files open in the factory's CAD at the right scale. A pattern that produced one good sample is not automatically there yet.
The gap between "it worked for my sample" and "a cutting room can use it" is where small brands lose weeks. This article walks through what closes that gap.
Sample pattern vs production pattern
A sample pattern only has to work once, in the hands of the person who drafted it. That person knows the sleeve cap has 1 cm of ease, that the facing is cut twice, and that the pocket bag was never actually drawn. A production pattern has to carry all of that knowledge on the pieces themselves, because the people cutting and sewing never met the drafter.
| Aspect | Good enough for a sample | Production-ready |
|---|---|---|
| Seam lengths | Roughly match, eased by hand | Walked and matched, ease stated where intended |
| Notches | Some, where the drafter needed them | Every seam, matching counts on both sides |
| Labels | Piece name, maybe | Style number, piece name, size, cut quantity, fabric |
| Seam allowance | Added by eye or "standard" | Fixed widths per seam, included and stated |
| Grain line | Present | Present on every piece, full length, correct direction |
| Sizes | One sample size | Full graded size run, checked at each size |
| Small pieces | Sometimes skipped | Facings, interfacing, linings, pocket bags all drawn |
| File | Paper or PDF | Clean DXF AAMA plus a reference PDF |
Accuracy: seams that actually match
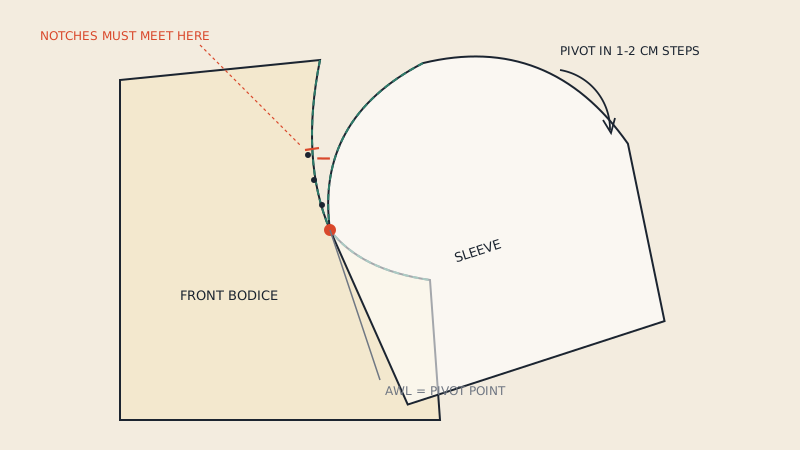
The first test of production readiness is boring and essential: walk every seam. Side seam front against side seam back, shoulder against shoulder, sleeve cap against armhole, collar against neckline. Lengths should match within your intended ease, and the difference should be deliberate rather than accidental.
Tolerances in industry are commonly expressed in millimetres, not "close enough". A 3 mm mismatch on a side seam is easy to absorb when you sew one sample, but across a bundle of 50 cut layers it turns into puckering, twisting hems and operators trimming fabric by eye. The method, on paper and in CAD, is covered step by step in walking the seams of a pattern.
Check corners too. Where two seams meet (shoulder and armhole, crotch and inseam), the corners of the seam allowance should be shaped so that the stitched pieces sit flush. Unshaped corners are one of the most common reasons a factory edits a designer's pattern before cutting.
Notches and internal markings
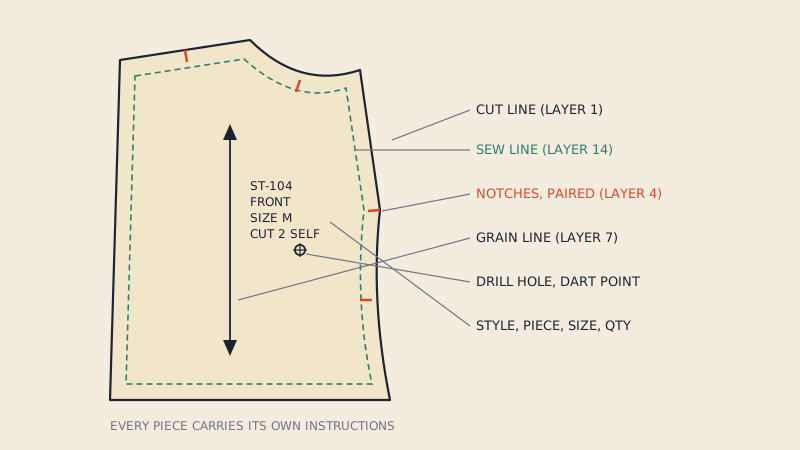
Notches are the instructions a sewing operator reads at speed. A production pattern has:
- a notch on every seam long enough to twist or stretch during sewing, usually every 10–15 cm (4–6") on long seams, as a common practice rather than a rule;
- distinct front and back indications, conventionally one notch for front and two for back at the armhole;
- matching counts on the two pieces that join, at matching distances from the seam end;
- drill holes or marks for dart points, pocket placements and buttonholes, set slightly inside the stitching so they are hidden after sewing.
The notch type matters too. Slits, V-notches and T-notches behave differently in different fabrics and cutting methods; see types of notches in pattern making before you choose one for a whole range.
Labels that survive the cutting room
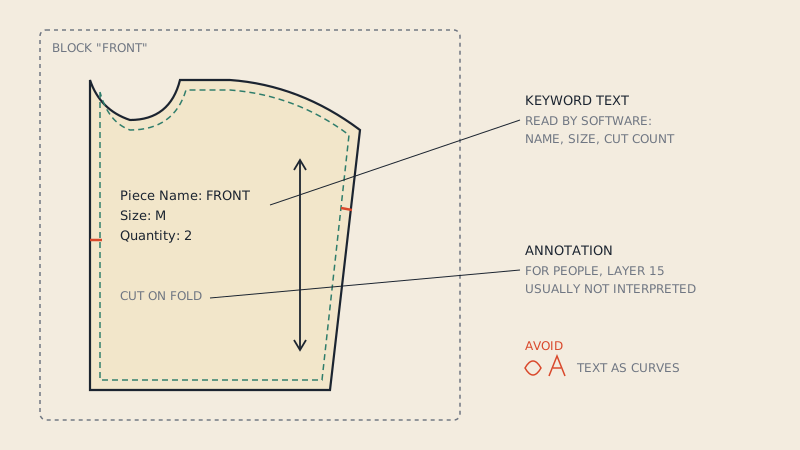
After cutting, pieces are bundled and separated from their pattern. The label on the pattern piece is what tells the cutter how many to cut and from what. A minimal production label contains:
- Style number or name.
- Piece name, in plain words (FRONT, BACK YOKE, UNDER COLLAR).
- Size.
- Cut quantity and whether pairs are mirrored ("CUT 2, MIRRORED" or "CUT 1 PAIR").
- Fabric: self, lining, interfacing, contrast.
In a digital pattern, these labels live as piece text inside the DXF, so the factory's CAD can read them rather than an operator retyping them. What gets stored, and how, is described in the article on piece names and text in DXF.
Seam allowance: fixed, consistent, stated
Production patterns almost always include seam allowance, and each seam has a defined width. A common pattern is 1 cm (3/8") for most seams, smaller at necklines and enclosed curves, larger where alterations or certain seam finishes need it. The exact numbers depend on the factory's machines and finishes, so agree them before you finalise.
Two things make seam allowance production-ready. First, consistency: the same seam type gets the same width across the range. Second, it is documented, both on the pattern (a note or a sew line drawn inside the cut line) and in the tech pack. In a DXF AAMA file the cut line sits on layer 1 and the sew line on layer 14, so a CAD operator can see both.
Grain lines on every piece
Every piece needs a grain line, drawn long enough to measure from the selvedge at both ends. Pieces cut on the bias need it at 45°. Pieces with a direction (napped fabric, one-way prints) need an arrowhead that says which way is up. Missing grain lines get guessed, and guesses produce garments that twist after the first wash.
Grading and the size set
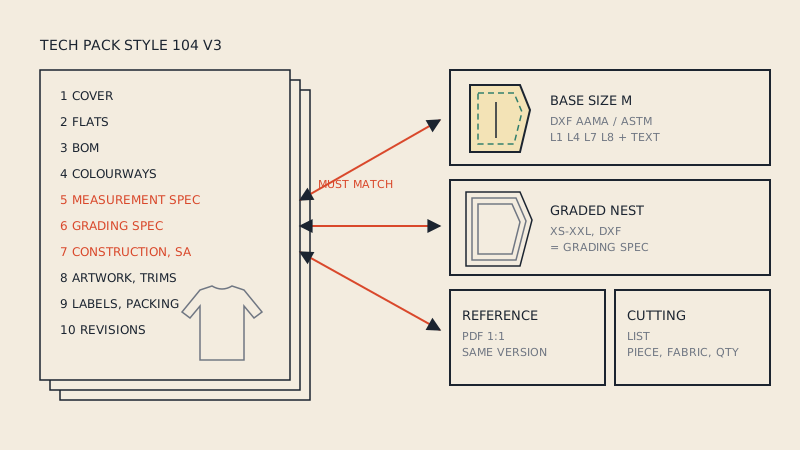
A pattern in one size is a sample pattern. Production needs the full size run, and each size has to be checked separately: graded seams still matching, notches still in place, curves still smooth at the extremes of the range. The concepts, grade rules, grade points, nests, are explained in pattern grading basics.
Small brands often skip checking the smallest and largest sizes because the middle size fitted. That is exactly where grading errors show up: a dart that drifts off the bust point at the top of the range, or a collar that no longer reaches the centre back mark at the bottom.
The complete piece list
Count what the garment needs and compare it with what the pattern contains. Typical omissions:
- facings and interfacing pieces drawn as "same as facing" instead of as separate pieces;
- lining pieces, which usually differ from the shell (pleats, length, ease);
- pocket bags, welts, belt loops, bindings and ties;
- fusible pieces that are smaller than the shell piece to keep fusible out of the seam allowance.
A piece that isn't on the pattern gets improvised in the cutting room, and improvised pieces are where inconsistency between batches comes from.
Files the factory can actually open
Most factories and pattern services work in 2D pattern CAD, and the common exchange format is DXF AAMA (or its successor, ASTM). A production-ready digital pattern is a file where each piece is its own block, the outline is closed, notches and grain lines sit on their own layers, and the piece text is attached. Plain DXF with everything on one layer looks fine on screen but loses all of that meaning. Each layer number has a fixed meaning that pattern CAD relies on.
Units matter here as much as geometry. A file that opens 25.4 times too large or small wastes a day of back-and-forth. Measure a known piece after export, every time.
If your pattern exists only as a vector PDF (for example, a pattern you drafted in an illustration program or a sample pattern you bought the rights to), you can convert the PDF pattern to DXF AAMA and review each detected piece, with its seam allowance, grain line and notch count, before deciding.
Test before you call it ready
Production readiness is proven, not declared. A practical sequence for a small brand:
- Sew a sample from the final pattern exactly as the factory will, not from an earlier version with pencil corrections.
- Sew the smallest and largest graded sizes, or at least check them in 3D if your CAD supports it.
- Have someone who did not draft the pattern cut and sew it from the pieces and tech pack alone. Every question they ask is a gap.
- Fix the pattern, not the instructions. If an operator needs a note to sew it correctly, consider whether a notch or a mark would do the job better.
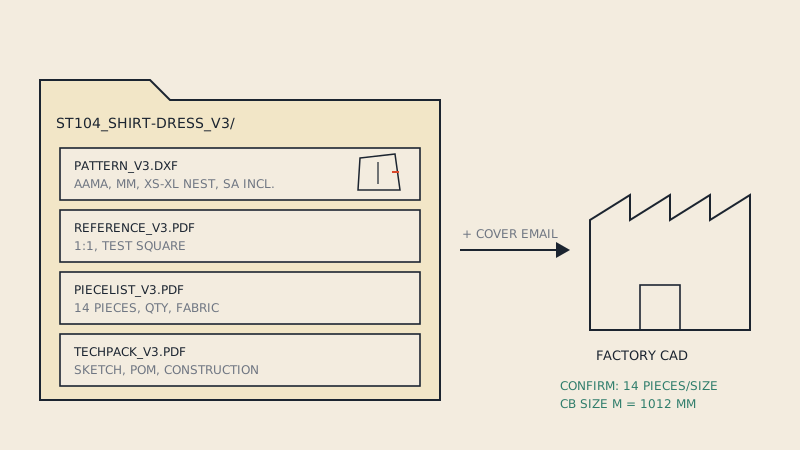
When the pattern passes, package it with the tech pack. What a factory expects in that package, and how to name and check it, is the subject of how to send patterns to a factory; the tech pack itself is covered in tech packs and pattern files.
FAQ
What is a production ready pattern?
A production-ready pattern is a complete, graded, fully marked pattern that a factory can cut and sew from without questions. It has matching seams, notches on every seam, grain lines, labelled pieces with cut quantities, stated seam allowance and a clean DXF file.
Does a production pattern include seam allowance?
Almost always, yes. Factories cut directly from the pattern, so seam allowance is included and each seam has a fixed, documented width agreed with the factory.
Can a pattern be production-ready in one size only?
Not for most production runs. A single size is fine for a sample, but production needs the full graded size set, with each size checked for matching seams and notches.
Which file format do factories want for patterns?
Most factories using pattern CAD accept DXF AAMA or DXF ASTM, usually alongside a PDF for reference. Ask your factory which format and units they prefer before exporting.
How do I know my pattern is ready?
Walk every seam, check every notch has a partner, confirm labels and grain lines on each piece, then have someone else sew it from the files alone. If they finish without asking you anything, it is close.