To digitize a vintage sewing pattern without damaging it, handle the tissue as little as possible, relax creases with gentle flattening rather than a hot iron, capture it flat on a scanner or under glass in overlapping sections, and record every marking, including perforations and unprinted notches, before you trace anything. Keep the original as the reference and do all repairs and corrections on the digital copy. The rest of this guide covers each stage and the questions worth asking about copyright before you share the result.
Why vintage patterns need a different approach
Old pattern tissue is thin, often brittle, and has been folded the same way for decades. It may be torn at folds, shrunk or stretched by humidity, and taped in places. Many older patterns were also unprinted: the pieces were cut-out tissue with shapes identified by punched holes and notches rather than printed lines and labels.
That changes the job. A modern printed pattern is mostly about tracing visible lines; a vintage one is about capturing information that is easy to miss and impossible to recover once a fold tears through it.
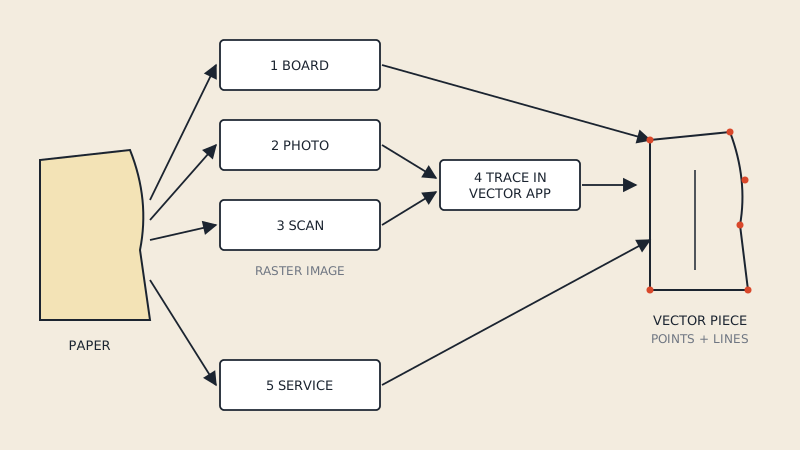
For the general comparison of methods (board, photo, scan, tracing, service), see how to digitize sewing patterns. This article focuses on what is specific to old and fragile originals.
Before you start: document the pattern
Photograph the envelope front and back, and the instruction sheet, before opening anything else. The envelope often carries the only record of the size, body measurements, yardage and the list of pieces.
Then make an inventory:
| Item | Record |
|---|---|
| Envelope | Front and back photos, pattern number, size, bust/waist/hip |
| Instruction sheet | All pages, flat |
| Pieces | Count against the envelope or sheet; note missing ones |
| Condition | Tears, tape, pinholes, owner's alterations |
| Markings | Printed lines, perforations, notches, handwritten notes |
Owner alterations matter. A previous sewist may have folded out a tuck or added paper at the hem. Decide whether you are digitizing the pattern as published or as altered, and photograph the alteration before flattening it.
Handling old tissue
- Clean, dry hands. Skin oils mark tissue. Some archivists prefer nitrile gloves; others find bare clean hands safer because gloves reduce sensitivity. Pick what lets you handle the paper gently.
- Big, clean surface. Clear a table larger than the largest piece.
- Unfold slowly. Follow the existing folds in reverse. If a fold resists, stop and let the paper relax for a while rather than forcing it.
- No pins. Pins add holes that can be confused with perforations later. Use smooth weights.
- Leave old tape alone. Removing aged tape often tears the paper. Note where it is and work around it.
Flattening creases
Most creases relax if the piece lies flat under a sheet of clean paper and a few books for a day. If you need more, a cool, dry iron through a press cloth on the lowest setting can help, but test on a margin first: some old tissue scorches or becomes brittle with heat, and steam can shrink or cockle it. When in doubt, skip the iron and accept small creases; you will correct them in tracing.
Capturing the pieces
Scanning in sections
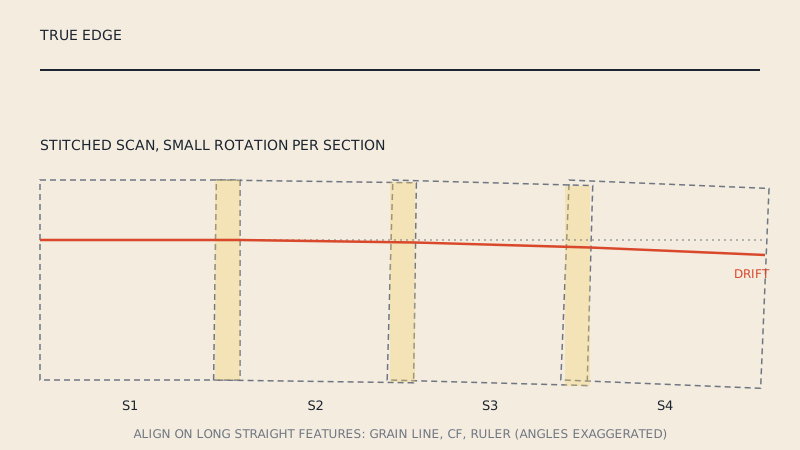
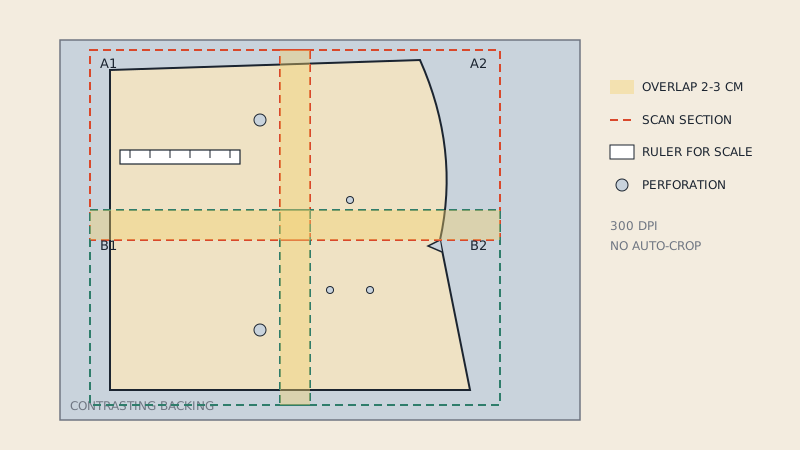
A flatbed scanner gives the most even, least distorted capture of fragile tissue, because the paper lies flat under glass and does not move. Most home scanners are A4 or Letter size, so larger pieces need several overlapping scans.
- Place a sheet of plain coloured paper behind the tissue so the edges and holes show clearly. Mid-grey or pale blue works well against cream tissue.
- Lay a clear ruler or a printed grid in each scan if space allows. It gives you a scale reference and helps alignment.
- Overlap each section by at least 2–3 cm and keep the tissue in the same position; move the scanner lid gently.
- Scan at a fixed resolution, commonly 300 dpi, and turn off any automatic cropping or enhancement.
- Number the sections as you go: piece 3, section A1, A2, B1.
The guide to scanning sewing patterns covers stitching sections together and why the scan still needs tracing.
Larger pieces
For skirt panels and long pieces, a wide-format roll scanner at a reprographics shop avoids stitching, but feed scanners pull the paper through rollers. Ask whether the shop can use a carrier sheet, or skip this route for very brittle tissue.
The alternative is photographing under glass: lay the tissue flat, cover with a sheet of glass or clear acrylic to hold it down, and photograph from directly above with a reference grid in frame. This needs careful calibration but never moves the paper.
Preserving the markings
This is where vintage digitizing most often loses information.
Perforations
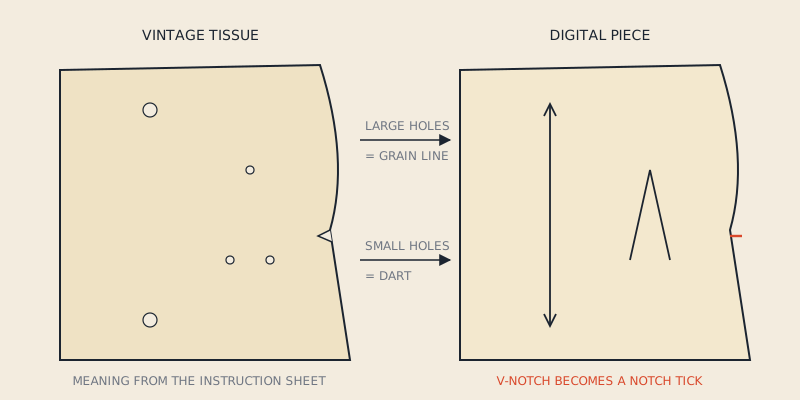
Unprinted patterns used punched holes in different sizes and groupings: large and small circles, or groups of holes, for grain line, darts, pleats, button positions and seam allowance turning points. The meaning is usually explained on the instruction sheet. Record:
- the position of every hole
- its size (often two or three sizes)
- what the instruction sheet says it means
In the digital pattern, convert each meaning to a clear modern marking: a grain line drawn between the two grain holes, dart legs drawn between the dart holes, a drill hole symbol for buttons. Keep a note of the original hole layout in case you misread one.
Notches
Vintage notches were often cut as small V shapes out of the edge, sometimes in single, double and triple groupings. Torn edges can look like notches, and notches can be lost in tears. Check suspected notches against the matching piece.
Seam allowance
Many vintage patterns include seam allowance, frequently wider than modern home patterns, and some unprinted patterns mark it only with perforations at corners. Read the instruction sheet and measure, rather than assuming. Record the width on the digital piece.
Tracing and correcting digitally
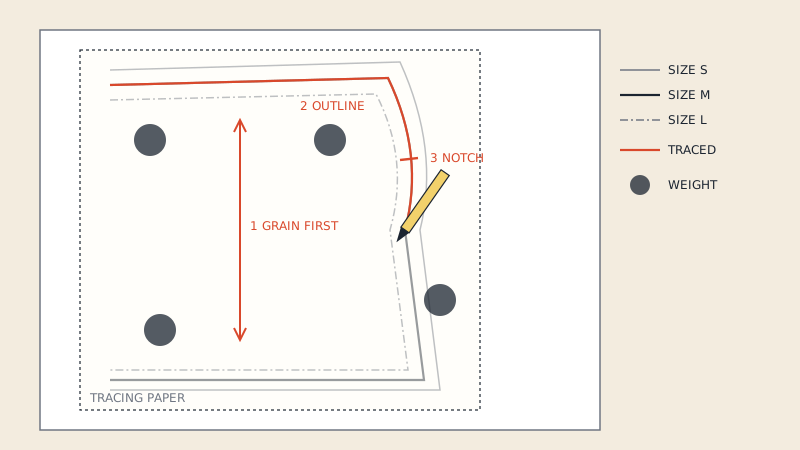
Trace on a new layer above the scan, as covered in how to trace a sewing pattern for paper and in the digitizing guide for screen tracing. For vintage pieces, a few extra rules:
- Trace the intended line, not the damage. Through a torn or crumpled section, follow the curve from either side.
- Compare left and right halves where pieces are symmetrical, and both sides of a seam with its partner piece. Walking the seams catches distortion from shrinkage.
- Measure against the envelope. Finished lengths and widths printed on the envelope are a useful check.
- Keep the scan layer. It is your evidence for every decision.
Expect some shrinkage or stretch in old tissue. If several measurements agree on a small, consistent difference, you can scale the trace; if the difference varies across the piece, correct locally rather than scaling everything.
After digitizing: storing the original
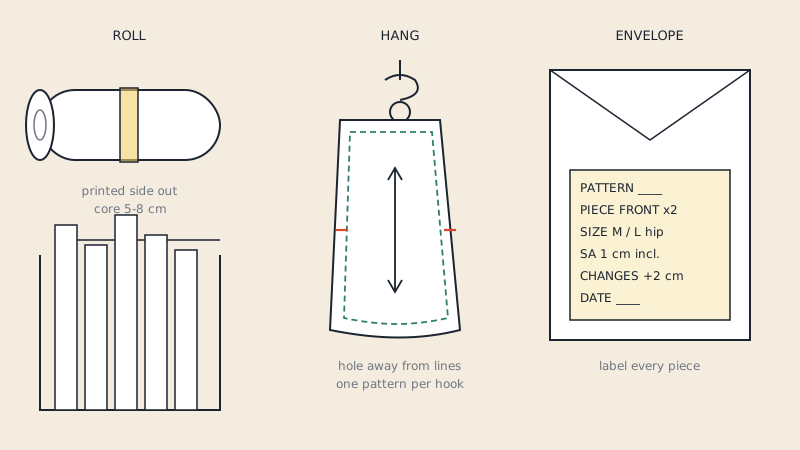
Return the tissue to its envelope loosely folded along its original folds, or store it flat in acid-free paper if you have space. Store away from light and damp. Ideas for storing working copies are in how to store printed and traced patterns.
Use your new digital or traced copy for fitting, alterations and cutting, so the original stays untouched.
Copyright and sharing
Digitizing a pattern you own for your own sewing is a common practice. Sharing or selling the digital file is a different question. Copyright in patterns depends on the country, the age of the pattern, the publisher and what part of the pattern is in question (instructions and illustrations are treated differently from the shapes in some legal systems). "Vintage" does not automatically mean "out of copyright".
This is general information, not legal advice. If you plan to publish, sell or distribute a digitized vintage pattern, check the rules in your country or ask a lawyer. The article on sewing pattern copyright explains the general principles.
A note on conversion services
Converters for PDF patterns, including our own, work on vector PDFs where the lines already exist as geometry. A scanned vintage pattern is an image, so it needs to be traced first; we do not process scans or photos. Once you have traced the pattern into vector form yourself, it can go into CAD like any other digital pattern.
FAQ
Can I iron vintage pattern tissue?
Sometimes, with a cool, dry iron through a press cloth, after testing on a margin. Brittle or very old tissue can scorch or shrink, so flattening under weight for a day is the safer first step.
What resolution should I scan a vintage pattern at?
300 dpi is a common choice for pattern tissue: enough detail for small perforations and notches without huge files. Higher resolution helps little if the tissue itself is creased or distorted.
How do I read the holes on an unprinted vintage pattern?
The instruction sheet usually explains them: different hole sizes and groupings mark grain line, darts, pleats, fold lines and placement points. Record every hole's position and size, then translate each meaning into a drawn modern marking.
Is it legal to share a digitized vintage pattern?
It depends on the country, the pattern's age and its publisher; old does not always mean out of copyright. This is not legal advice, so check local rules before sharing or selling a digitized copy.