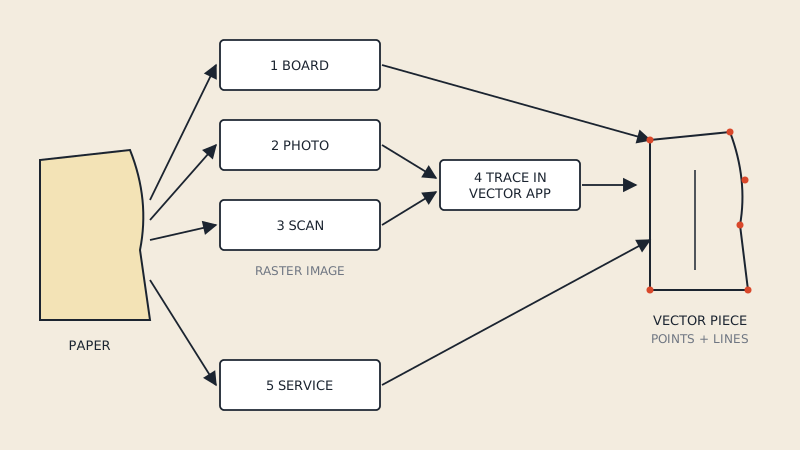
To digitize a paper sewing pattern you need to turn its outlines and markings into accurate vector lines in a computer. There are five practical ways to do it: a digitizer board, a calibrated photo, a scanner, tracing by hand in a vector program, or paying a digitizing service. Every method ends the same way, with someone (or software) placing points along each edge; the methods differ in how accurate the starting image is, how much time the tracing takes, and how much equipment you need.
First: is your pattern already digital?
Before digitizing anything, check what you actually have. Many patterns bought in the last decade exist as PDF files, and most of those are vector: the lines are already geometry, not pixels. A vector PDF does not need to be digitized; it needs to be converted.
If you have a vector PDF, our PDF to DXF converter extracts the pieces into a DXF AAMA file directly. It does not work on scans, photos or paper patterns, which is what the rest of this article is about. The 30-second vector check tells you which case you are in.
What "digitized" should mean
A useful digital pattern is more than a picture of the pattern. For CAD, 3D sampling or a factory you want, per piece:
- a closed outline (cut line, and sew line if seam allowance is included)
- the grain line
- notches as notches, at the right positions
- internal lines: darts, pocket placements, buttonholes, drill holes
- the piece name, size and cut quantity
A scan or photo gives you only an image. The digitizing step is turning that image, or the paper itself, into these elements. Keep that end goal in mind when you compare methods: a method that gives a sharp image but leaves you tracing 40 pieces by hand is not finished.
The 5 methods at a glance
| Method | What you need | Typical accuracy | Effort per piece | Best for |
|---|---|---|---|---|
| Digitizer board | Large tablet, puck, CAD software | High, depends on board and operator | Medium: click every point | Studios digitizing often |
| Photo + calibration | Camera, reference frame or markers, software | Medium; depends on lens correction and calibration | Low capture, medium tracing | Quick capture of many pieces |
| Scanner | Large-format scanner or A4/A3 scanner with stitching | Medium to high for flat pieces; stitching adds error | Low capture, medium to high tracing | Archiving, vintage tissue |
| Tracing in a vector app | Image (scan or photo), Inkscape or Illustrator | Limited by the image | High | Occasional, small patterns |
| Digitizing service | Courier or upload, budget | Depends on provider | None for you | Production patterns, deadlines |
The accuracy column is qualitative on purpose. Actual results depend on equipment, calibration and the person doing it, and no method gets around a pattern that has stretched or curled.
Method 1: digitizer board
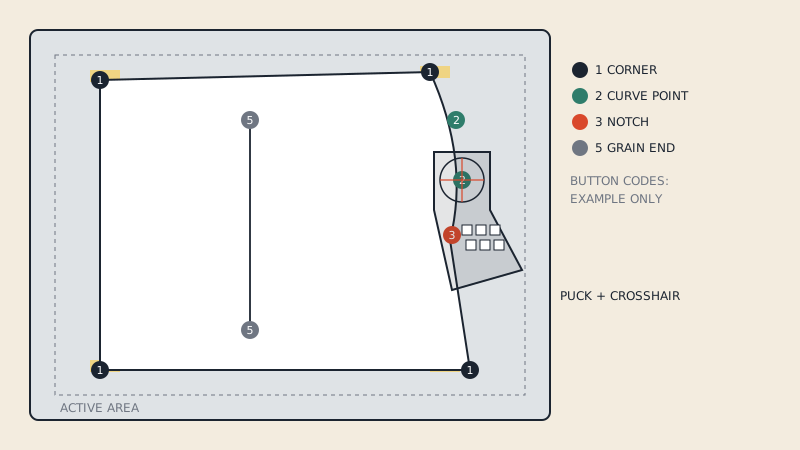
A digitizer board is a large flat tablet with an electromagnetic grid under the surface. You tape the pattern on top and click points along each edge with a puck that has a crosshair and several buttons. Each button tells the CAD software what kind of point it is: a corner, a curve point, a notch, a grain line end.
Pros: works directly from the paper with no image in between; the button codes mean pieces arrive with notches and grain already typed.
Cons: the board takes space and is tied to compatible CAD software; it is slow for complex curves; the operator's care sets the quality.
Boards are still common in production studios that receive paper patterns. The digitizer board guide explains how they work and who still benefits from one.
Method 2: photo with calibration
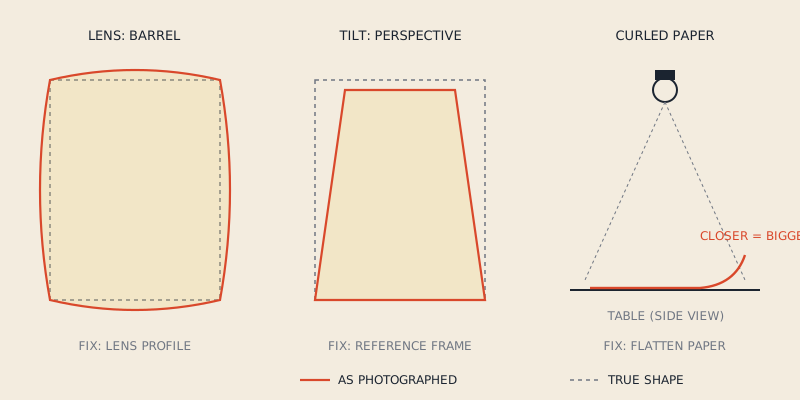
You photograph the pattern on a flat surface next to a known reference, such as a printed frame, markers or a grid, and software corrects the perspective and lens distortion before you trace or auto-detect the outline.
Pros: fast capture, cheap hardware, handles pieces too big for a home scanner.
Cons: lens distortion and perspective are real; without good calibration a long piece can bend or stretch. Fine markings and notches can be hard to see.
This is a fair way to capture many pieces quickly if you test accuracy on a known shape first. Photo digitizing covers calibration and what accuracy to expect.
Method 3: scanner
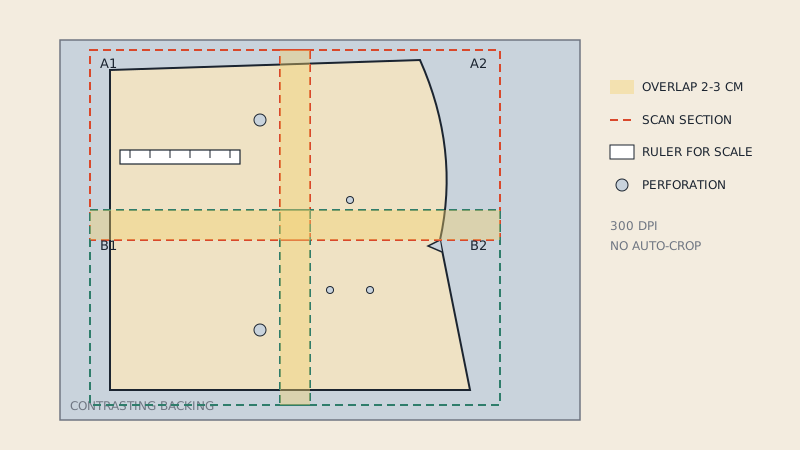
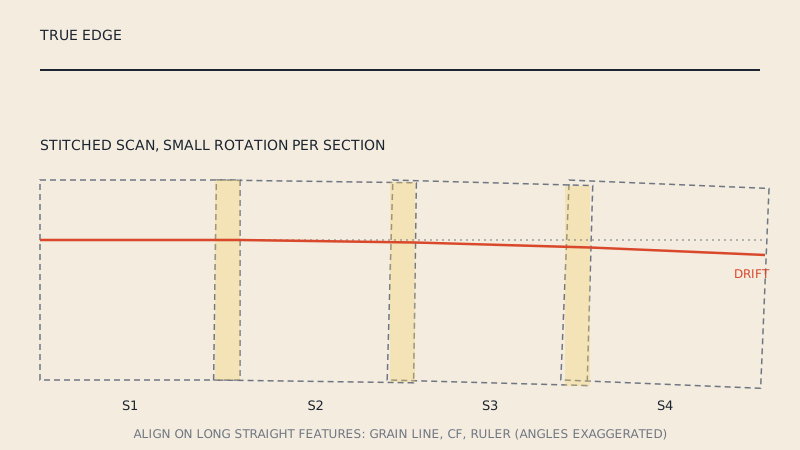
Flatbed or large-format scanners produce a flat, evenly lit image. Large pieces either go through a wide-format roll scanner, often available at reprographics shops, or are scanned in sections on a smaller flatbed and stitched together.
Pros: much less perspective distortion than a photo; good for fragile tissue and for archiving.
Cons: stitching sections introduces small errors at every seam of the stitch; feed scanners can stretch soft paper; the result is still a raster image that needs tracing.
The scanning guide goes through settings, stitching and why a scan is not yet CAD-ready.
Method 4: tracing in a vector app
Place a scan or a calibrated photo in Inkscape or Illustrator, scale it to a known measurement, lock it, and redraw each piece with the pen or Bezier tool on a new layer. Mark notches as short lines, add the grain line and text, then export.
Pros: free or software you may already own; full control over every curve.
Cons: slow; accuracy cannot exceed the image you trace; export to pattern CAD needs care, because generic DXF export from these programs is not DXF AAMA.
Auto-trace features such as bitmap tracing can save time on clean outlines but tend to produce many small segments and fail on notches and dashed lines. Most people end up correcting them by hand. The article on Inkscape for sewing patterns covers the drawing side.
Method 5: a digitizing service
Pattern digitizing services take your paper pattern, or a scan of it, and return files in the format you ask for, often DXF AAMA or a CAD-native format. Some work from the paper on a board; some from images.
When choosing one, ask:
- which input they accept (original paper only, or scans and photos)
- which output formats and layer conventions they deliver
- whether notches, grain lines, internal lines and piece text are included
- what tolerance they work to and how they check it
- how they handle multiple sizes: digitize each size, or digitize one and grade
Prices vary widely by provider, piece count and complexity, so get a quote for your specific pattern.
How to choose
A rough decision path:
- Already a vector PDF? Convert it instead of digitizing.
- Fragile or valuable original? Scan it flat, archive the scan, then trace. See digitizing vintage patterns for handling.
- Many patterns, regularly, for production CAD? A digitizer board or a service.
- A few pieces, occasionally? Photo or scan plus tracing in a vector app.
- Deadline and production use? A service, with a clear spec of the output.
Check the result against the paper
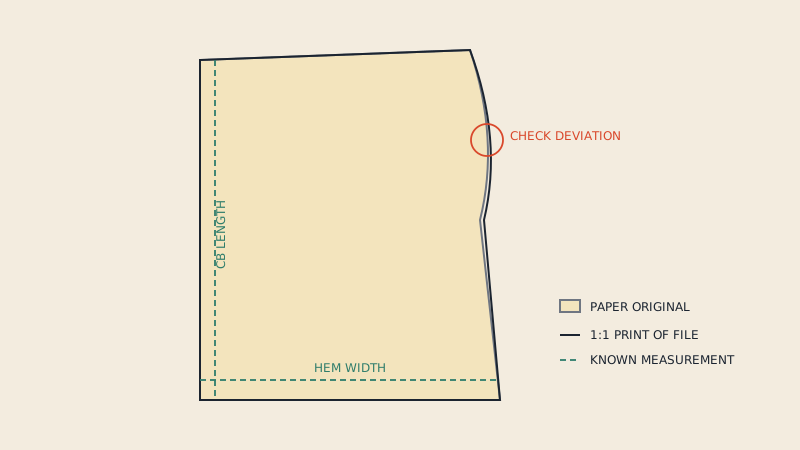
Whatever method you use, verify the digital pattern before relying on it:
- Measure two or three known dimensions on screen against the paper: centre-back length, waist width, a long straight edge.
- Plot or print the digital piece at 1:1 and lay it over the original on a light table or window.
- Walk the main seams digitally; small errors from tracing often show up as seams that no longer match.
- Confirm every notch and internal mark is present.
A digitized pattern that is 3 mm out on a side seam is still a pattern with a 3 mm error, just a tidier one.
FAQ
What is the cheapest way to digitize a sewing pattern?
Photographing or scanning the pattern and tracing it in a free vector program such as Inkscape costs the least in equipment. It costs the most in time, and accuracy depends on how well the image is calibrated.
Can I convert a scanned pattern to DXF automatically?
A scan is an image, so it has to be traced into vector lines first, manually or with auto-trace tools that usually need correction. Converters for vector PDFs, including ours, do not process scanned or photographed patterns.
Is a digitizer board more accurate than a scanner?
A board works directly from the paper and avoids image distortion, so it can be very accurate with a careful operator. A flat scan traced carefully can come close; stitched or photographed images usually add more error.
Do I need to digitize every size of a multi-size pattern?
Not always. Production studios often digitize one base size and grade the rest in CAD. If the pattern's grading matters to you, digitizing each size or the full nest preserves the original grading.