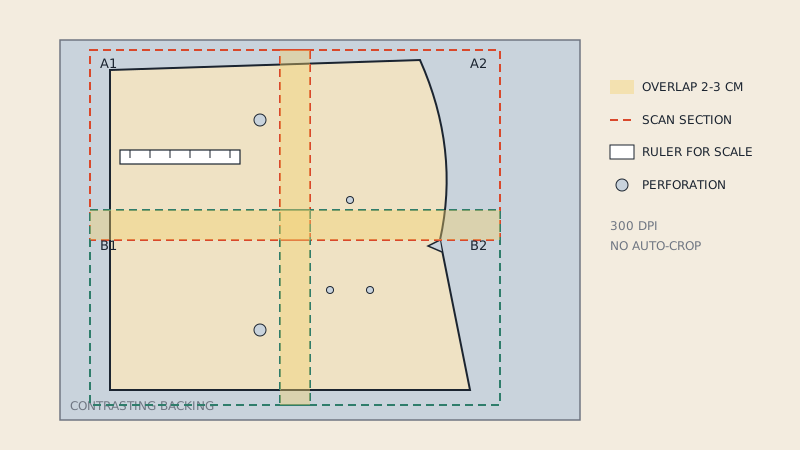
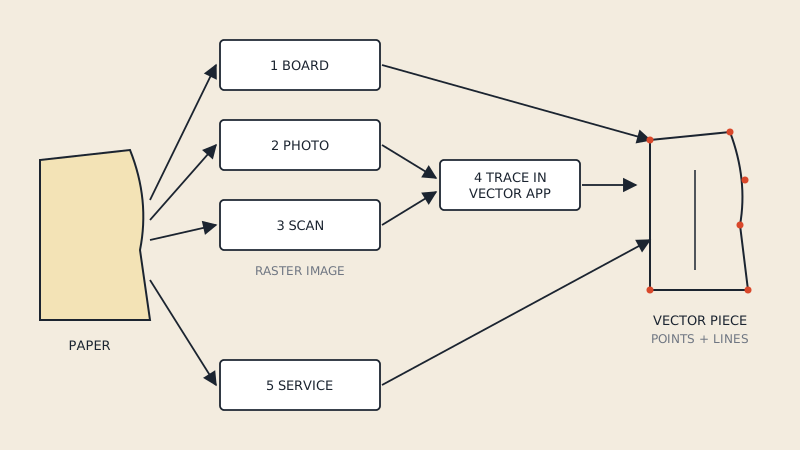
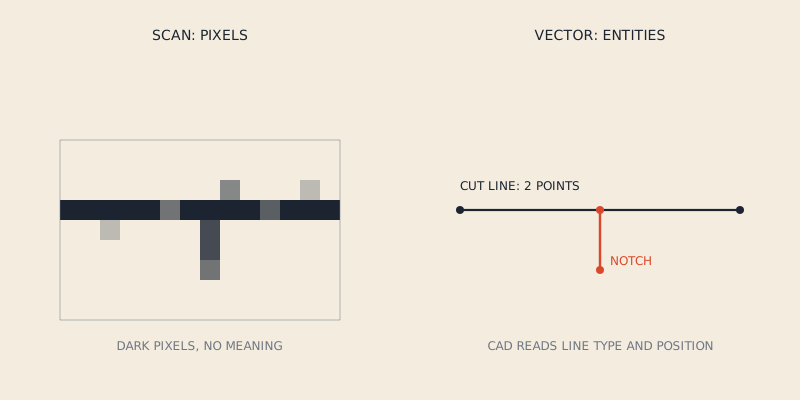
To scan a sewing pattern, lay the piece flat on a flatbed scanner (in overlapping sections if it is larger than the glass) or feed it through a wide-format scanner, scan at a fixed resolution such as 300 dpi with all auto-correction off, and include a ruler so you can check the scale. The result is a raster image: a grid of pixels that looks like the pattern but contains no pieces, lines or notches a CAD program can use. To get there, the scan has to be traced into vector lines.
Raster vs vector: the core problem
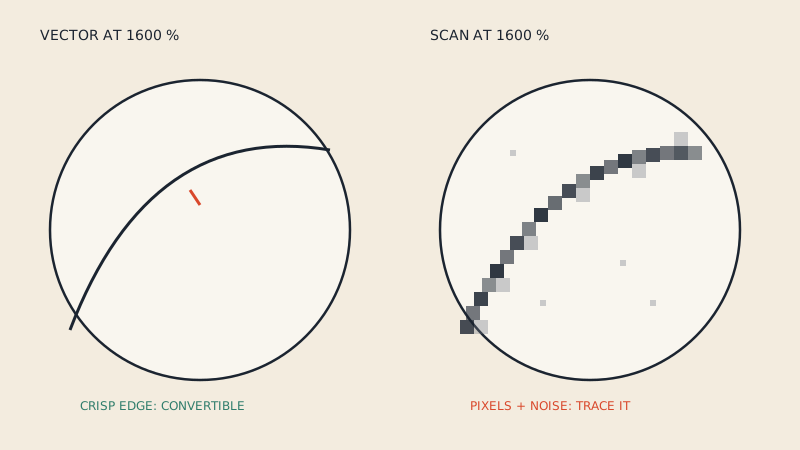
A scan records colour per pixel. A 1-metre skirt panel at 300 dpi becomes roughly 11,800 pixels long, and every line on it is just a band of darker pixels a few pixels wide.
Pattern CAD and 3D software need vector geometry instead: outlines as connected points and curves, notches as short line segments, the grain line as a two-point line, and text as text. Nothing in a scan tells the software where a piece starts, which line is the cut line, or which tick is a notch.
| Scanned image (raster) | Vector pattern | |
|---|---|---|
| Stores | Pixels | Points, lines, curves, text |
| Zooming in | Lines get blurry and blocky | Lines stay sharp |
| Measuring | Approximate, depends on resolution and scale | Exact to the file |
| Pieces | None, just a picture | Each piece a closed shape |
| Notches, grain | Visible to a person only | Separate entities, readable by CAD |
| Opens in CAD as pieces | No | Yes, as DXF AAMA or native format |
This is also why a scanned PDF is not the same as a pattern PDF from a designer. A PDF can contain either. If you are unsure which one you have, the vector check takes 30 seconds.
Choosing a scanner
Flatbed (A4 / Letter or A3)
The paper lies still under glass, so there is little stretching and very even lighting. The limit is size: almost every pattern piece is bigger than the glass, so you scan in sections and stitch.
Wide-format feed scanner
Reprographics and copy shops often have roll-fed scanners around 91–107 cm (36–42") wide that take a long sheet in one pass. No stitching, but the paper is pulled through rollers. Thin tissue can wrinkle or stretch, and pieces narrower than the feed may skew. Ask whether a carrier sheet is available.
Phone or camera
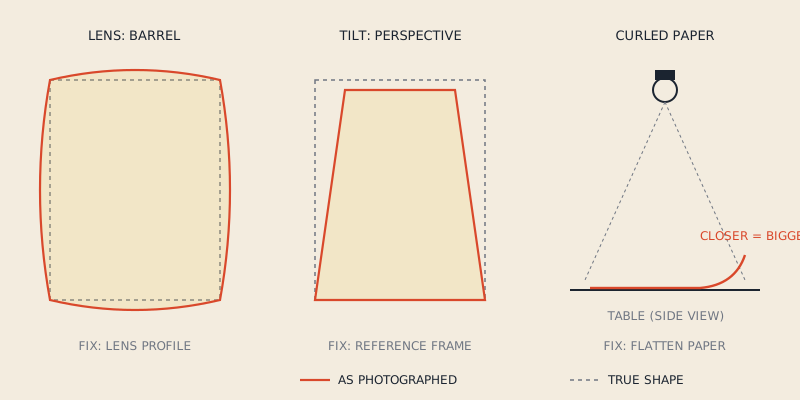
Technically a photo is not a scan, and its distortion behaves differently: perspective and lens bend rather than stitching seams. That route is covered in photo digitizing.
Scan settings
- Resolution: a fixed value, commonly 300 dpi. It is enough for fine lines and small notches; going higher mostly increases file size.
- Mode: greyscale for printed patterns, colour if lines are colour-coded by size.
- Auto features off: auto-crop, deskew, sharpening and "document enhancement" can shift or warp content between sections.
- File format: lossless (PNG or TIFF). JPEG compression adds artefacts along lines.
- Same settings for every section of a piece, so pixels mean the same distance in all of them.
Including scale references
Place a ruler or a printed grid in every section. It lets you check the resolution actually achieved (some scanners round) and gives you landmarks to align sections. A 10 cm line at 300 dpi should measure about 1,181 pixels; if it measures noticeably more or less, use the measured value for scaling.
Scanning large pieces in sections
- Mark a light pencil grid on the back of the pattern, or note landmarks, so you know where each section sits.
- Scan with 2–3 cm overlap between neighbouring sections, both across and down.
- Keep the pattern orientation the same in every scan: rotate the scanner position, not the paper, if you can.
- Name files systematically:
front_r1c1.png,front_r1c2.png. - After the last section, scan the first one again. If both match, nothing moved.
For fragile tissue, see the handling advice in digitizing vintage patterns; this article assumes paper that tolerates normal handling.
Stitching sections
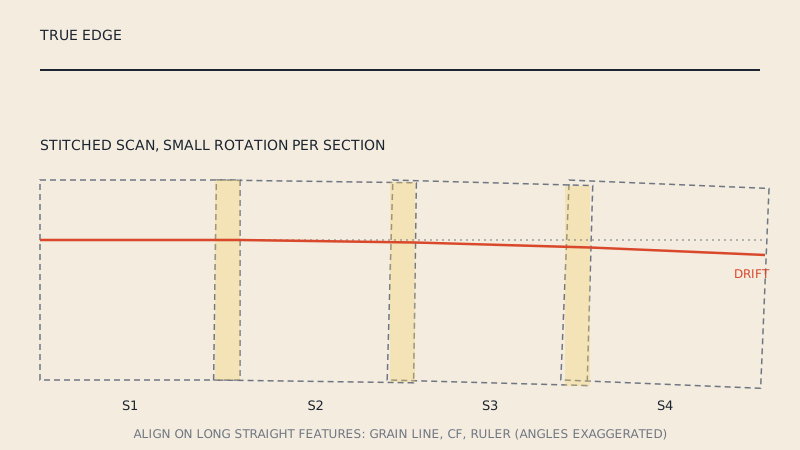
Image editors and panorama tools can align overlapping scans. For patterns, use translation and rotation only: let the software move and rotate sections, but not scale, warp or blend them perspective-style. Panorama defaults often correct for camera lenses, which a flatbed does not have, and that correction can bend straight lines.
Where you can, align on features that are definitely straight and long: the grain line, a centre-front edge, the ruler. Small rotation errors accumulate over several sections, so a 0.2° error in each of four sections can become a visible bow along a long edge.
Checking the scan for distortion
Before tracing, measure the stitched image:
- Known lengths: compare two or three measurements on the image with the same measurements on the paper, in both directions.
- Straight edges: place a straight line in the editor along centre front or the grain line. Any gap along its length is bowing.
- Right angles: check corners that should be square, such as a hem meeting centre front.
- Ruler in frame: confirm the scale at opposite ends of the image.
If different areas give different scales, the problem is in stitching or feed stretching. Re-scan rather than trying to fix it by stretching the image.
From scan to CAD: tracing
To get a usable pattern, the scan has to be redrawn as vectors:
- Place the stitched image in a vector program such as Inkscape or Illustrator, or in pattern CAD that accepts a background image.
- Scale it so a known measurement is exactly right, then lock it.
- Trace each piece outline with curves on a new layer. Use as few points as the curve needs; too many points make a wobbly line.
- Add notches as short lines perpendicular to the edge, the grain line, darts and other internal marks.
- Add piece name, size and cut quantity as text.
- Export to the format your CAD expects.
Auto-trace tools can turn dark pixels into paths quickly, but they trace both edges of every line, break dashed lines into dozens of fragments and turn text into shapes. They are a start for clean single-line outlines, not a finished pattern. Generic PDF or image converters have the same limitation, as explained in why generic converters fail on sewing patterns.
For the full comparison with boards, photos and services, see how to digitize sewing patterns.
When scanning is the right choice
Scanning is worth it when:
- you want an archive copy of a paper pattern before it wears out
- the pattern exists only on paper and you will trace it digitally
- you want to print copies at 1:1 for personal use, without editing
It is the wrong route when the pattern already exists as a vector PDF. Printing a vector PDF and scanning it back throws away exactly the precision you need.
If your PDF is vector, our converter can extract its pieces straight into DXF AAMA. It does not accept scans or photographed patterns, because there are no vector lines in them to extract.
FAQ
What dpi should I use to scan a sewing pattern?
300 dpi is a common choice: fine lines and notches are clear, and file sizes stay manageable. Keep the same resolution for every section of a piece.
Can I open a scanned pattern in CLO3D or other CAD?
You can usually import it as a background image to trace over, but not as pattern pieces. The pieces have to be drawn as vector outlines first.
Why does my stitched scan measure wrong?
Common causes are auto-scaling or deskew in the scanner software, panorama tools applying lens correction, small rotation errors that add up across sections, and paper stretching in feed scanners. Measure each section on its own to find where the error comes in.
Can a scanned PDF be converted to DXF?
Only after tracing. A scanned PDF holds an image, not lines, so converters for vector PDF patterns, including ours, cannot extract pieces from it.