Projector sewing means shining a PDF pattern straight onto your fabric from a projector mounted above the cutting table, at exactly 1:1 scale, and cutting along the projected lines - no printing, no taping. You need a projector that can reach your table from above, a way to mount it, a computer or tablet to open the PDF, and a few minutes of calibration so that 10 cm on screen is 10 cm on the mat. It suits people who sew often and have a fixed cutting area; for an occasional project, printing is still simpler.
How it works
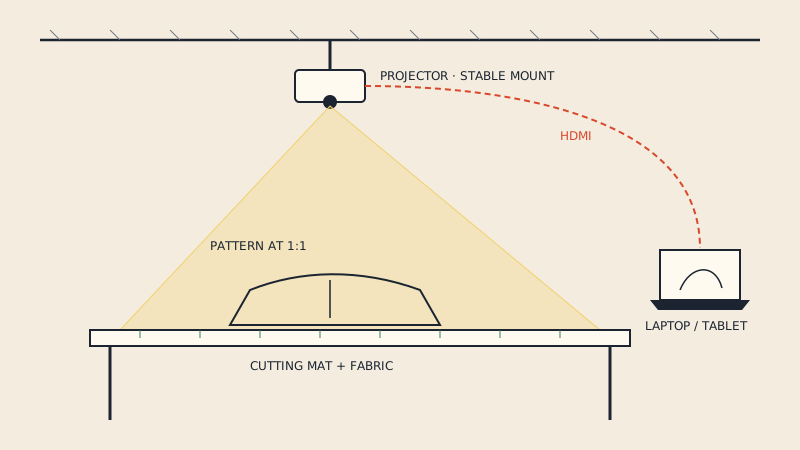
The setup is straightforward once you see it:
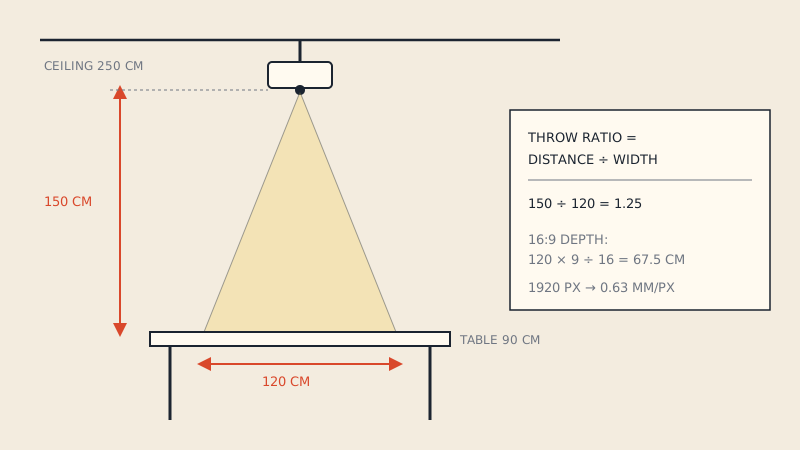
- A projector sits above the table, pointing down (or at a mirror that turns the beam down).
- A laptop, tablet or phone sends the pattern to the projector, usually over HDMI.
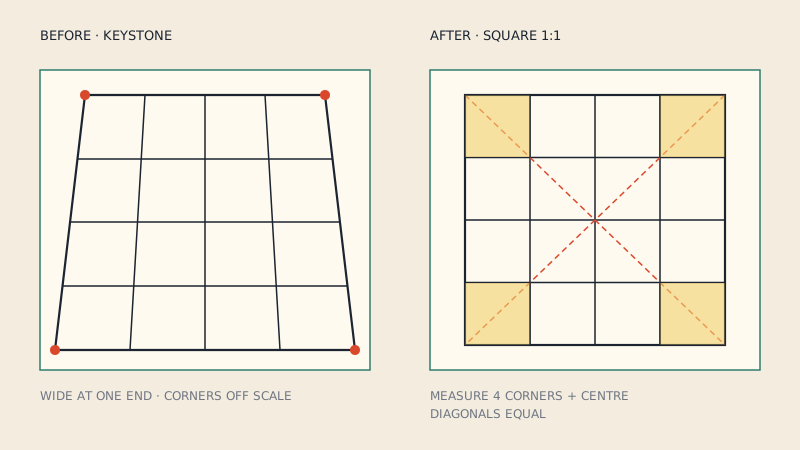
- You calibrate once, so the projected image is square and at true scale on the table.
- You open the pattern, lay fabric under it and cut, either directly or after chalking the lines.
- You move the image across the fabric to reach pieces that do not fit in the projected area.
The projector does not "know" the pattern size. Scale comes entirely from calibration, which ties the pixels of the image to centimetres on your table. That process is covered in how to calibrate a projector for sewing.
What you need
| Item | Why | Notes |
|---|---|---|
| Projector | Throws the pattern onto the table | Throw distance must suit your ceiling or mount height |
| Mount | Holds it steady above the table | Ceiling mount, wall arm, heavy tripod or shelf; must not move once calibrated |
| Computer, tablet or phone | Opens the PDF and sends it to the projector | Needs a video output or adapter |
| Cable or wireless link | Connects the two | HDMI is the most predictable |
| Cutting surface | Where you cut | A gridded self-healing mat makes calibration and checking easy |
| Calibration method | Sets 1:1 scale | A grid file plus the PDF reader's zoom, or a dedicated projection app |
| Dimmable room light | Lets lines stay visible | Most projector sewing happens in the evening for a reason |
Choosing the projector itself - throw ratio, brightness, resolution and mounting - is a topic of its own; see choosing a projector for sewing.
The cutting area
The projected image is limited by how high the projector is. From a typical ceiling height, many setups cover roughly a 100-150 cm wide area, but this depends entirely on the projector's lens and the mounting height. Bigger is not always better: the further the light spreads, the dimmer and softer the lines get.
A gridded mat under the projection pays for itself. You can check scale at a glance, and the grid tells you instantly if the projector or table has been knocked.
Pros and cons
| Pros | Cons |
|---|---|
| No printing, trimming or taping | Equipment cost and setup time |
| Switch sizes or views in seconds | Needs a fixed, stable mount; a bump means recalibrating |
| Pieces can be laid out to save fabric as you go | Lines are harder to see on dark, patterned or textured fabric |
| No paper to store | Your hands and scissors cast shadows on the lines |
| Large pieces need no assembly | Works best in a dim room |
| Pattern on fabric directly: grain and print placement are easy to judge | Accuracy is lower at the edges of the image if calibration is rushed |
The big practical win is speed for pieces that would otherwise take 20-40 tiled pages, such as coats, full skirts and trousers. The big practical cost is that the setup must stay put.
Which files to use
Almost any vector PDF pattern can be projected, but some files work better than others.
- Projector files. Many pattern designers now include a file made for projection: one continuous layout, no tile frames, often with thicker lines and a black background. These are the easiest to use. See what a projector file is.
- A0 or copy-shop files. Also fine. Pieces are laid out on large sheets without tile breaks; you just pan across.
- A4 or US Letter tiled files. Usable, but every page frame, overlap margin and page number is projected too, and pieces are split across pages. You end up assembling in your head.
- Scanned patterns. Can be projected, but there is no vector information: lines may be fuzzy and the scale must be checked carefully.
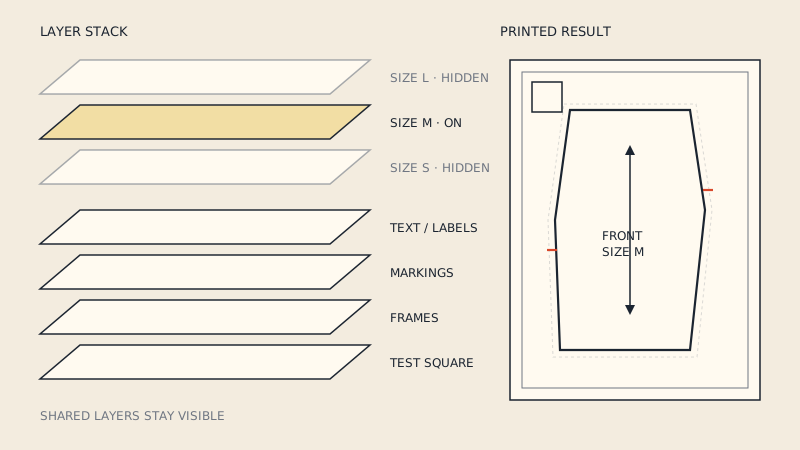
Whatever the file, use layers to show only your size if the pattern has them - with nine nested size lines, it is easy to cut on the wrong one. PDF pattern layers shows how.
If your pattern only exists as home-print tiles, you can turn it into a single sheet first. Our converter assembles the tiles into a one-page file without the original tile frames, which is far easier to project than 40 separate pages.
Your first projector session
- Mount and focus. Point the projector straight down, focus on the table surface, and lock any zoom ring.
- Calibrate. Project a grid and adjust until a known length measures correctly on the mat in both directions and in the corners.
- Open the pattern in a PDF reader and set the zoom you found during calibration (or let your projection app do it).
- Show only your size with layers.
- Check scale on the pattern itself. Project the test square and measure it on the mat.
- Lay the fabric flat, right side up or folded as the layout says, and align the grain with the grid.
- Mark or cut. Many people trace lines with chalk or a washable marker first, then switch the projector off and cut with full light. Others cut directly with a rotary cutter.
- Transfer notches and markings. Notches show clearly in projection; snip or chalk them before moving the image.
- Pan to the next piece. Move the image, not the fabric, where you can; re-check alignment with the grid after each move.
Plan on your first session taking longer than printing would. The time savings come from the second project onwards.
Is projector sewing right for you?
It is a good fit if you sew several garments a month, have space for a permanent cutting table, and often use large or multi-size patterns. It is a poorer fit if you cut on the dining table and pack everything away, sew mostly small items, or work mainly with dark or heavily printed fabric.
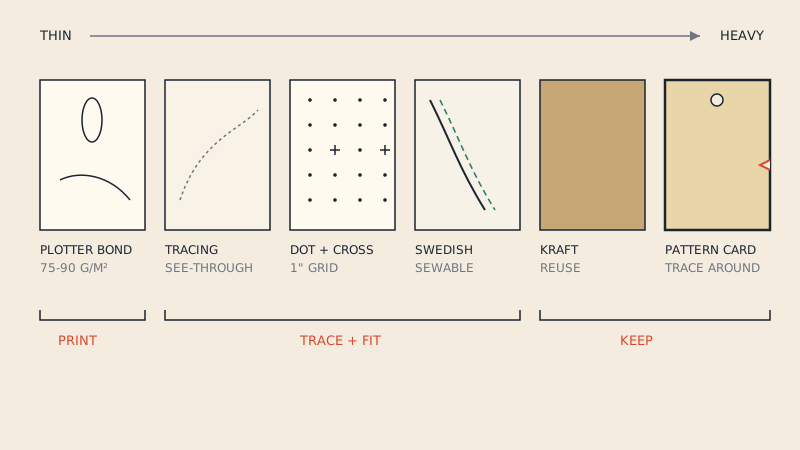
Many sewists keep both workflows: projector for big pieces and frequent patterns, printed and traced paper for patterns they will alter heavily or reuse for years. Paper still wins for fitting changes, where you want to slash, spread and tape. If you go that way, the plotter and pattern paper guide helps choose what to trace on.
FAQ
What is projector sewing?
It is cutting fabric from a PDF pattern projected at 1:1 scale onto the cutting table, instead of printing and taping the pattern. A calibrated projector above the table shows the pattern lines directly on the fabric.
What equipment do I need for projector sewing?
A projector that can reach your table from its mounting height, a stable mount, a computer or tablet with a video output, a cutting surface (ideally a gridded mat) and a way to calibrate the scale. A dimmable room light helps.
Can I project any PDF sewing pattern?
Most vector PDF patterns can be projected. Projector files and A0 files work best; tiled A4 or Letter files work but show every page frame and split pieces across pages.
Is projector sewing accurate?
It can be as accurate as a print if it is calibrated carefully and the projector and table do not move. Always project and measure the pattern's test square before cutting.
Does projector sewing work on dark fabric?
It is harder, because thin projected lines are less visible on dark, textured or busy prints. Patterns with a black background and thick lines help, as does a very dark room.