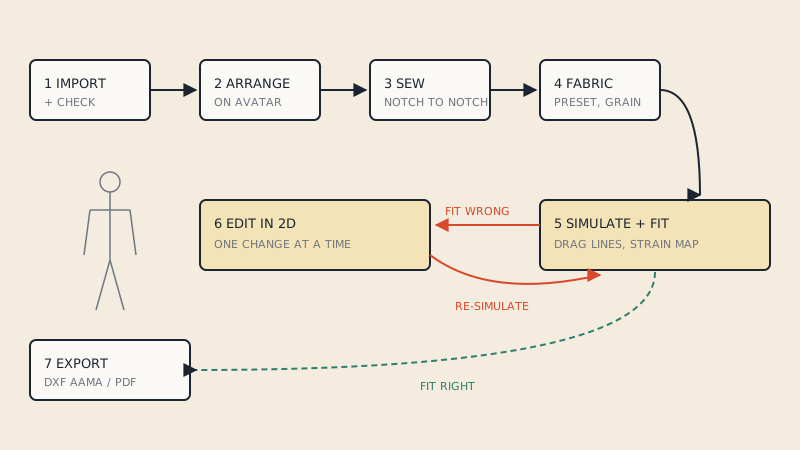
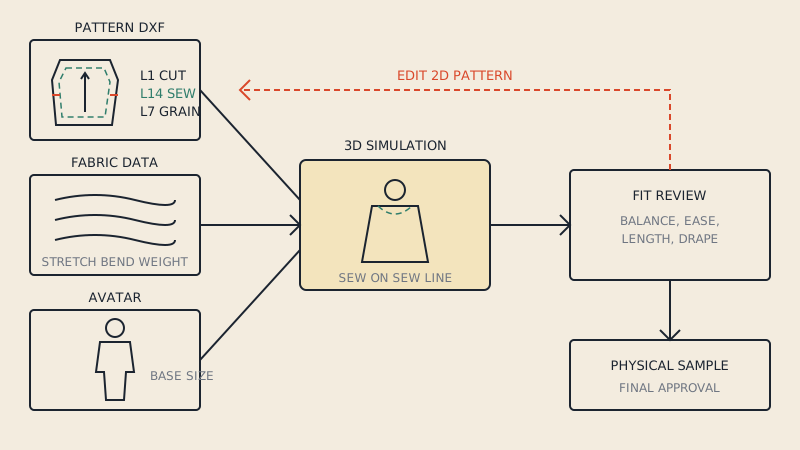
3D virtual sampling means sewing your garment in software, on a digital body, before anyone cuts real fabric. To start you need three inputs: the pattern as CAD pieces (usually a DXF AAMA file), fabric data that tells the simulation how the cloth behaves, and an avatar in your base size. Get those three right and a 3D sample is a useful fit and design check. Get one wrong and you get a convincing picture of a garment that does not exist.
This guide is for small brands and independent designers deciding whether to bring 3D into their sampling, and what to prepare first.
What a 3D sample is (and is not)
A 3D sample is a simulation. The software takes flat pattern pieces, places them around an avatar, joins the seams you define and lets the cloth settle under gravity using the fabric's physical properties. The result shows how the pieces fit together, where the garment pulls or collapses, and how proportions read on a body.
It is not a photograph of the finished product. It does not know how your factory sews a collar, how much a fusible stiffens a front, or how a wash changes the hand of denim. Treat it as a pattern review tool first and a visual tool second.
What 3D sampling is commonly good at:
- Checking that seams walk and notches line up before a toile is cut.
- Seeing balance problems: side seams swinging forward, hems dipping, necklines gaping.
- Reviewing proportion and length changes in minutes instead of a new sample round.
- Producing early images for line reviews, colourway decisions and pre-orders.
What it is weak at:
- Final fit approval on a real body, especially for close-fitting or stretch garments.
- Construction details that depend on interfacing, pressing and topstitching.
- Fabrics whose behaviour was never measured (the simulation guesses from a preset).
The three inputs
1. Pattern pieces as CAD files
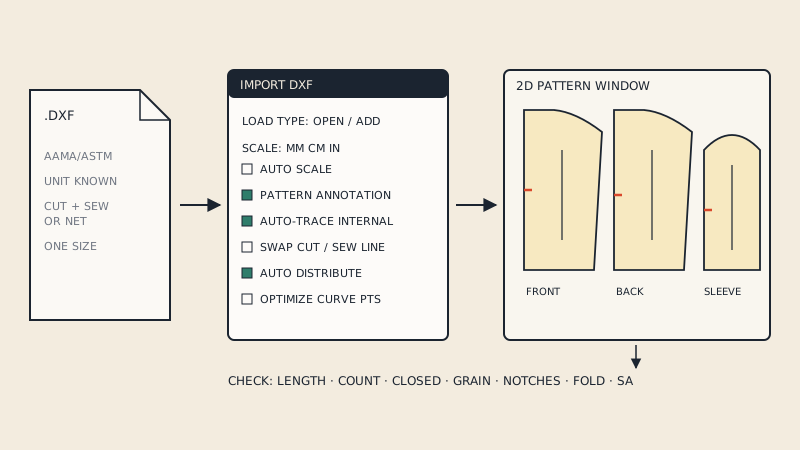
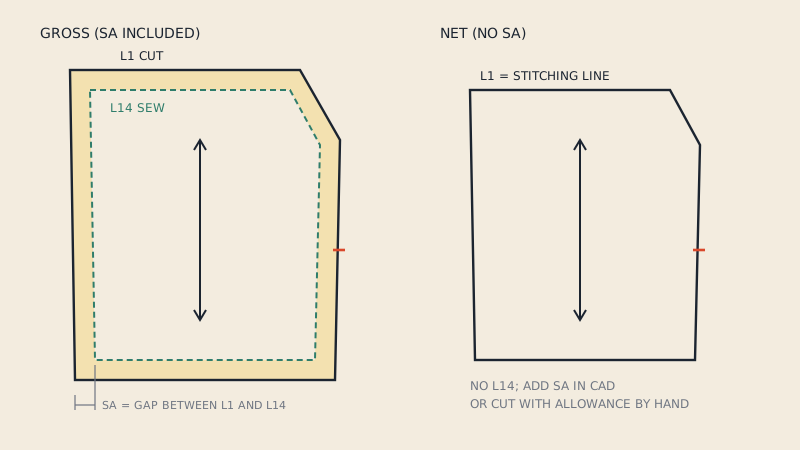
The 3D software needs each pattern piece as a closed outline with its internal lines. It does not need a PDF to print; it needs geometry. The usual exchange format is DXF AAMA (or its successor ASTM D6673), where each piece is a separate block and lines sit on numbered layers: cut line on layer 1, notches on layer 4, grain line on layer 7, internal lines such as darts and pocket placements on layer 8, sew line on layer 14.
Why those layers matter in 3D:
- Grain line orients the fabric. The simulation stretches warp and weft differently, so a missing or wrong grain line makes a bias-cut skirt drape like a straight-grain one.
- Notches are where you join seams accurately. Without them you match seams by eye in the 3D window.
- Sew line vs cut line. Most 3D tools simulate the garment on the stitching line. A pattern with seam allowance included needs its sew line identified, or the simulation sews the cut edges together and the garment comes out larger by twice the allowance at every seam. The article on cut line vs sew line in DXF goes into this in detail.
If your patterns come from a pattern maker using industrial CAD, ask for DXF AAMA in your base size. If they only exist as PDF patterns, they need converting first; a PDF is not something CLO3D or Browzwear can sew. A pattern-aware converter such as our PDF to DXF AAMA converter extracts one size into pieces with those layers, so you can check the preview before you start a 3D project.
2. Fabric data
Fabric is where 3D sampling succeeds or quietly fails. The simulation needs physical parameters: stretch in warp, weft and bias, bending stiffness, weight, thickness, and sometimes friction. Visual texture (the image you see) is separate and matters only for the render.
You have three options:
| Fabric source | What it is | Good enough for |
|---|---|---|
| Software preset | Generic "cotton poplin", "denim", "jersey" from the library | Early shape and proportion checks |
| Measured fabric | Your actual fabric measured with a testing kit or by a digitization service | Fit and drape decisions |
| Supplier digital fabric | Files supplied by the mill alongside the swatch | Depends on how it was measured; ask |
Several 3D vendors sell or partner with fabric testing kits that measure stretch, bend and weight and output a file for their software. For a small brand, measuring the two or three fabrics you use most is usually a better investment than measuring every swatch in the studio.
3. The avatar
The avatar is your fit model. Most 3D tools let you edit body measurements directly or import a body scan. Set it to the measurements of your base size, the same body you would give a fit model, and keep it fixed while you review patterns. Changing the avatar and the pattern at the same time makes it impossible to tell which change caused what.
Note the posture too. A slightly forward neck or a sway back changes how a jacket sits, and default avatars tend to have idealised posture.
Where the pattern comes from in a small brand
Small brands often hold patterns in mixed forms: a few in industrial CAD from a freelance pattern maker, some as PDF files from a pattern library or an earlier collaboration, some only on paper. For 3D, each route ends in the same place, a DXF with clean pieces:
- Already in CAD: export DXF AAMA or ASTM from the pattern system, one size, with the sew line if seam allowance is included.
- Vector PDF: convert to DXF AAMA rather than redrawing. Check that grain lines and notches came through.
- Paper: digitize (digitizer board, calibrated photo, or redraw). A scan alone is a picture, not pieces.
Whatever the route, make sure you own the pattern or have the right to use it this way. A pattern bought for personal sewing is not usually licensed for use in a commercial collection.
A first 3D sampling workflow
- Pick one garment you know well, ideally one already sampled physically. Your first job is to learn how far the simulation matches reality.
- Import the DXF at real scale and check a known measurement: a waist seam, a sleeve length. Our guide to importing DXF into CLO3D lists the import options and what to verify.
- Arrange and sew. Place pieces around the avatar, define seam pairs using the notches, and simulate.
- Apply measured fabric if you have it, a preset if not, and write down which one you used.
- Compare with the physical sample: length, ease at bust and hip, how the hem hangs. Note where the 3D sample is optimistic.
- Make one pattern change in 2D, re-simulate, and see whether the change behaves as you expected.
The detailed step-by-step for CLO3D is in From Flat Pattern to 3D Sample in CLO3D. If you are still choosing software, CLO3D vs Marvelous Designer compares the two products built on the same core.
What it saves, honestly
Brands adopt 3D sampling mainly to cut physical sample rounds, shipping and waiting time between design and fit decisions. How much it saves depends on what you make. A brand doing structured woven garments in fabrics it has measured often replaces early proto rounds with 3D and keeps physical samples for final fit and production approval. A brand doing knitwear or garments built from unusual materials may find the simulation too approximate to skip much.
There are costs to weigh:
- Software licences and the time to learn them (count weeks, not days, for a first useful sample).
- Fabric measurement, if you want fit decisions from 3D.
- Pattern preparation: clean pieces, correct grain, notches, sew lines. Bad patterns cost more time in 3D than on paper, because the simulation exposes every mismatch.
A reasonable rule: use 3D to decide what to change, use the physical sample to approve it.
Common mistakes when starting
- Simulating on the cut line. The garment comes out too big and the designer blames the software. Check whether seam allowance is included and which line the import used.
- No grain lines. The fabric orients to the piece's default direction and the drape is wrong.
- One avatar for every style. Fine for a block, misleading for maternity, plus-size or menswear tailoring if the base body does not match.
- Judging fit from a preset fabric. Presets are averages. Your cotton twill may be much stiffer.
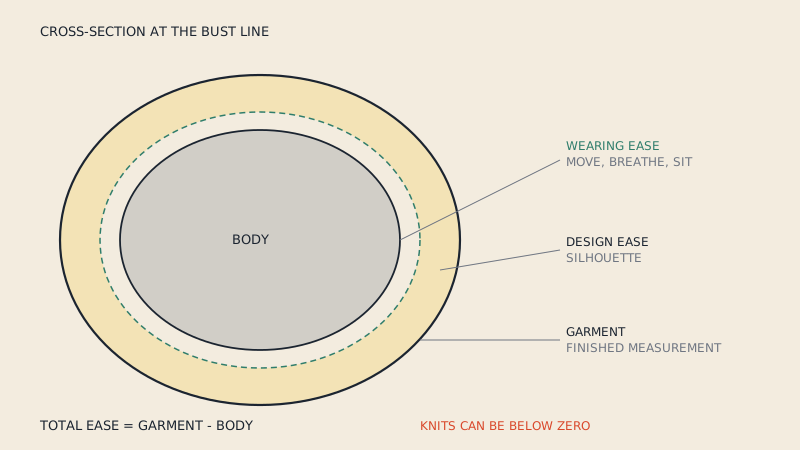
- Ignoring ease. 3D makes it easy to see a garment that "fits" with too little wearing ease to move in. Our article on wearing ease vs design ease explains what to look for.
- Skipping the tech pack. A 3D image does not tell a factory what you mean. Pair it with a tech pack and pattern files.
A minimal starter kit
| Item | Minimum | Better |
|---|---|---|
| Pattern | DXF AAMA, one base size, with grain and notches | Same, plus sew line on layer 14 and piece names |
| Fabric | Software presets, noted per garment | Measured files for your core fabrics |
| Avatar | Edited to your base size measurements | Scan or measurements of your fit model |
| Reference | One physically sampled garment | A small set of approved samples to calibrate against |
| People | One person who drafts or reads patterns | Pattern maker and designer reviewing together |
FAQ
What files do I need for 3D virtual sampling?
You need the pattern as CAD pieces, usually a DXF AAMA or ASTM file in one size, plus fabric data and an avatar in your base size. A print PDF is not enough, because the software needs separate closed pieces with grain lines and notches.
Can I use a PDF sewing pattern for 3D sampling?
Not directly. CLO3D, Browzwear and Marvelous Designer import pattern pieces from DXF, not from a PDF made for printing. A vector PDF can be converted to DXF AAMA first, then imported at real scale.
Does 3D sampling replace physical samples?
For most garments it reduces the number of physical rounds rather than removing them. 3D is good for spotting pattern and proportion problems early; final fit and production approval are still usually done on a real sample.
Why does my garment look too big in 3D?
The most common cause is a pattern with seam allowance included being sewn on the cut line. Each seam then adds twice the allowance. Import the sew line, or remove the allowance, before you simulate.
Do I need measured fabric to start?
No. Presets are fine for learning the software and checking proportions. For fit and drape decisions, measure the fabrics you use most, because presets can behave very differently from your actual cloth.