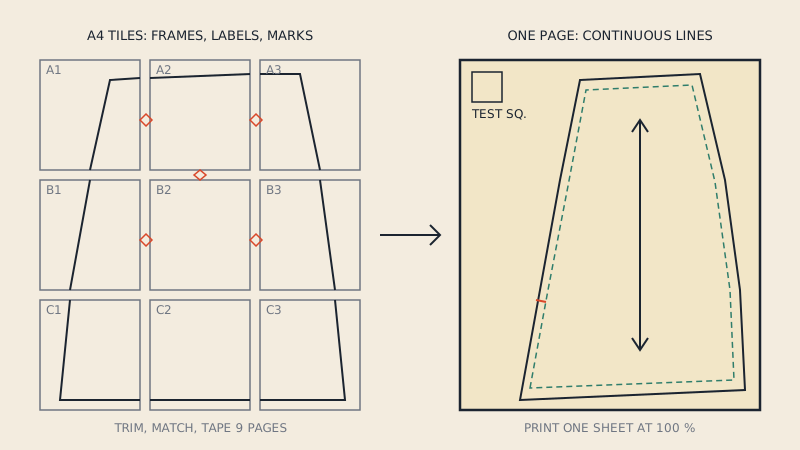
To assemble a PDF sewing pattern, lay the printed pages out in the order shown on the assembly map, trim one edge of each page along its frame line, overlap it onto the next page until the match marks line up, and tape. Work in rows first, then join the rows. Most problems come from skipping the test square, trimming both edges, or taping the whole sheet in a spiral instead of a grid.
The method below is the one we use in the studio when a client hands us a stack of tiles. It takes a little longer to set up and much less time to fix.
Before you cut anything
Assembly can only be as accurate as the print. Two checks take two minutes and save an evening.
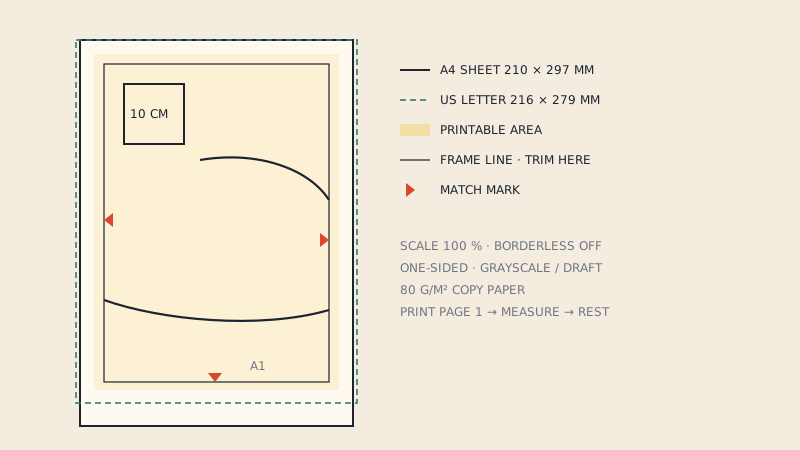
- Measure the test square on the first page. If it is not exactly the stated size, stop and fix your print settings before printing the rest. Our guide to the test square explains how to measure it and what tolerance is acceptable.
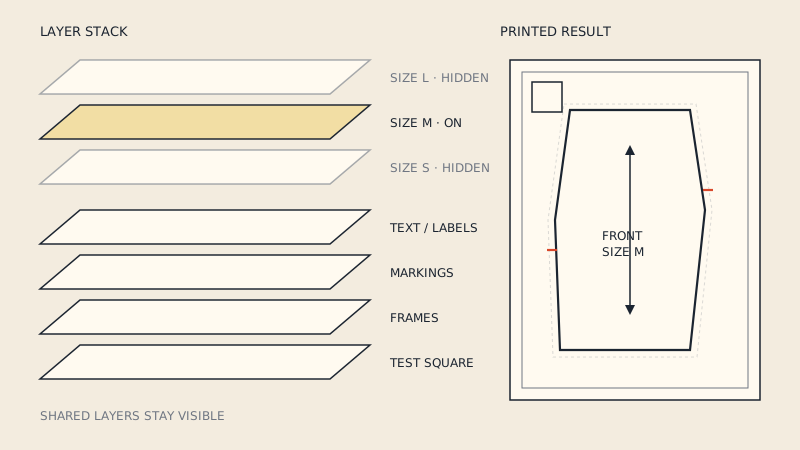
- Print only the pages you need. Many patterns list which pages carry which pieces. If you only make view A, the pocket pages for view B can stay unprinted. If the file has size layers, switch off the sizes you do not need first - see printing only your size with PDF layers.
Then number the pages lightly in pencil on the back if the page numbers are small or faint. Once pages are trimmed, a page with no visible number is surprisingly easy to misplace.
What you need
- Paper scissors or, better, a rotary cutter, a straight ruler and a cutting mat (keep the blade for paper only).
- Matte "invisible" tape or a glue stick. Matte tape can be written on; glossy tape cannot.
- A large flat surface. The floor works; a bed does not.
- A pencil, and a few weights (tins, books) to stop rows from shifting.
Reading the page: frames, marks and the assembly map
Every tiled pattern carries three kinds of guides. Learn to tell them apart before you start.
| Guide | What it looks like | What you do with it |
|---|---|---|
| Frame line | A thin rectangle near the page edge | Trim along it (on the edges you trim) |
| Match marks | Triangles, half-diamonds, circles or letters split across two pages | Align the two halves exactly |
| Page label | Row/column code such as B3, or a page number | Tells you where the page sits on the grid |
| Assembly map | A thumbnail of the whole grid, usually on page 1 or in the instructions | Your layout plan |
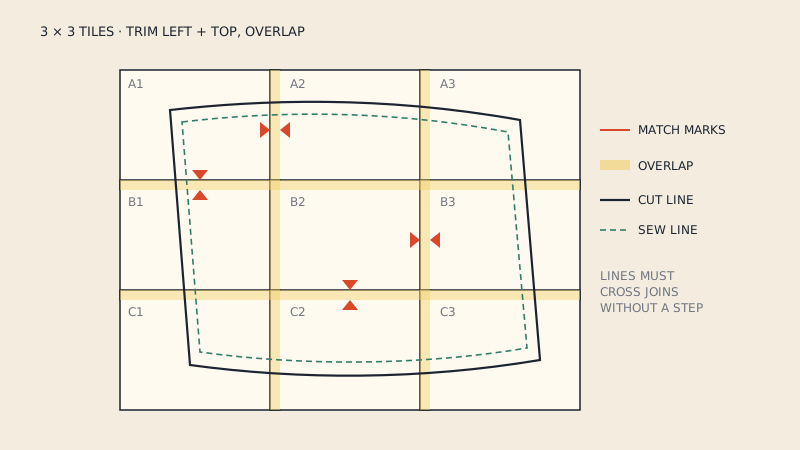
The pattern lines themselves are also a guide: where a cut line crosses from one page to the next, it should continue without a step. If the marks agree but the line jumps, one of the pages printed at a different scale.
Trim or overlap: pick one rule and keep it
There are two schools, and both work if you are consistent.
Trim and overlap. On each page, cut off the margin on two sides only - usually the left and the top - exactly on the frame line. Lay the trimmed edge on top of the untrimmed neighbour so the frame line sits on the neighbour's frame line. This is the most forgiving method because the untrimmed margin gives you a strip to tape onto.
Trim and butt. Cut off all four margins and butt the pages edge to edge. It gives a flatter sheet, but every cutting error of half a millimetre becomes a gap or an overlap in the pattern. Over eight pages across, that adds up.
Rules that keep either method honest:
- Never trim both sides of a join. One side gets trimmed, the other keeps its margin.
- Cut on the line, not beside it. A 1 mm offset per join over a 6-page row is 6 mm across the width of a skirt piece.
- If your printer shifted the image slightly, trust the match marks over the frame line.
Step-by-step assembly
- Lay out the whole grid dry. Place every page in position, untrimmed, following the assembly map. Check that nothing is missing or upside down. Page labels should read the same way up on every page.
- Trim the edges. Using the trim-and-overlap method, trim the left edge of every page except column 1, and the top edge of every page except row 1.
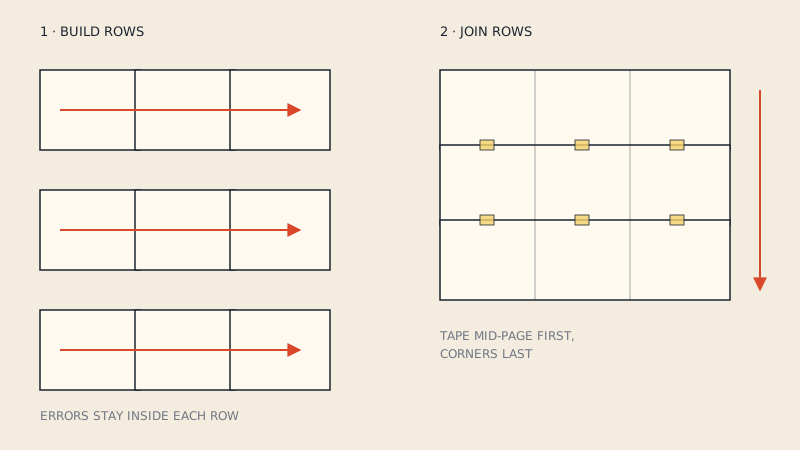
- Build row 1. Start top left. Lay page 2 over page 1 so the trimmed edge sits on the frame line and the match marks meet. Tape the join at both ends, then along its length. Continue to the end of the row.
- Build the remaining rows the same way. Weight each finished row so it stays flat.
- Join the rows. Lay row 2 over row 1 (row 2's trimmed top edge on top), align the marks at the left end, then work across. Tape in the middle of each page first, then the corners.
- Check across the joins. Sight along each cut line where it crosses a join. A continuous curve means you are done; a kink means one page needs lifting and re-taping.
- Cut only the pieces you need. Cut on your size line, or trace it off (see below) if you want to keep the master sheet intact.
Building in rows matters because each join is a small error. In a grid, errors stay inside their row. In a spiral or random order, they accumulate and the last page refuses to fit.
Glue or tape?
| Matte tape | Glue stick | |
|---|---|---|
| Speed | Fast, easy to lift and re-place | Slower, sets quickly |
| Corrections | Easy | Difficult once dry |
| Flatness | Slight ridge at joins | Flatter |
| Long-term storage | Can yellow and lose grip over years | Usually stable |
| Best for | First assembly, fitting muslins | Patterns you will keep for years |
A common studio compromise: assemble with small pieces of tape at the corners, check the lines, then run a glue stick under each overlap and press it down.
Trace or cut the master?
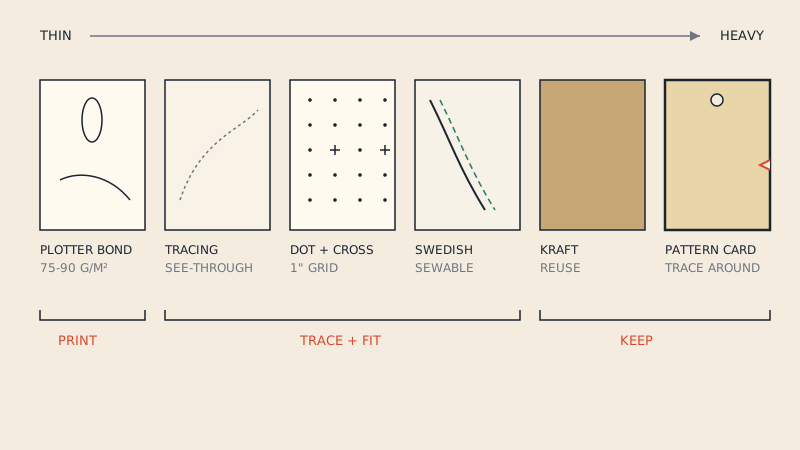
If the pattern is multi-size and you might sew a different size later, trace your size onto pattern paper or tracing material instead of cutting the assembled sheet. Tracing also lets you transfer every notch and internal line properly - a guide to tracing a sewing pattern covers which marks to keep.
If you do cut the master, cut through the taped joins, not beside them, and keep the offcuts with the pieces until you have transferred all markings.
Common mistakes
- Skipping the test square. The single most common reason pages do not meet. If a whole row is slightly short, the pages were scaled.
- Mixing paper sizes. A US Letter page and an A4 page are not interchangeable; a file laid out for A4 printed on Letter loses a strip at the bottom of each page. See printing on A4 or US Letter at home for the right setup.
- Printing on two printers. Two printers rarely place the image in exactly the same spot on the page. Print the whole pattern on one.
- Trimming all four sides "to be tidy". You lose the tape margin and every cut error shows.
- Taping on the carpet. Pile lets pages drift. Use a hard floor or table.
- Ignoring the map orientation. Some maps are drawn landscape while the pages print portrait. Match the page labels, not your assumption.
- Assembling pages that carry no pieces. Many patterns have blank or nearly blank pages; the instructions often say which ones can be skipped.
When assembly is not worth it
For a dress or a coat, a tiled pattern can run to 30-60 pages. If you sew a lot, it is often faster to print on one large sheet at a copy shop. Many patterns include an A0 or copy-shop file; if yours only has print-at-home tiles, a one-page PDF solves it: our converter assembles the tiles automatically and gives you a single copy-shop sheet plus A0, A1, A2, A3, A4 and US Letter versions without the original tile frames, each starting with test squares.
FAQ
Should I trim the margins on all four sides of each page?
No. Trim two sides - usually left and top - and overlap them onto the untrimmed edges of the neighbouring pages. Keeping one margin per join gives you a strip to tape onto and hides small cutting errors.
Why don't my PDF pattern pages line up?
Usually because the pages printed scaled, so check the test square first. Other causes are mixing A4 and US Letter paper, printing on two different printers, or trimming off the frame line rather than on it.
In what order should I tape PDF pattern pages?
Tape each row left to right first, then join the finished rows top to bottom. Working in a grid keeps small errors inside each row instead of letting them build up across the whole sheet.
Is tape or glue better for assembling a PDF pattern?
Matte tape is easier to correct and can be written on, so it suits a first assembly. A glue stick gives a flatter, longer-lasting sheet; many sewists tack the corners with tape, check the lines, then glue.
Can I avoid assembling a tiled PDF pattern?
Yes, if you print the pattern on one large sheet at a copy shop. If the pattern only came as A4 or Letter tiles, it can be converted into a single one-page file first.