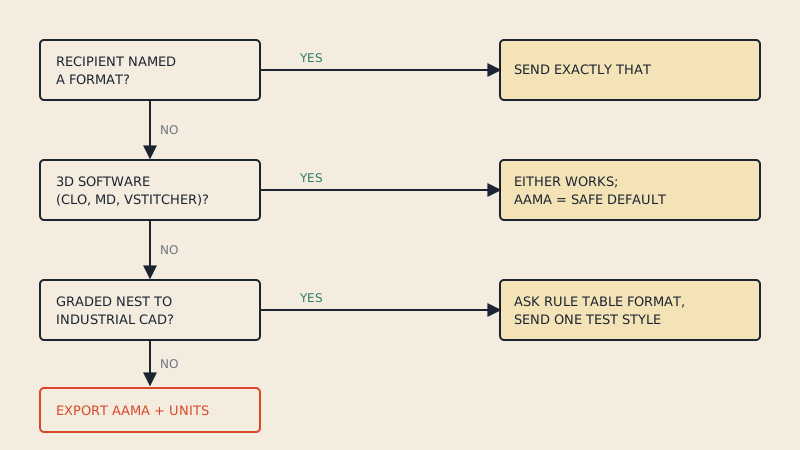
Browzwear VStitcher imports 2D patterns as DXF in the AAMA or ASTM flavour, not as generic AutoCAD DXF. Browzwear's own help pages recommend converting files to one of those two flavours before import and exporting patterns from other software without seam allowance. Get those two things right and most VStitcher DXF problems never appear.
This article is about the preparation side: what the file should contain before it reaches VStitcher, what to look at right after import, and how to trace common faults back to the file.
Why VStitcher is strict about the DXF flavour
A generic DXF is a drawing: lines, arcs, text, with no idea what a pattern piece is. Browzwear notes that a standard DXF holds less information and can import improperly. An AAMA or ASTM file adds the structure a 3D program needs: each piece is a separate block, the outline is on a known layer, and grain lines, notches and internal lines each have their own layer number.
When the structure is missing, VStitcher has to guess which lines belong to which piece and which line is the outline. That guess is where you get merged pieces, missing pieces, or outlines that will not close. The layers and their meaning are listed in the AAMA DXF layers, one by one; the choice between the two flavours is in DXF AAMA vs ASTM.
Pattern prep before you import
Treat the DXF as a delivery to a customer who cannot ask you questions. These checks take a few minutes and save a lot of time in 3D.
- One size only, or a clean graded set. If the file came from a multi-size PDF, make sure it contains one size. Nested sizes sharing one block confuse any 3D import.
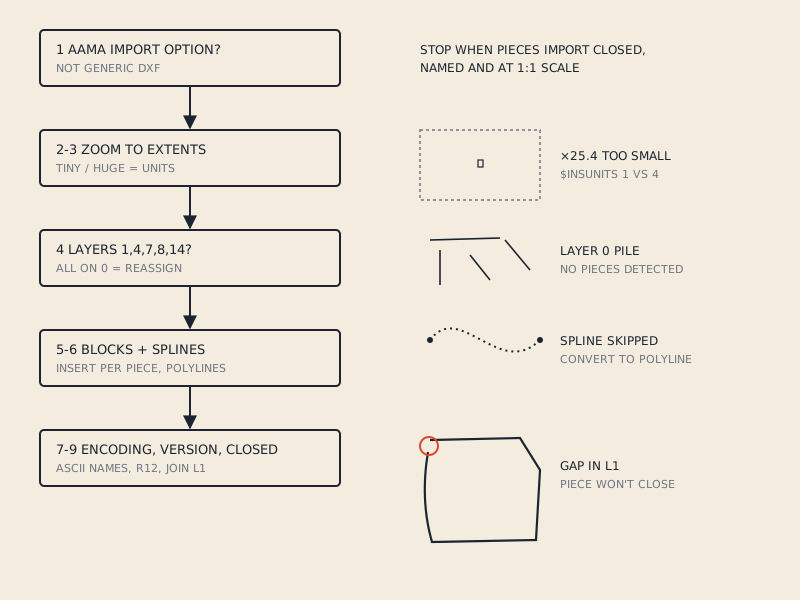
- Closed outlines. Every piece boundary must be one closed line. A small gap where two curves meet stops the piece from becoming a panel.
- Net or gross decided. Browzwear recommends net patterns (no seam allowance) for import. If your pattern includes allowance, know which line is the cut line and which is the sew line before you start.
- Grain line on every piece. VStitcher uses it to orient the fabric. A piece without one gets a default direction, which is wrong for stripes, nap and stretch.
- Notches where seams meet. They are your reference for setting up seams and checking that seam lengths match.
- Piece names that mean something. "Front", "Back", "Sleeve" read better in the piece list than "Piece 1" to "Piece 9".
- True scale. Measure one known piece in the source program before export.
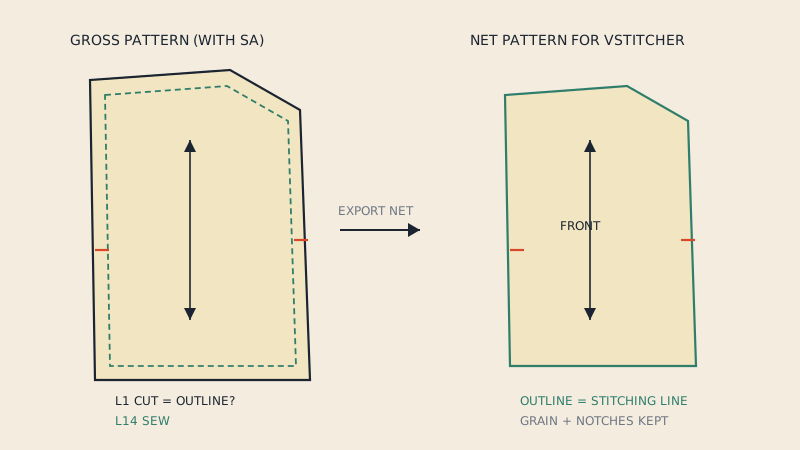
The seam allowance question
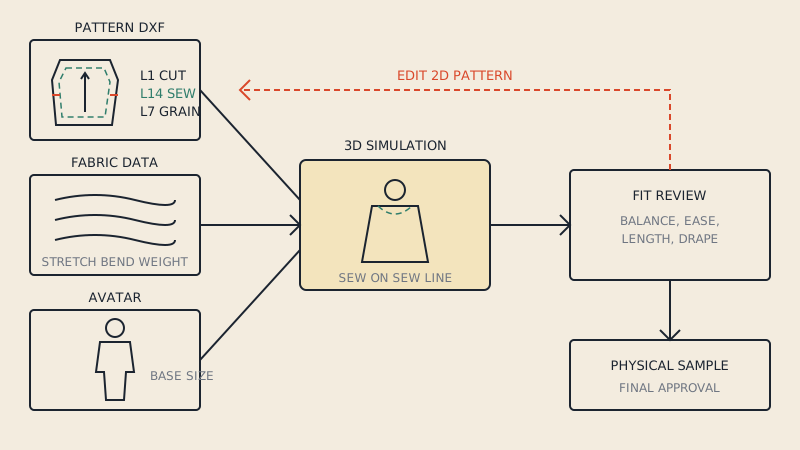
VStitcher builds its seams on the piece outline. If the outline is the cut line of a gross pattern, every seam is simulated at the raw edge. The garment then grows by two allowances across every seam, so a bodice with 1 cm (3/8") allowances on side seams gains roughly 4 cm (1 1/2") around the body. Fit checks on such a sample are misleading.
There are three ways to handle it:
| Source pattern | What to do | Result in VStitcher |
|---|---|---|
| Net pattern (no allowance) | Export as is | Outline = stitching line, correct fit |
| Gross pattern, CAD available | Export the net outline from the CAD | Outline = stitching line |
| Gross pattern, only the file | Use a file that keeps the sew line on its own layer (layer 14) and check how your version treats it | Depends on import handling; verify on one piece |
An AAMA file with allowance usually carries the cut line on layer 1 and the sew line on layer 14, so the information is there; what matters is which line VStitcher uses as the outline. Test on a single simple piece and measure. The background is in PDF to DXF with or without seam allowance.
Importing: the flow in general terms
The exact dialogs differ between VStitcher versions, so here is the flow rather than menu names.
- Open or create the garment file you want the pattern in.
- Use VStitcher's import command for 2D patterns and choose the DXF.
- Pick the format the file was written in (AAMA or ASTM) if asked, and check the unit.
- Confirm and look at the pieces in the 2D view before arranging anything on the avatar.
Browzwear's help centre has a current article on importing, exporting and opening files; follow it for the menu path in your version.
What to check right after import
- Piece count and names against the cutting list.
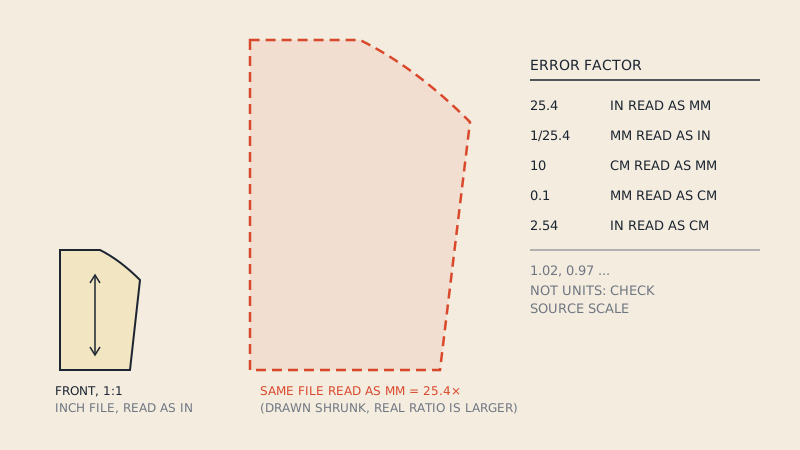
- Scale: measure a waistband, cuff or a straight edge you know. A factor of 25.4 means a millimetre/inch mix-up; see DXF units in pattern files.
- Grain lines visible on each piece and pointing the right way.
- Notches present on both sides of each seam.
- Internal lines: darts, pocket placements and fold lines arrive as internal lines; they should not have become extra pieces.
- Mirrored and fold pieces: a "cut 2" piece arrives once, and a half cut on fold arrives as a half. Mirror or unfold before you sew.
Common issues and where they come from
| Symptom in VStitcher | Likely cause in the file | Fix |
|---|---|---|
| Nothing imports, or only text | Generic DXF, no piece blocks | Re-export as AAMA/ASTM |
| All pieces merged into one | Lines on layer 0, no blocks | Re-export with piece blocks |
| Piece shows as lines, not a panel | Outline not closed | Close the gap in the source and re-export |
| Garment too big everywhere | Cut line used as outline on a gross pattern | Use net pattern or the sew line |
| Pieces 25.4 times too big or small | Unit mismatch | Re-import with the right unit |
| Notches or grain lines missing | Wrong layer numbers in the export | Check the AAMA layer setup in the source program |
Browzwear's troubleshooting advice for wrong imports points at the AAMA export settings of the originating software, especially the layer setup. If a file from one CAD keeps failing while files from others work, the layer table in that CAD's export is the first place to look. For a broader troubleshooting list, see DXF pattern won't open.
When the pattern is a PDF
Many brands start 3D sampling with patterns that exist only as PDFs from a freelancer or an archive. VStitcher cannot read those as pieces. If the PDF is vector, convert it to DXF AAMA: our converter extracts one chosen size, assembles A4 or Letter tiles automatically, and writes the cut line, sew line (when the pattern has allowance), grain lines, notches and internal lines on the standard layers. You can check every detected piece in a free preview before paying. If you are setting up 3D sampling from scratch, 3D sampling for small brands covers what else you need besides the pattern.
FAQ
What DXF format does VStitcher import?
VStitcher imports DXF in the AAMA or ASTM flavour. Browzwear advises converting plain DXF files to one of these before import, because a standard DXF carries less information and can import incorrectly.
Should a pattern for VStitcher include seam allowance?
Browzwear recommends exporting patterns without seam allowance. If the outline used for simulation is the cut line, every seam sits at the raw edge and the garment comes out too large.
Why are my pieces missing after importing a DXF into VStitcher?
Usually the pieces are not separate blocks or their outlines are not closed. Re-export the pattern as AAMA or ASTM from the source program and check that each piece boundary is one closed line.
Can VStitcher open a PDF sewing pattern?
Not as pattern pieces. A vector PDF pattern has to be converted to DXF AAMA or ASTM first, then imported.
How do I check the scale after import?
Measure a piece whose size you know, such as a waistband. If the value is about 25.4 times off, the file was read in inches instead of millimetres or the reverse, so re-import with the correct unit.