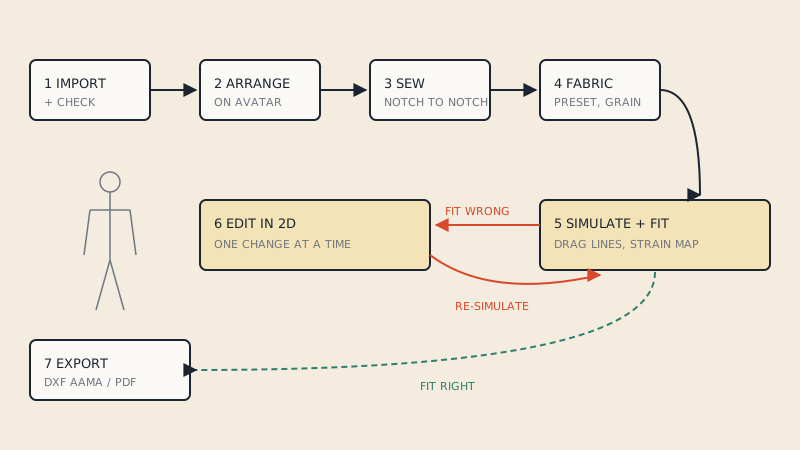
The fastest way to learn CLO3D is to skip drafting at first and work with a real pattern you already know: import it as DXF, arrange it on the avatar, sew it, simulate it and fix what looks wrong. That way every hour is spent learning the 3D side, and you can judge the result against a garment you have actually sewn. Drafting in CLO's 2D window comes later, once the tools make sense.
Below is a seven-day plan built on that idea. Each day has one goal and a clear finish line. It assumes you have CLO3D installed (a trial is enough) and one or two patterns you own as DXF or vector PDF.
Why start with a real pattern
Tutorials often start with drawing a rectangle skirt in CLO's 2D window. That teaches the drawing tools, but it hides the hard part: getting a real, multi-piece garment to sit and drape correctly. With a real pattern you already know what the finished garment looks like, so you can tell whether a wrinkle is a fit problem in the pattern or a beginner mistake in the setup.
Pick your first pattern carefully:
| Good first pattern | Leave for later |
|---|---|
| A simple woven top or shift dress, 4–8 pieces | Tailored jackets with canvas and linings |
| A pattern you have sewn and fitted before | Patterns you have never made |
| Clear notches and seam allowance | Knits with heavy negative ease |
| A single size, net or with stated SA | Multi-size nests in one file |
Before day one: get the pattern into DXF
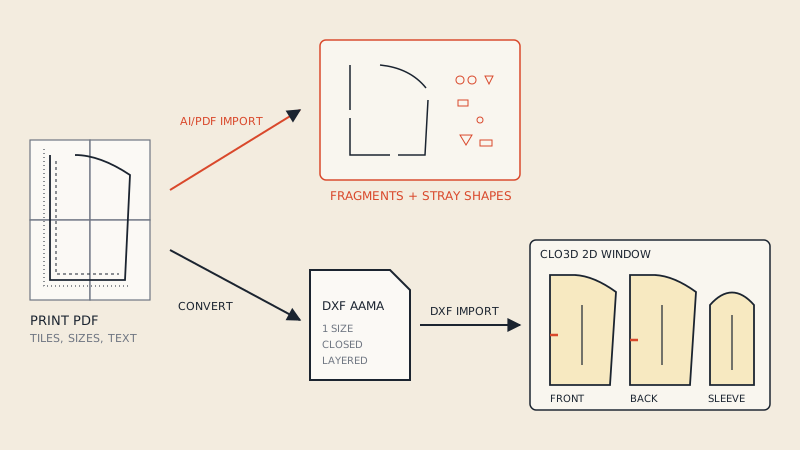
CLO3D imports pattern pieces through File > Import > DXF (AAMA/ASTM). It does not read a PDF pattern as pieces, which is explained in importing a PDF pattern into CLO3D. If your pattern is a vector PDF, convert it to DXF AAMA first; you choose one size, and the preview shows every piece before you pay.
Day 1: import and read the 2D window
Goal: your pattern pieces visible in the 2D window at the correct size.
- Import the DXF with File > Import > DXF (AAMA/ASTM). The import options (scale, units, whether to import the sew line or cut line) are walked through in how to import a DXF pattern into CLO3D.
- Measure one known edge with a measuring tool in the 2D window. If it is wrong by a factor of 25.4 or 10, re-import with the correct unit.
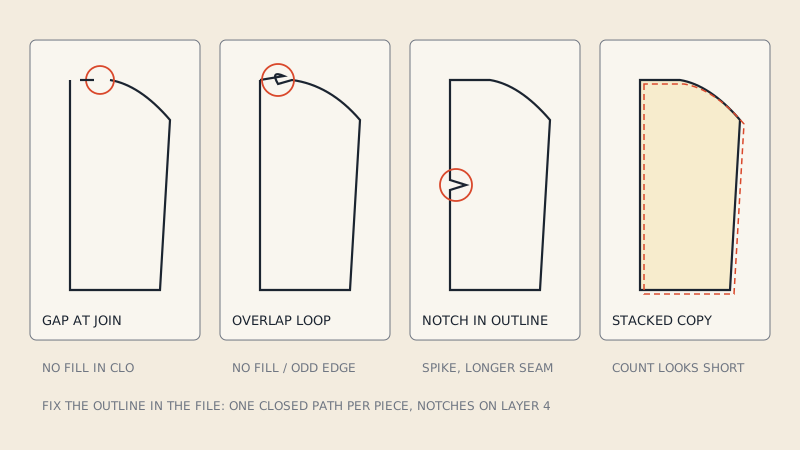
- Check the piece count against the pattern. Look for pieces that arrived as loose lines instead of filled shapes.
- Save the project.
If pieces are missing or open, don't fight it on day one. The usual causes are listed in CLO3D DXF import problems.
Day 2: avatar and arrangement
Goal: every piece placed around the avatar, roughly where it will be worn.
Load an avatar close to the size your pattern was drafted for. Then switch on the arrangement points and place each piece: fronts on the front, backs on the back, sleeves around the arms. Pieces should float a little outside the body, not intersect it.
Spend real time here. Bad arrangement causes most "my garment exploded" moments for beginners. Mirrored pairs (two fronts, two sleeves) need to face the right way; a sleeve placed inside out will sew, but it will twist.
Day 3: sewing
Goal: every seam sewn, with matching lengths shown along each seam.
CLO has segment sewing (edge to edge) and free sewing (point to point along part of an edge). Start with segment sewing for simple seams and use free sewing where notches split a seam into sections, such as a sleeve cap with front and back halves.
Watch the sewing direction. Seam lines that cross each other in the 3D view mean one edge is sewn in reverse, which produces a twisted seam. Fix it before simulating. Also check that the lengths on both sides of each seam are close; CLO shows them, and a large difference is either intended ease or a pattern error you just found.
Day 4: first simulation
Goal: the garment drapes on the avatar without pieces passing through the body or through each other.
Toggle simulation (the Space bar by default) and let the garment settle. Expect problems the first time:
- a piece that shoots away usually has a sewing error or was arranged inside the avatar;
- a collar or facing tangled in the main body usually needs layering set so it sits outside or inside the shell;
- pieces that hang flat with no shape may still need sewing on one seam.
Stop the simulation, fix one problem, run again. Small iterations are much faster than fixing everything at once.
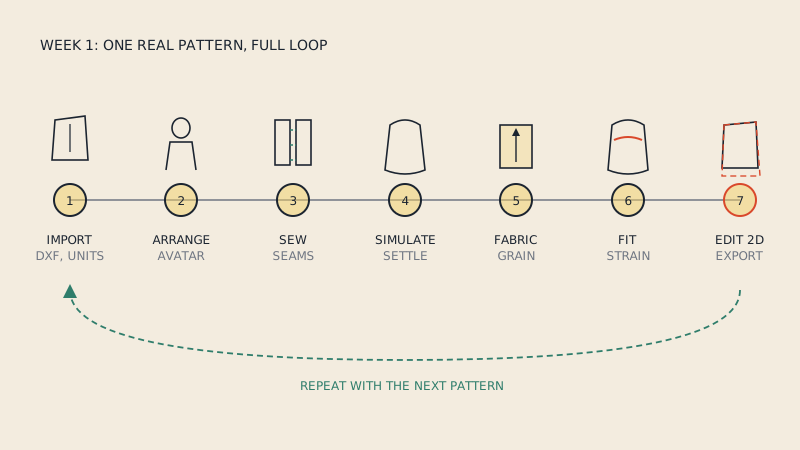
Day 5: fabric and grain
Goal: the garment drapes like the fabric you would actually use.
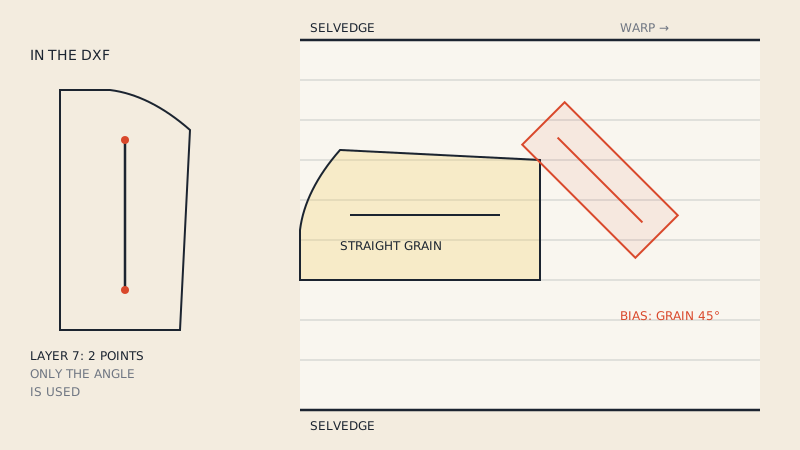
Assign a fabric from the library that resembles your real fabric (a cotton poplin behaves very differently from a jersey). Then check grain: the fabric direction in CLO follows the piece's grain line, which comes from the DXF if it was on the grain layer. A piece with a wrong or missing grain line will drape incorrectly even with the right fabric. How the grain line travels in the file is covered in grain lines in DXF patterns.
Day 6: fit check
Goal: read the garment as a fitter would.
Use CLO's fit and strain views to see where the garment is tight or stretched. Compare with what you know from sewing the real garment: if your real top pulls across the upper back, the 3D version should show that too. If it doesn't, check the avatar measurements and the fabric settings before trusting the result.
Write down two or three fit changes you would make to the pattern. That list is tomorrow's work.
Day 7: back to 2D
Goal: make one real pattern change and see it update in 3D.
This is where CLO becomes a pattern tool rather than a visualisation tool. Pick one change from your list (lengthen a bodice, move a dart, add ease across the back) and make it in the 2D window. Re-simulate and compare.
Then deal with seam allowance. If you imported a net pattern, add seam allowance in CLO before exporting for production; if you imported the cut line, decide how you will handle it. The options are covered in seam allowance in CLO3D. Finally, export your edited pattern as DXF and re-open it to confirm it survived.
After the first week
Once the full loop works (import, arrange, sew, simulate, fit, edit, export), you can branch out:
- import a second pattern and try a garment with a lining or a collar stand;
- start drafting simple pieces directly in CLO's 2D window;
- learn layering for multi-layer garments such as jackets over shirts;
- explore the complete process in more detail in from flat pattern to 3D sample.
The most common beginner habit to avoid is treating the 3D render as the goal. The goal is a better pattern. A good-looking render on a wrong avatar, with the wrong fabric, proves nothing about the real garment.
FAQ
How do I start learning CLO3D as a beginner?
Start with a simple pattern you have already sewn, import it as DXF, and learn arrangement, sewing and simulation on it. Drafting in CLO's 2D window is easier to learn once you understand how pieces behave in 3D.
Can CLO3D open PDF sewing patterns?
No, CLO3D does not import PDF patterns as pattern pieces. Convert a vector PDF pattern to DXF AAMA first, then use File > Import > DXF (AAMA/ASTM).
Why does my garment explode or fly away in CLO3D?
Usually a piece was arranged inside the avatar, a seam is sewn in reverse, or a piece is not sewn at all. Stop the simulation, fix one issue, and run it again.
How long does it take to learn CLO3D?
Basic import, sewing and simulation can be learned in about a week of focused practice with a real pattern. Accurate fitting, fabric calibration and production workflows take considerably longer.
Should I import patterns with or without seam allowance into CLO3D?
Either works if you set the import correctly. Many users import the sew line for simulation and keep or add seam allowance for production export.