Digital pattern making means drafting, editing, grading and outputting sewing patterns as files instead of paper: in 2D pattern CAD, in vector drawing programs, or in 3D garment software. The skills are the same as on paper (you still need to know what a dart does and why a sleeve cap has ease); what changes is the precision, the speed of changes, and what you can do with the result: print it any size, send it to a factory, simulate it in 3D. Most working pattern makers today use a hybrid of paper and digital, and you do not need to switch everything at once.
This guide maps the territory: the three ways patterns become digital, the tool families, the skills worth learning first, and workflows that combine paper and screen sensibly.
Three ways a pattern becomes digital
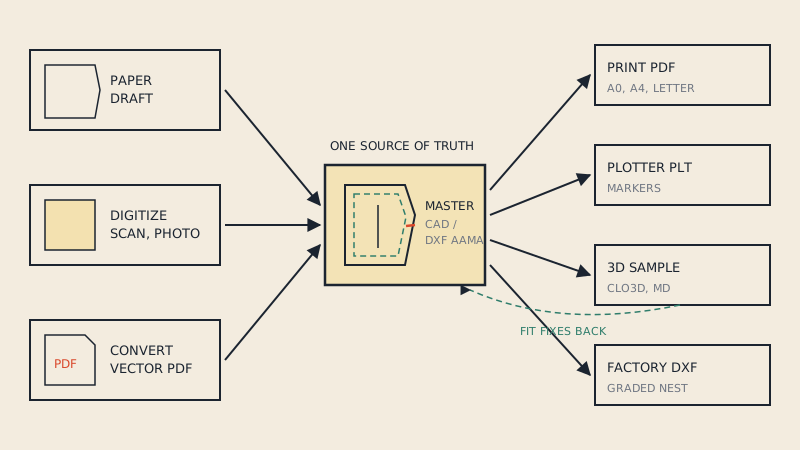
Every digital pattern starts in one of three ways. They lead to the same place, a set of pieces in a file, but the effort and accuracy differ.
1. Drafted digitally from the start
You draft the block or design directly in pattern CAD or a vector program, using measurements. This gives the cleanest files: every line is exactly where you put it, pieces are closed, and the software knows what is a seam and what is a notch. It requires the most new skills.
2. Digitized from paper
An existing paper pattern is captured with a digitizer board, a calibrated photo, a scanner, or by tracing in a vector program. This is how most studios bring their archive of blocks into CAD. Accuracy depends on the method and on care; the 5 digitizing methods compared article goes through each.
3. Converted from an existing vector PDF
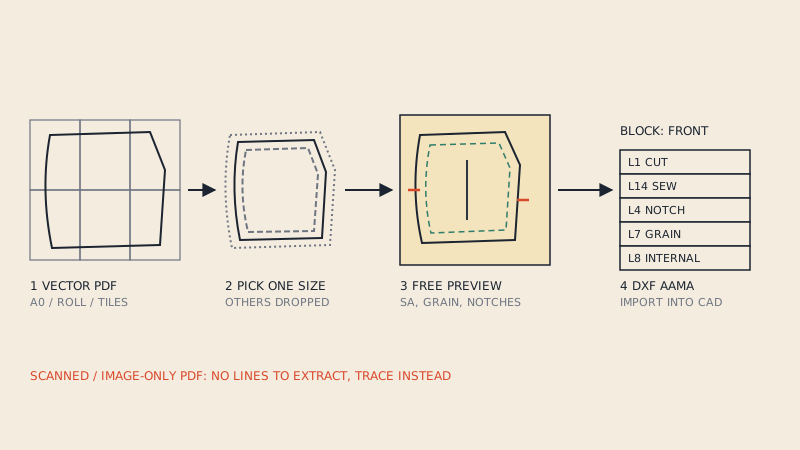
If the pattern already exists as a vector PDF (your own exported files, or a pattern you bought and want to use in CAD or 3D for your own work), the lines are already digital; they just are not organized as pattern pieces. A pattern-aware conversion turns them into closed pieces with grain lines, notches and labels. See how to convert a PDF sewing pattern to DXF.
| Starting point | Effort | Accuracy | Best for |
|---|---|---|---|
| Draft in CAD | High (learning), then fast | Highest | New designs, blocks, made-to-measure |
| Digitize paper | Medium per pattern | Depends on method and care | Existing paper blocks and archives |
| Convert vector PDF | Low | As good as the PDF | Patterns that already exist as PDF |
| Scanned or photographed PDF | Needs digitizing | Depends on method | Only route for raster files |
The tool families
Digital pattern tools fall into a handful of families. You rarely need all of them.
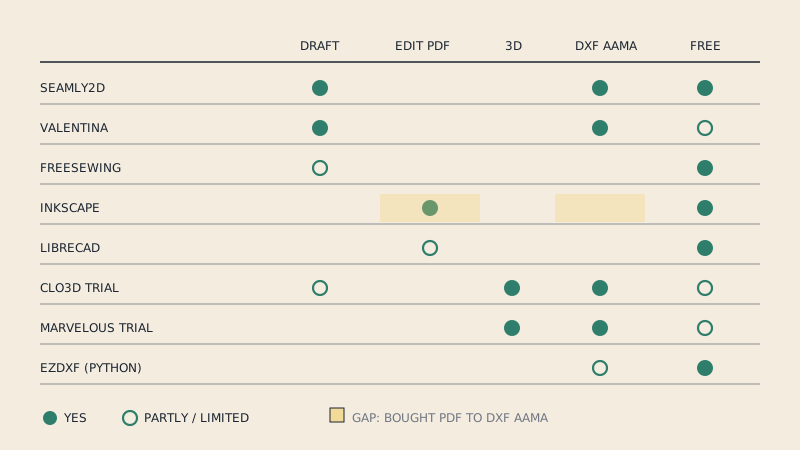
- 2D pattern CAD: built for patterns. Pieces, seam allowance, notches, grading, markers, DXF AAMA export. Industry systems and open-source parametric programs both belong here. The pattern making software comparison and the free pattern making software roundup cover the options.
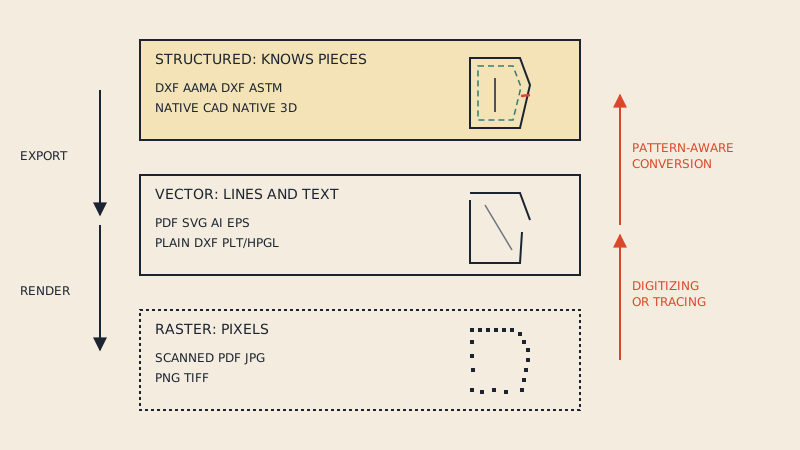
- Vector drawing programs (Inkscape, Adobe Illustrator): good for drawing and for producing print PDFs, weak at pattern logic. Pieces are just shapes, and DXF export is generic, not AAMA.
- 3D garment software (CLO3D, Marvelous Designer, Browzwear): simulates the garment on an avatar from 2D pieces. Most can also edit the 2D pattern, and CLO3D in particular is used as a pattern tool in its own right.
- Utilities: converters, nesting tools, print-layout tools, file viewers.
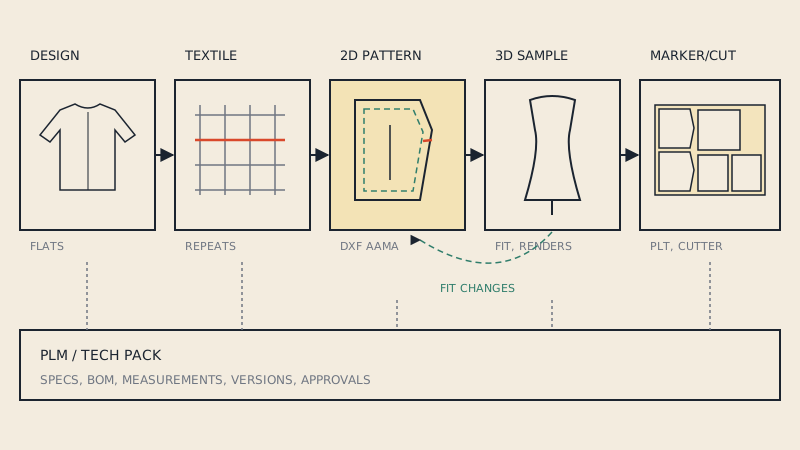
Where these sit in a company, from design to markers and PLM, is the subject of CAD in fashion.
File formats in one paragraph
You will meet PDF (print and distribution), DXF AAMA or ASTM (exchange between pattern CAD, 3D and cutters), PLT/HPGL (plotter output), SVG and AI (vector graphics), and native CAD formats that only open in the program that made them. The rule that saves the most trouble: keep one master file in a structured format (native CAD or DXF AAMA) and generate everything else from it. The full table, with conversion paths, is in sewing pattern file formats.
Skills worth learning first
Digital tools reward a few specific skills. In order of payoff:
- Pattern fundamentals. Seam allowance, notches, grain, darts, ease. Software does not replace them; it amplifies mistakes as precisely as it amplifies good work. How to read a sewing pattern is a good refresher.
- Thinking in closed pieces. In CAD, a piece is a closed outline with attributes. Lines that "nearly meet" on paper must meet exactly in a file.
- Cut line vs sew line. Decide whether your master pattern is net (sew line) or includes seam allowance, and label it. Many file problems start here.
- Units and scale. Know whether a file is in millimetres or inches, and verify with a known measurement after every import.
- Walking seams digitally. CAD measure tools make seam checks fast; use them every time you change a piece.
- Layers and naming. Name pieces, sizes and quantities consistently. A factory, a 3D designer and future you will all rely on it.
- Output discipline. Print a test square at 100 % every time a file goes to a printer or copy shop.
Hybrid workflows that work
You do not have to choose between paper and digital. These combinations are common and sensible.
Paper draft, digital everything else
Draft and fit on paper as you always have. Once the pattern is approved, digitize it once, then do grading, print files, markers and 3D from the digital master. Fitting on paper keeps the hands-on feel; the digital master stops you retracing.
Digital draft, paper fitting
Draft in CAD, plot or print at 1:1, cut a toile, and transfer fitting changes back into the file. The file stays the master; paper is a test print.
3D first, 2D master
Some designers develop the shape in 3D software, refine the 2D pieces there, and export DXF AAMA for production. The 3D step replaces some physical sampling, not all of it; fabric behaviour and fit on real bodies still need a sewn sample.
Existing PDFs into a digital library
If you have a shelf of vector PDF patterns you are entitled to use, converting the ones you use most to DXF gives you pieces you can edit, simulate and lay out. Our PDF to DXF converter handles vector PDFs (A0, large-format sheets and A4/Letter tiles), one size per file, with a free preview of every detected piece.
A realistic learning path
- Weeks 1 to 2: pick one 2D tool and redraw a block you know well. Compare measurements with the paper version.
- Weeks 3 to 4: add seam allowance, notches and grain line; export a PDF and print it to scale.
- Month 2: import a pattern into 3D software and simulate it. Problems you see in 3D often point back to 2D issues: seams of unequal length, missing notches.
- Month 3: export DXF AAMA and reopen it in a second program. If it round-trips cleanly, your files are ready for other people.
Common pitfalls
- Treating vector drawings as patterns. A shape in a drawing program has no grain line, no notches, no quantity. Add them deliberately.
- Several masters. If the PDF, the CAD file and the paper pattern each have different fixes, nobody knows which is right.
- Trusting scale without checking. Mm vs inch confusion produces patterns 25.4 times too large or small; see DXF units.
- Scanning when a vector file exists. A scan turns precise lines into pixels. Ask for the original vector file first.
- Learning every tool at once. One 2D tool, then 3D if you need it.
What digital pattern making will not do
It will not fit a garment for you, choose ease, or fix a draft whose proportions are wrong. Automation helps most with repetitive, mechanical work: tracing, conversion, grading with rules you supply, nesting and output. The AI and pattern making article takes a sober look at where automation stands.
FAQ
What is digital pattern making?
It is drafting, editing, grading and outputting sewing patterns as files in pattern CAD, vector programs or 3D garment software instead of on paper. The pattern-making principles stay the same.
Do I need expensive software to start digital pattern making?
No. Open-source pattern programs such as Seamly2D and Valentina, and vector programs such as Inkscape, are free. Industry CAD becomes worth it for grading many sizes, markers and factory work.
Can I combine paper and digital pattern making?
Yes, and most pattern makers do. A common workflow is to draft and fit on paper, then digitize the approved pattern once and produce grading, print files and DXF from the digital master.
What file format should I keep my patterns in?
Keep a master in your CAD's native format or in DXF AAMA, which carries pieces, grain lines, notches and labels. Generate PDFs and plotter files from that master when needed.
How do I get an existing PDF pattern into CAD?
If the PDF is vector (not scanned), convert it to DXF AAMA with a pattern-aware converter and import that. Scanned PDFs must be digitized instead.