To read a sewing pattern, go from the outside in: first the size chart and finished measurements, then the list of pieces and cutting layouts, then each paper piece, where the outer line is where you cut, the dashed inner line (if there is one) is where you sew, and every other mark tells you how to place the piece on fabric or how it joins its neighbours. Once you know what each kind of line is for, even a dense multi-size sheet becomes readable.
This guide walks through a pattern in the order you actually use it. For a compact reference table of individual marks, see the sewing pattern symbols glossary.
Step 1: the size chart and finished measurements
A pattern size is not a shop size. Pattern companies have their own size charts, and the same number can mean different body measurements across brands.
- Take your measurements: bust or chest, waist, hip, and for some garments high bust, back length, inseam.
- Find your size on the body measurement chart. If you fall in different sizes for bust and hip, note both.
- Look at the finished garment measurements, often printed on the pattern pieces themselves (for example a circle with a cross and "finished bust 96 cm"). The difference between body and finished measurement is the ease, which tells you how loose the garment is designed to be.
- Choose by the measurement that is hardest to alter, usually bust for tops and hip for skirts and trousers, and plan to blend elsewhere.
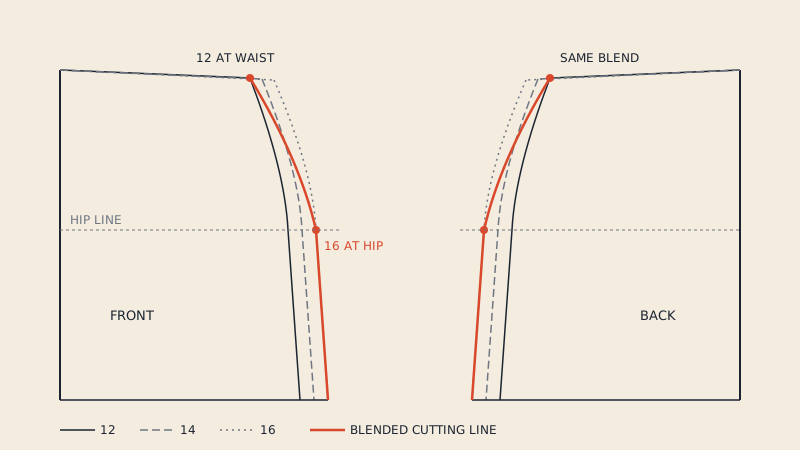
On multi-size patterns you will usually follow one size line around the piece and blend into another where needed; how to use multi-size sewing patterns covers this in detail.
Step 2: the instruction sheet and cutting layouts
Before touching the paper pieces, read the instructions once from start to finish. Look for:
- Seam allowance: whether it is included, and how wide. This single fact changes how you read every piece. If the instructions do not say, see seam allowance included or not.
- The piece list: a numbered or lettered list with a small drawing of each piece. Check you have all of them.
- Cutting layouts: diagrams showing how pieces sit on the fabric for each fabric width and size. Shaded pieces are usually placed printed side down.
- Abbreviations: RS (right side), WS (wrong side), CF and CB (centre front and back), SA (seam allowance).
- Fabric and notions: needed length, interfacing, zip length, buttons.
Step 3: the piece label
Each piece carries a block of text. Read it before cutting.
| Label text | What it means |
|---|---|
| Piece name and number | "Front, 1", "Sleeve, 3": matches the piece list and instructions |
| Size(s) | The sizes this outline covers; multi-size pieces list all of them |
| Cut 2 | Cut two mirror-image pieces, usually from folded fabric |
| Cut 1 | Cut one; if the piece is not symmetrical, check which side is right side up |
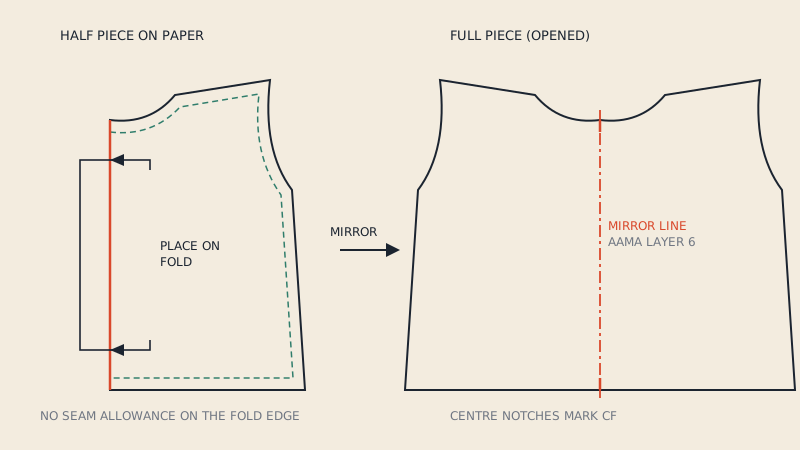
| Cut 1 on fold | Cut one piece with the marked edge on the fabric fold |
| Cut 2 interfacing | Also cut this piece from interfacing |
| Cut 4 lining | Additional pieces from lining fabric |
| Right side up | Lay the piece printed side up on the right side of single-layer fabric |
Step 4: the lines on the piece
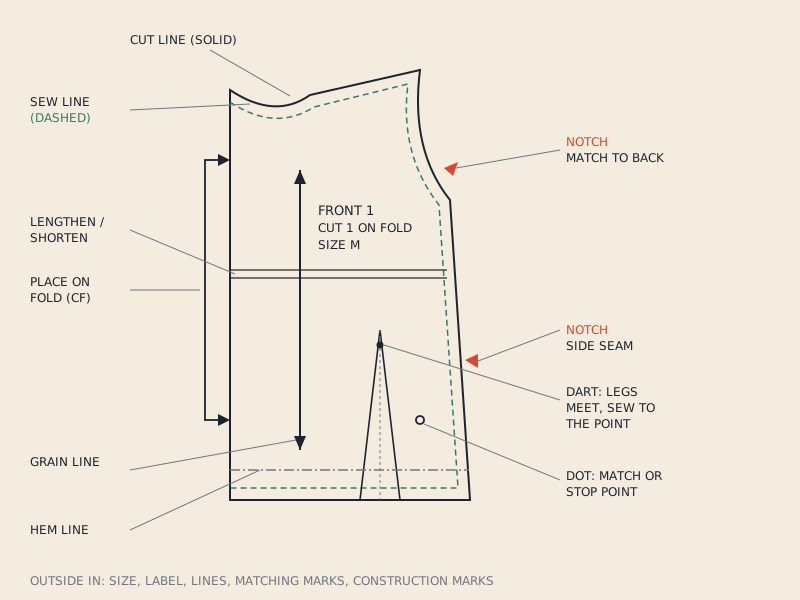
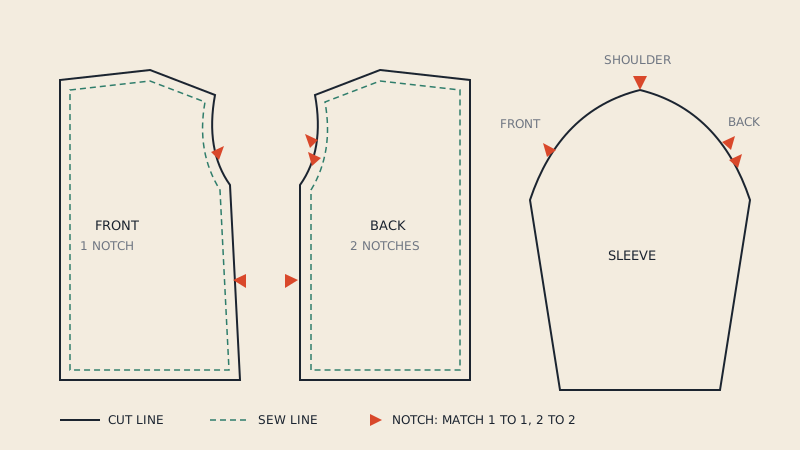
Cutting line
The outermost solid line. On single-size patterns there is one; on multi-size patterns there is one per size, distinguished by colour, dash pattern or thickness. Find yours and follow it all the way round, including through notches and dart legs.
Sewing line
A dashed or dotted line inside the cutting line, at the seam allowance distance. Many home patterns with included seam allowance do not draw it at all; you sew at the stated distance from the edge. Patterns without seam allowance show only the sewing line, and you add seam allowance when cutting.
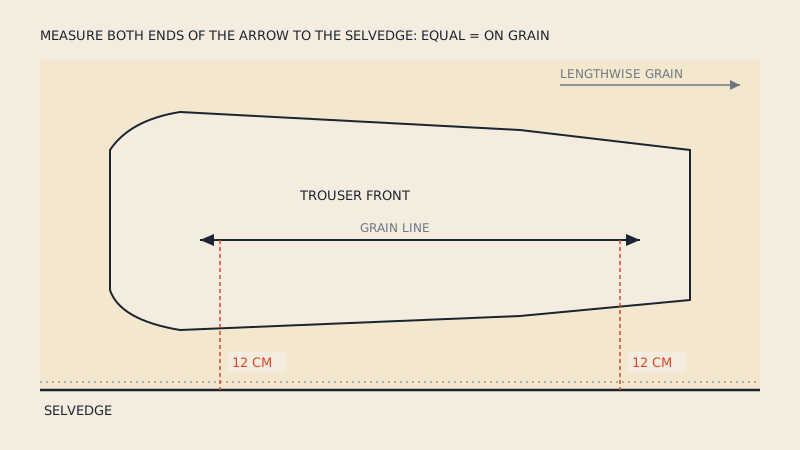
Grain line
A long straight line with arrowheads. It must run parallel to the selvage of the fabric. How to place it accurately is in grain line on a sewing pattern.
Place on fold
A line with a bracket and arrows pointing to the edge, labelled "place on fold". That edge goes exactly on the fabric fold, and the piece is cut as one mirrored whole. Details in place on fold.
Fold line
A line, often solid or dash-dot, inside a piece, labelled "fold line". It is not a fabric fold for cutting: it is where the finished piece folds, for example a facing that folds back along the front edge, or a hem.
Hem line
Shows the finished length. The distance from the hem line to the cut edge is the hem allowance, which is often wider than the seam allowance, commonly 2–4 cm (3/4"–1 1/2") on skirts and trousers.
Lengthen or shorten line
Two parallel lines across the piece. Cut along them and spread the piece to lengthen, or fold out a tuck to shorten, then true the side edges. They sit where the change will not distort the shape, such as above the waist on a bodice or between knee and hip on trousers.
Centre front and centre back
Usually marked CF and CB. They are reference lines for buttons, zips and fold edges, and often coincide with the grain line direction.
Step 5: the matching marks
Notches
Small triangles or ticks on the cutting line. Single, double and triple groups show which edges meet and which way round. Cutting and matching them is covered in notches in sewing patterns.
Dots, circles and squares
Small filled or hollow circles mark points inside the piece or on the sewing line: dart points, the end of a zip opening, the corner of a pocket, the point where stitching stops at a corner, or where a gathered section starts. Patterns sometimes use large and small dots or squares and triangles to separate different matching points. Transfer them with chalk, a marking pen or a tailor's tack.
Darts
Two converging lines (the legs) meeting at a point, with a fold line in the middle. You fold the fabric so the legs meet and stitch from the edge to the point, tapering the last stitches along the fold.
Step 6: construction marks
- Pleats and tucks: pairs of lines with an arrow showing which way to fold. Bring the line at the tail of the arrow to the line at its head.
- Gathering lines: a section between two marks to be gathered, sometimes shown as a wavy line.
- Buttonholes: a short line with small bars at the ends, at the exact buttonhole length and position. Horizontal buttonholes start slightly beyond the centre front line, usually around 3 mm (1/8"), towards the edge.
- Buttons: a small cross or circle on the centre line.
- Pocket and trim placement: an outline or corner marks where a patch pocket, appliqué or belt loop goes.
- Zip markings: a mark where the zip stops, and sometimes the zip outline.
- Bust, waist and hip lines: horizontal lines for alterations and for checking fit.
Reading a pattern in CAD or 3D
All these marks exist in digital patterns too, but as data rather than drawing. In a DXF AAMA file, the cut line, sew line, grain line, notches and internal lines such as darts, buttonholes and pocket placements each go on their own numbered layer, and the piece label text travels with the piece. Our converter writes them that way when turning a vector PDF pattern into DXF. The same order of reading applies after import: check sizes, piece list and labels first, then lines and marks.
FAQ
Which line do I cut on a sewing pattern?
Cut on the outermost solid line of your size. On multi-size patterns each size has its own cutting line, identified by colour, dash style or a size label printed along it.
What is the dotted line on a sewing pattern?
It is usually the sewing line, at the seam allowance distance inside the cutting line. Some patterns use dotted lines for other sizes or for fold lines, so check the legend on the instruction sheet.
What do the dots on a pattern mean?
Dots and circles mark points to match or to stop at: dart points, zip and vent ends, pocket corners, and the start of gathers. Transfer them to the fabric before removing the paper.
What does "cut 2" mean on a pattern piece?
It means you need two pieces, usually mirror images. Cut them from folded fabric with the pattern on top, or from single-layer fabric by flipping the paper over for the second piece.
How do I know if seam allowance is included?
The instruction sheet or the pattern pieces state it, for example "1.5 cm seam allowance included". If two parallel lines run around the edge, the outer one is usually the cutting line and the inner one the sewing line.