Sewing pattern symbols fall into four groups: lines that define the piece (cut, sew, fold, hem), arrows that place it on fabric (grain, bias, fold), marks that match it to other pieces (notches, dots, drill holes), and marks that tell you how to construct it (darts, pleats, buttonholes, placements). Below are 30 of the most common, each with what it looks like, what it means and what you do with it.
Pattern companies vary in the details, so treat this as a reference and check the legend on your instruction sheet. For a walkthrough of reading a whole pattern in order, see how to read a sewing pattern.
Lines and placement marks
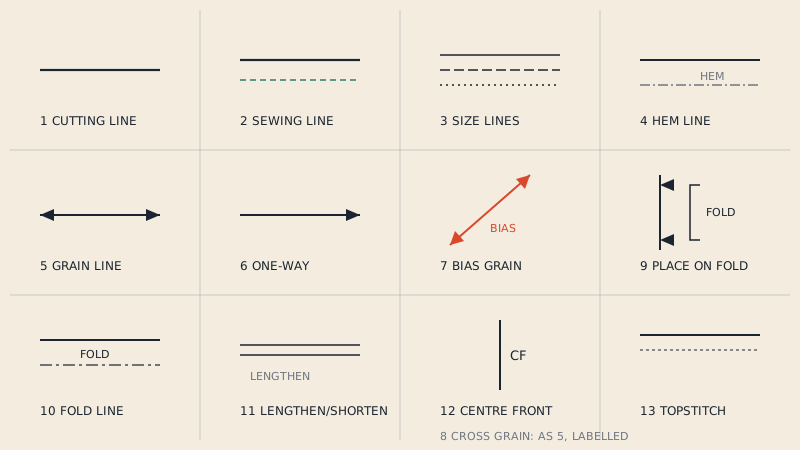
| # | Symbol | Looks like | Means | What you do |
|---|---|---|---|---|
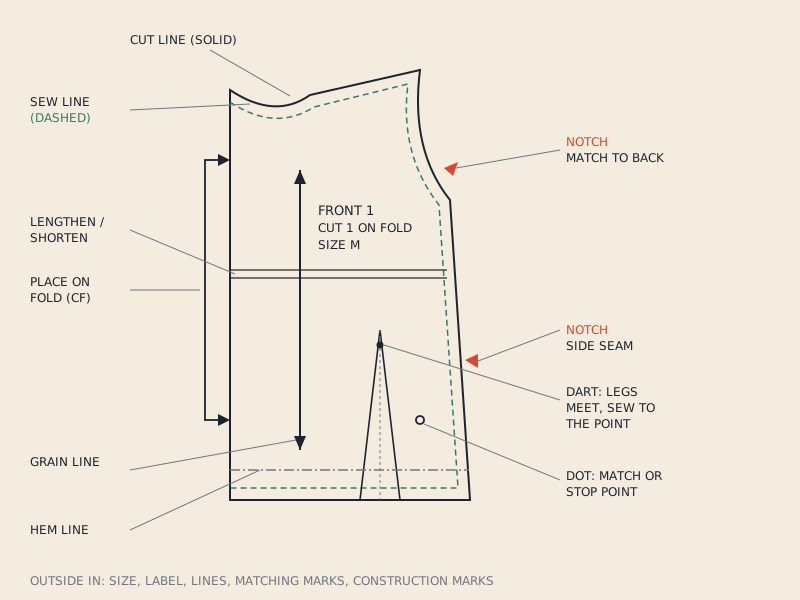
| 1 | Cutting line | Solid outer line | The edge of the piece | Cut on it |
| 2 | Sewing line | Dashed line inside the cutting line | Where the seam is stitched | Stitch on it; measure seam allowance from the edge if it is not drawn |
| 3 | Nested size lines | Several outlines in different dashes or colours | One cutting line per size | Follow your size; blend between sizes where needed |
| 4 | Hem line | Line parallel to the lower edge, labelled "hem" | Finished length | Fold the hem allowance up to this line |
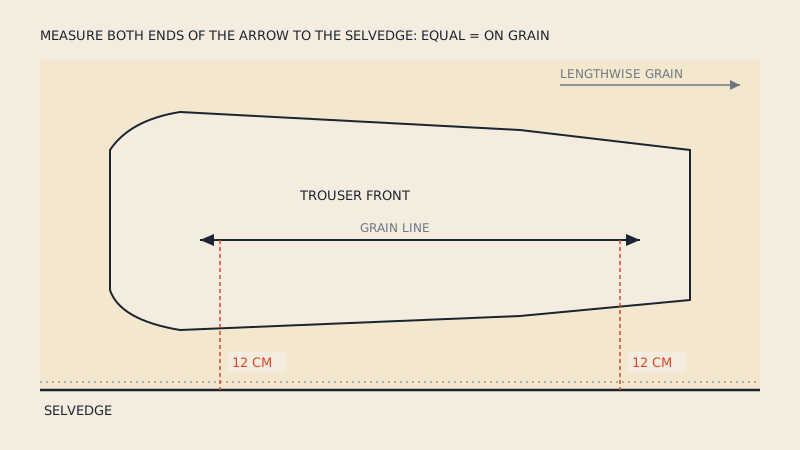
| 5 | Grain line | Long line with arrowheads at both ends | Lengthwise grain direction | Place parallel to the selvage |
| 6 | One-way grain | Grain line with a single arrowhead | Piece must face a set direction | Point all pieces the same way on napped or one-way fabric |
| 7 | Bias grain | Grain line at 45°, labelled "bias" | Cut on the true bias | Place at 45° to the selvage |
| 8 | Cross grain | Grain line marked "cross grain" | Crosswise grain direction | Place parallel to the cut edge, selvage to selvage |
| 9 | Place on fold | Bracket with arrows to the edge | Edge goes on the fabric fold | Place exactly on the fold; no seam allowance there |
| 10 | Fold line | Line inside the piece, labelled "fold" | Where the finished piece folds | Fold during construction, not when cutting |
| 11 | Lengthen or shorten line | Two parallel lines across the piece | Place to change length | Cut and spread, or fold out a tuck |
| 12 | Centre front / centre back | Line or edge labelled CF or CB | Garment centre | Use as a reference for buttons, zips and alignment |
| 13 | Topstitching line | Fine dashed line near an edge, often labelled | Visible stitching on the right side | Stitch from the right side at this distance |
The grain-related marks are explained in grain line on a sewing pattern, and fold edges in place on fold.
Matching marks
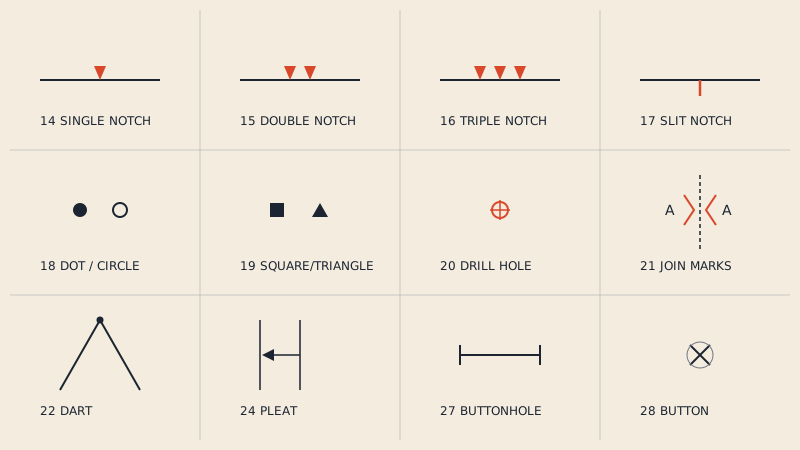
| # | Symbol | Looks like | Means | What you do |
|---|---|---|---|---|
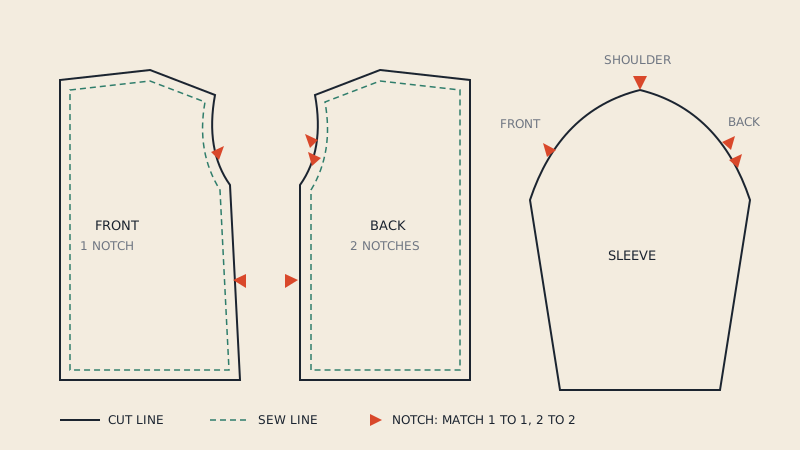
| 14 | Single notch | One triangle or tick on the cutting line | Matching point, often front | Cut or snip; match to the single notch on the joining piece |
| 15 | Double notch | Two triangles or ticks | Matching point, often back | Match to the double notch |
| 16 | Triple notch | Three triangles or ticks | Third seam that must not be confused | Match to the triple notch |
| 17 | Slit notch | Short line square to the edge | Industrial-style notch | Snip into the seam allowance, shallower than half its width |
| 18 | Dot or circle | Filled or hollow circle | Point to match or stop at | Transfer with chalk, pen or tailor's tack |
| 19 | Square or triangle | Small solid square or triangle inside the piece | A second set of match points | Transfer and match like dots |
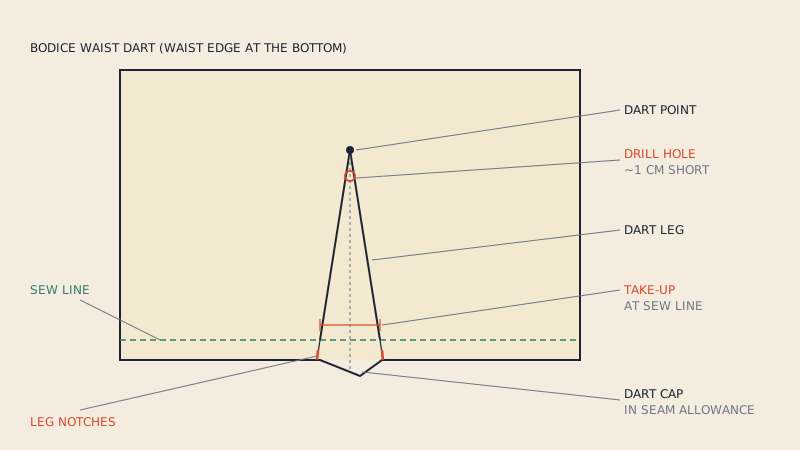
| 20 | Drill hole | Small circle with a cross, or a circle labelled "drill" | Point inside the piece, used in industry | Mark through the layers; often sits just short of a dart point |
| 21 | Join marks | Letters or symbols on two halves, such as A-A, with a "join here" line | A long piece split across sheets | Overlap or butt the halves so the marks align |
The meaning of notch groups and how to cut them is in notches in sewing patterns. Factories also use V, T and castle notches, which look different but mark the same matching points.
Construction marks
| # | Symbol | Looks like | Means | What you do |
|---|---|---|---|---|
| 22 | Dart | Two converging lines meeting at a point | Fold and stitch to shape the piece | Match the legs, stitch to the point |
| 23 | Double-pointed dart | Diamond shape | Dart shaping two areas, such as bust and hip | Stitch from the centre to each point |
| 24 | Pleat | Two lines with an arrow between them | Fold of fabric, pressed or unpressed | Bring the line at the arrow's tail to the line at its head |
| 25 | Tuck | Pair of lines, often narrow and repeated | Stitched fold, usually decorative | Fold and stitch along the lines |
| 26 | Gathering line | Section between two marks, sometimes a wavy line | Area to gather | Run gathering stitches between the marks |
| 27 | Buttonhole | Short line with bars at both ends | Buttonhole position and length | Mark and sew the buttonhole to this length |
| 28 | Button | Small cross or circle | Button position | Sew the button here, after checking against the buttonhole |
| 29 | Placement line | Outline or corner marks inside the piece | Where a pocket, appliqué, belt loop or trim goes | Mark and align the other piece with it |
| 30 | Bust point or finished measurement | Circle with a cross, often with a measurement | Bust apex, or finished garment measurement at that line | Use for fit checks and alterations |
Darts deserve their own article: darts in pattern making.
Marks you may also meet
A few marks appear less often but are worth recognising:
- Interfacing indication: a shaded area or a note "cut 2 interfacing", showing which pieces or parts are interfaced.
- Easing marks: a section between two notches labelled "ease", where a slightly longer edge is eased into a shorter one without visible gathers.
- Zip stop: a dot or bar marking the end of the zip opening.
- Stitch to here: a dot or bar where stitching stops, at a vent, a slit or a pivot corner.
- Rotation or match symbols on PDF tiles: page-assembly marks such as triangles, letters and numbers along tile edges; they are for assembling the sheets, not for sewing.
How symbols translate to digital patterns
On paper, every symbol is drawn ink. In a pattern CAD file, the important ones become data: the cutting line, the sewing line, the grain line, notches, internal lines (darts, buttonholes, placements), drill holes and the mirror line at a fold each have a role, and in DXF AAMA each has its own numbered layer. Decorative marks and page-assembly marks are not part of the pattern and are left out. The full mapping is in the AAMA DXF layers, one by one.
That mapping is also what a pattern-aware conversion has to get right. When our converter turns a vector PDF pattern into DXF AAMA, it writes the cut line to layer 1, sew line to layer 14 where the pattern has seam allowance, grain line to layer 7, notches to layer 4 and internal lines such as darts, buttonholes and pocket placements to layer 8, along with the piece text.
FAQ
What do the symbols on a sewing pattern mean?
They fall into four groups: lines that define the piece (cutting, sewing, fold and hem lines), arrows for placing it on fabric (grain, bias, fold), marks for matching it to other pieces (notches, dots, drill holes) and construction marks (darts, pleats, buttonholes, placements).
What does the double-headed arrow on a pattern mean?
It is the grain line. Place the piece so this arrow is parallel to the selvage of the fabric, measuring from both ends of the arrow to the selvage.
What does a circle with a cross mean on a sewing pattern?
It usually marks the bust point or a finished garment measurement at that position, such as the finished bust or hip width. In industrial patterns a similar mark can denote a drill hole.
What is the difference between a fold line and place on fold?
"Place on fold" marks an edge that goes on the folded fabric when cutting, producing one symmetrical piece. A fold line inside a piece marks where the finished piece is folded during sewing, such as a facing or hem.
How do I read a pleat symbol?
A pleat is shown as two lines with an arrow between them. Fold the fabric so the line at the tail of the arrow meets the line at the head, then pin or baste the pleat in place.