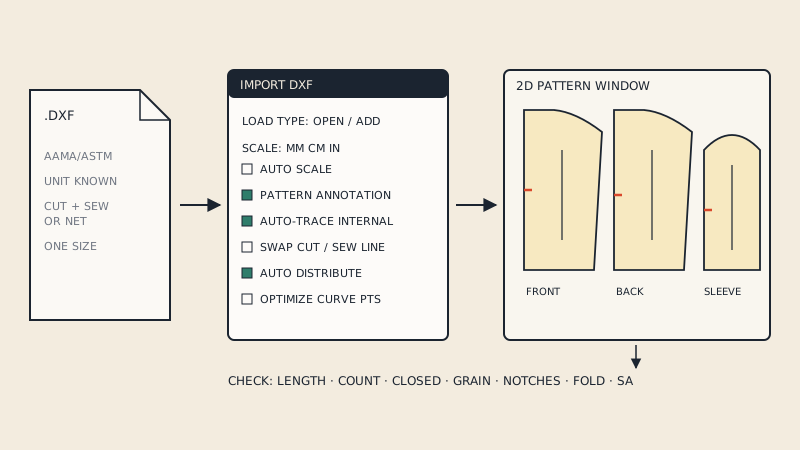
Marvelous Designer reads 2D sewing patterns through File > Import > DXF (AAMA/ASTM). Choose the file, confirm the unit it was drawn in, and the pieces land in the 2D window as editable patterns ready to be arranged and sewn. The import itself takes seconds; what decides whether you get a usable garment is the quality of the DXF and a few checks you make straight after.
This guide covers the import, the scale check, the cut line vs sew line question, and what changes depending on whether you build garments for a game, a film or a real production sample.
What Marvelous Designer expects from a DXF
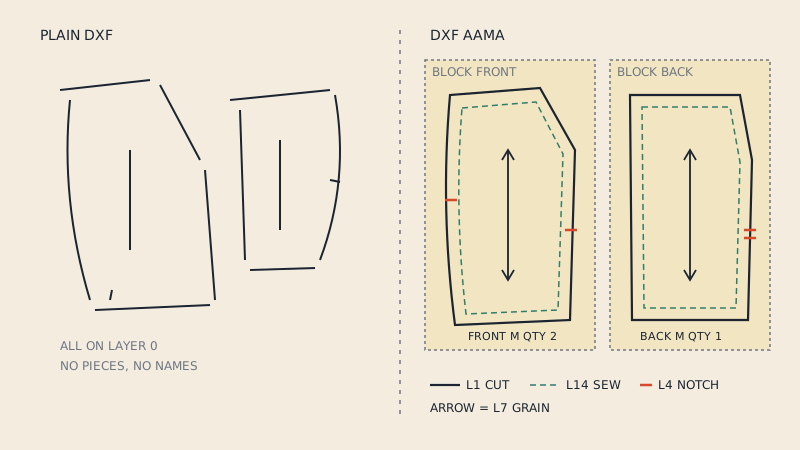
Marvelous Designer does not want a generic AutoCAD drawing. It wants a pattern-industry DXF in the AAMA or ASTM flavour, where every piece is its own block and each kind of line sits on a numbered layer. A plain DXF of loose lines (what most PDF-to-DXF tools or a quick Illustrator export produce) either imports as nothing or as hundreds of disconnected segments that cannot be simulated.
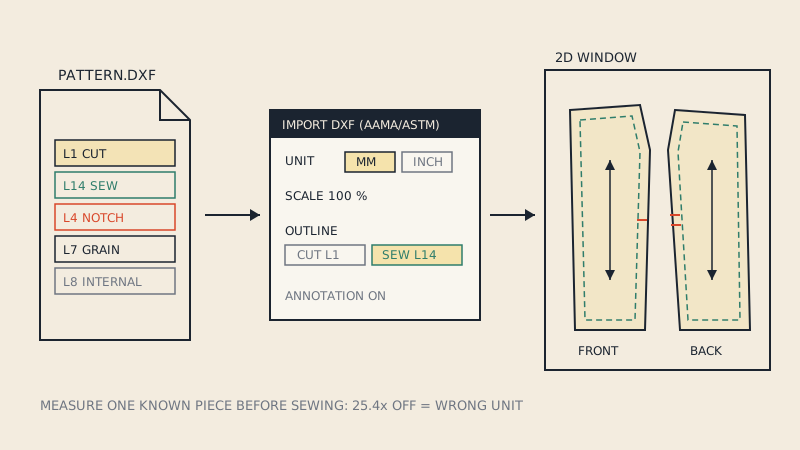
If you are not sure what makes the AAMA flavour different, read what a DXF AAMA file is first. The short version: one block per piece, the cut line on layer 1, grain line on layer 7, notches on layer 4, internal lines on layer 8, and piece text such as name and quantity.
| What is in the DXF | Layer | What Marvelous Designer does with it |
|---|---|---|
| Cut (boundary) line | 1 | Becomes the pattern outline |
| Sew line | 14 | Can be used as the outline instead of the cut line, depending on import options |
| Notches | 4 | Imported as notches on the outline, useful for sewing |
| Grain line | 7 | Sets the fabric direction on the piece |
| Internal lines (darts, pockets) | 8 | Imported as internal lines you can fold or sew to |
| Piece text | in the block | Piece name and other annotation, if the option to read it is on |
Step by step: importing the pattern
- Save or open the project you want the pattern in. If you want the pieces added to an existing scene with an avatar, open that scene first.
- Go to File > Import > DXF (AAMA/ASTM) and pick the file.
- In the import dialog, set the unit to the one the pattern was drafted in. Pattern CAD files are most often in millimetres; some American files are in inches. Leave scale at 100 %.
- Decide whether the outline should be the cut line or the sew line (more on that below), and whether piece annotation should be read.
- Confirm. The pieces appear in the 2D window and, as flat panels, in the 3D window.
Some versions of the dialog also offer automatic arrangement of pieces and curve-point optimisation. Turn arrangement on if the pieces arrive stacked on top of each other; leave point optimisation off on the first import so you can see the file as it is.
The first check: is the scale right?
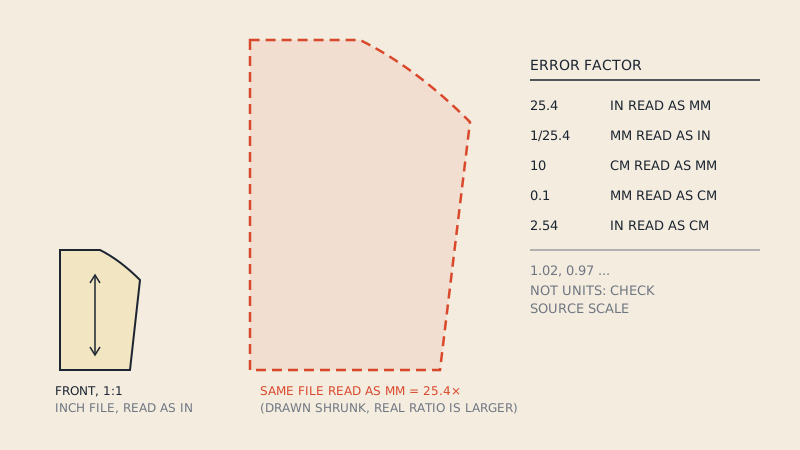
Before you sew anything, measure one piece. Pick something with a known size, such as a waistband or a cuff, and use the measuring tool in the 2D window. If the pattern says the waistband is 72 cm and you read 2.83 cm or 1829 cm, the file was read in the wrong unit: the factor of 25.4 between inches and millimetres gives it away. Re-import with the other unit rather than scaling the pieces by hand, because a manual scale also scales seam allowance, notch depth and internal-line lengths in ways that are easy to get slightly wrong.
The reasons a pattern comes in 25.4 times too big or too small, and how DXF stores (or fails to store) its unit, are covered in DXF units in pattern files.
Cut line or sew line as the outline
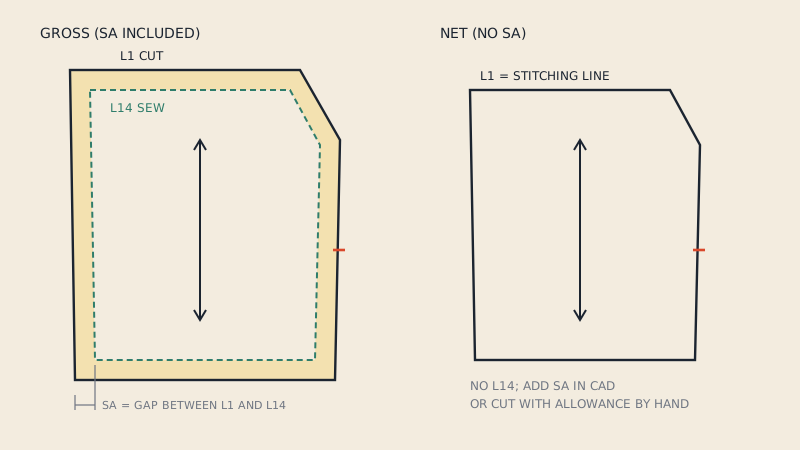
A garment pattern can be net (drawn at the stitching line) or gross (with seam allowance added outside it). In an AAMA file with seam allowance, the cut line is on layer 1 and the sew line is on layer 14.
For simulation this matters more than it looks. When two pieces are sewn in Marvelous Designer, the software joins their outlines. If the outline is the cut line, the simulated seam sits at the raw edge, every seam is in effect shifted outward by the seam allowance, and the garment ends up a little larger and the seam lengths include the allowance at the corners. For a quick visual this may be acceptable; for anything where fit or silhouette matters, you want the sew line as the simulation outline and the allowance kept as allowance.
Options in the import dialog let you swap which line is treated as the outline. Try one import each way on a simple piece and look at which line is drawn as the pattern edge. The background to net and gross patterns is in PDF to DXF with or without seam allowance.
After import: a short checklist
- Piece count. Compare with the pattern's cutting list. A missing piece usually means it was not a closed block in the file.
- Closed outlines. A piece that will not simulate, or shows as a line rather than a filled panel, has a gap in its outline.
- Grain lines. Each piece should show a grain direction. Without it, fabric is laid in a default direction and stripes or stretch fabrics behave wrongly.
- Notches. Count them on two pieces that sew together; they should match. Notches are your fastest way to set seams correctly.
- Mirrored pieces. "Cut 2" pieces arrive as one piece. Duplicate them as symmetric or mirrored copies so edits stay linked.
- Fold pieces. Halves that are cut on fold need to be unfolded or mirrored before simulation.
Game, film or fashion: how the use changes the job
Marvelous Designer's audience is wider than fashion. Many users build garments for games, animation and film, where the goal is a convincing look on screen; others use it alongside real pattern work. The same DXF import serves both, but you will treat the pieces differently.
| Goal | What to keep from the DXF | What you can drop or simplify |
|---|---|---|
| Game asset | Outline, rough proportions, main seams | Seam allowance, small notches, internal markings; pieces may be merged |
| Film / animation | Outline, grain, seam lines, darts for realistic drape | Exact seam allowance, buttonhole placement |
| Fashion sample or fit check | Everything: sew line, notches, darts, grain, piece names | Nothing; edits should go back to the production pattern |
For games, a real pattern gives proportions and drape that are hard to fake, but you will often retopologise the result afterwards, so tiny details are wasted effort. For fashion work, the pattern is the master: if you change a piece in 3D, the change has to make it back to the 2D pattern in your CAD, so keep the piece names and notches intact.
How this differs from importing into CLO3D
Marvelous Designer and CLO3D come from the same company and share the simulation core and the DXF import family, so a file that imports well into one usually imports well into the other. The menu path is the same. The difference is what comes after: CLO adds tools aimed at apparel production (pattern-making detail, grading, fabric data, technical output), while Marvelous Designer is aimed at 3D content. If your end product is a garment that will be cut and sewn, CLO is usually the better home; CLO3D vs Marvelous Designer compares them in detail, and importing a DXF into CLO3D covers the CLO-specific options.
When you only have a PDF
Most indie and home-sewing patterns are sold as PDFs, which Marvelous Designer cannot read as pattern pieces. You can trace a PDF over an image underlay, but tracing curves by hand loses accuracy and takes hours for a full garment.
If the PDF is vector (not a scan), it can be converted instead. Our converter reads vector PDF patterns, including A0 sheets and A4 or US Letter tiles, extracts the size you choose and writes a DXF AAMA file with cut line, sew line where the pattern has seam allowance, grain lines, notches and internal lines on the standard layers. You see a free preview of every detected piece before paying. Only convert patterns you own or have the right to convert; sewing pattern copyright explains the general principles.
FAQ
Can Marvelous Designer import DXF files?
Yes. Marvelous Designer imports 2D patterns through File > Import > DXF (AAMA/ASTM). The file should be a pattern-industry DXF with one block per piece; a generic DXF of loose lines usually imports incorrectly or not at all.
Why is my DXF pattern huge or tiny in Marvelous Designer?
The file was read in the wrong unit. A factor of about 25.4 means inches were read as millimetres or the reverse; re-import and choose the unit the pattern was drafted in instead of scaling the pieces by hand.
Should I import the cut line or the sew line?
For realistic fit and drape, simulate on the sew line so seams join where they will be stitched. Using the cut line places every seam at the raw edge and makes the garment slightly larger.
Can Marvelous Designer open a PDF sewing pattern?
Not as pattern pieces. You can trace a PDF by hand over an image, or convert a vector PDF to DXF AAMA first and import that file.
Is the DXF import the same as in CLO3D?
The import path and file requirements are the same because both programs come from the same company. What differs is the set of tools for production pattern work that CLO3D offers after the import.