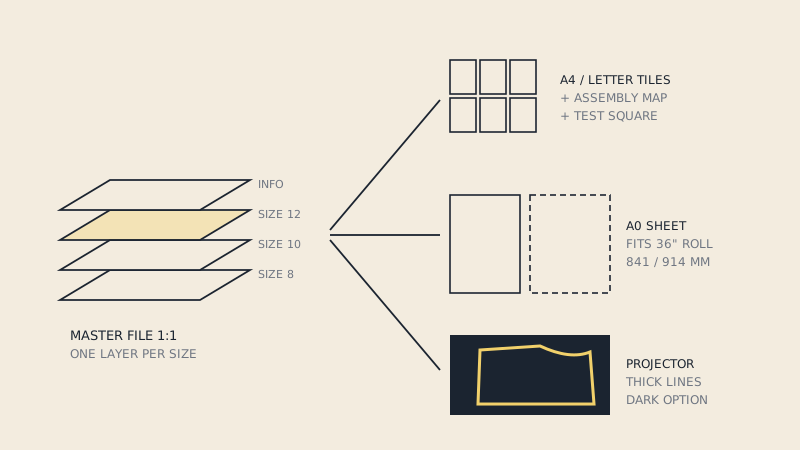
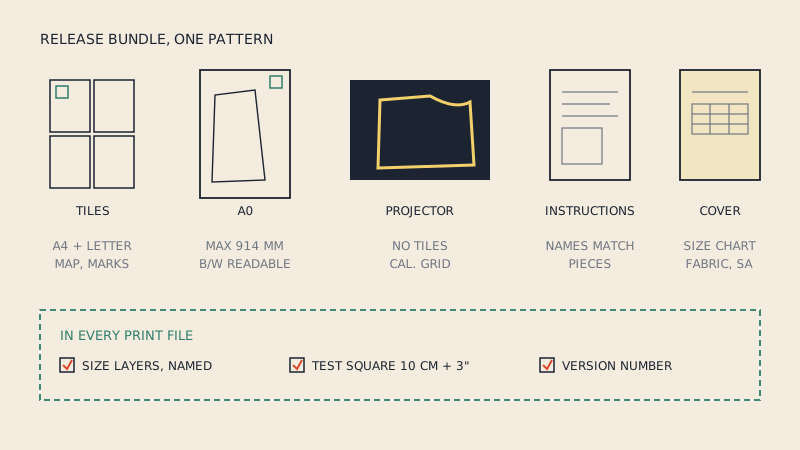
Buyers of PDF patterns now expect the same core set of files from an independent designer as from established PDF sewing pattern companies: a tiled file that prints on A4 and US Letter, a large-format file for A0 or 36" rolls, a projector file, size layers, test squares on every print file, a cover page with the size chart and fabric requirements, and clear instructions. Missing any of these generates support emails and refunds.
This is a release checklist: what to include and how to check each item before a pattern goes live. How to produce the files in the first place is covered in how to make PDF sewing patterns to sell.
The bundle buyers expect
| File | What buyers expect | Pass check |
|---|---|---|
| Print-at-home tiles | One file that works on A4 and US Letter | Prints on both without clipped edges |
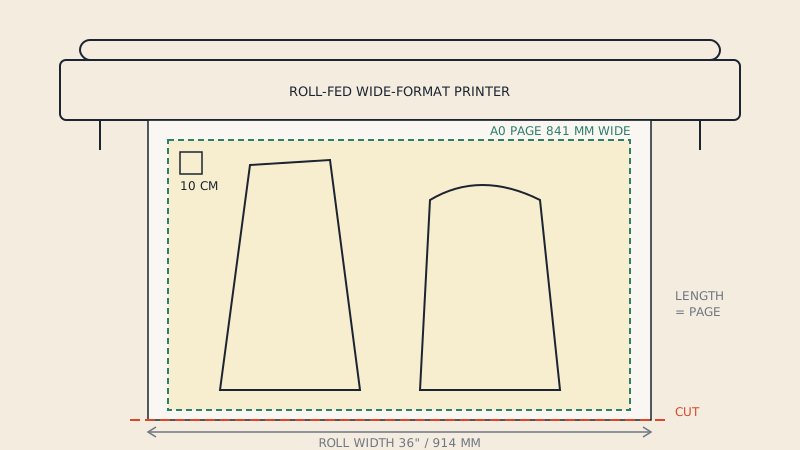
| Large format | A0 sheets, layout also fits a 36" roll | Widest sheet 914 mm or less |
| Projector | Continuous canvas, no tiles, bold lines | Opens on a laptop without lag, scale grid present |
| Instructions | Separate PDF, readable on screen and printed | Every step matches the pieces in the pattern |
| Cover / info page | Size chart, finished measurements, fabric, notions | Numbers match the graded pattern |
| Layers | One layer per size in all print files | Layers named by size, visible in common readers |
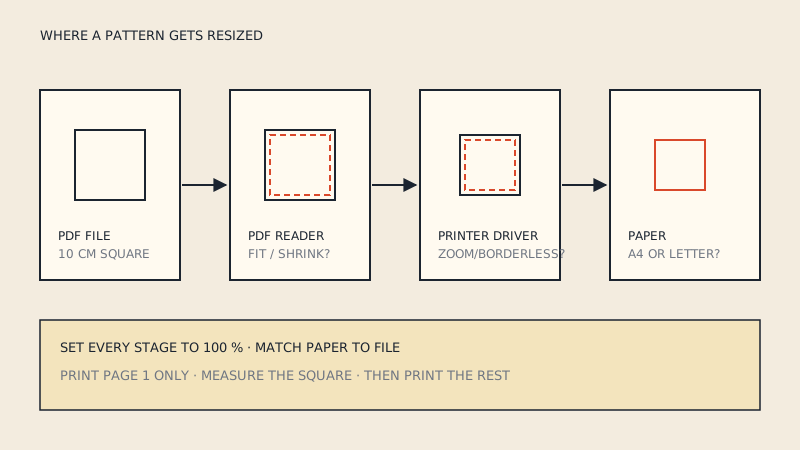
| Test squares | On every print file, metric and imperial | Measures exactly 10 cm and 3" when printed at 100 % |
| Assembly map | Grid of tiles, blank pages marked | Tile labels on the map match the pages |
The tiled file
The tiled file causes more support questions than everything else combined.
- Paper size. The tile grid fits both A4 (210 × 297 mm) and US Letter (216 × 279 mm). If you produce two separate files instead, each is clearly named. The size difference and what goes wrong with the wrong paper are explained in US Letter vs A4.
- Margins. Nothing important sits within about 10 mm of the paper edge.
- Test square on page 1, labelled with its size, with a line telling buyers to print page 1 alone first.
- Tile labels. Every page carries a row/column label and a page number.
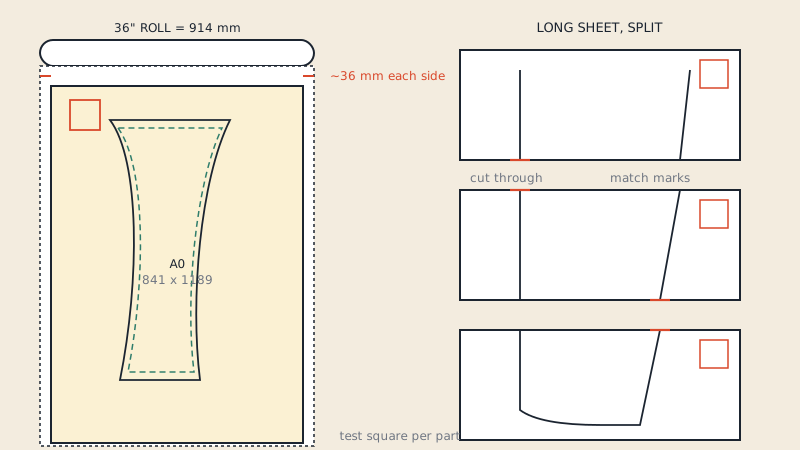
- Match marks on every shared edge, aligned across neighbouring pages.
- Assembly map showing the grid, with blank pages marked so buyers can skip them.
- Print instructions: actual size / 100 %, no "fit to page", which pages to print for which pieces.
The large-format file
- Sheet size. A0 is 841 × 1189 mm. Copy shops in North America commonly use 36" (914 mm) rolls, so a layout within A0 width suits both. The details are in printing on a 36-inch roll.
- Sheet count stated on the product page, so buyers can estimate copy-shop cost.
- Line weight and colour print clearly on a black-and-white plotter. Many copy shops print line drawings in black only; distinct dash patterns per size keep sizes readable.
- Test square on each sheet.
- No tile frames or page numbers from the home-print layout left on the large sheet.
The projector file
- One continuous canvas, no tiles or trim lines.
- Line weight thick enough to see on fabric; a dark-background version if you offer one.
- Calibration grid or large measured rectangle for scaling.
- Same layers as the print files.
- File size small enough to pan and zoom smoothly on an ordinary laptop.
Layers
- One layer per size, named by size ("Size 14" or "US 14 / EU 44"), not "Layer 3".
- Shared elements (grain lines, labels) on a layer that stays on with any size.
- Tested in at least two PDF readers, since some show layers and some don't.
- Line styles differ per size as well, so the pattern stays usable without layer support.
The cover page and product information
This is what buyers read before they buy, and again before they cut.
- Size chart with body measurements in cm and inches.
- Finished garment measurements, at least the key ones (bust, waist, hip, length).
- Fabric requirements per size, for the common fabric widths you recommend.
- Notions: buttons, zips, interfacing, elastic, with sizes and lengths.
- Seam allowance stated clearly: included or not, and the width.
- Skill level and recommended fabrics.
- Version number and date, so buyers know whether they have the latest file.
The pattern itself
A file can be flawless and the pattern still wrong. Run a pattern check in at least two sizes before release: piece count against instructions, matching seams, notch pairs, grain lines and labels on every piece. A structured version of that check is checking a pattern before you cut.
Instructions
- Piece names in the instructions match the names on the pattern exactly.
- Every piece is used in the instructions, and every piece used exists in the pattern.
- Diagrams show right and wrong sides clearly.
- Readable on a phone, since many buyers follow along on a screen.
Final QA run
Before release, do this once, in order, on the exported files:
- Download the files from your shop exactly as a buyer would, not from your working folder.
- Open each file in two PDF readers on a computer without your fonts installed.
- Print page 1 of the tiled file on A4 and on Letter at 100 %. Measure both test squares.
- Send the large-format file to a copy shop or print one sheet; measure its test square. Tips for that conversation are in copy shop printing for sewing patterns.
- Toggle each size layer on and off.
- Assemble the tiles for one piece and check that the match marks meet.
- Check that file names make the format obvious.
If a test square measures wrong, find out whether it is the file or the print settings before changing anything; the common causes are in PDF pattern not printing to scale.
Updating files without chaos
Patterns get corrected after release. When they do:
- fix the master, regenerate every output, and raise the version number on every file;
- note what changed in a short changelog on the cover page or product page;
- make sure existing buyers can download the new version;
- keep previous versions archived so you can answer questions about them.
If you also offer DXF to customers or factories, regenerate it from the same master so the DXF and the PDFs never drift apart. For files that only exist as PDF, a PDF-to-DXF conversion can produce a DXF AAMA of one size with grain lines and notches from the vector lines.
FAQ
What files should a PDF sewing pattern include?
A tiled file for A4 and US Letter, a large-format file for A0 or 36" rolls, a projector file, separate instructions, and a cover page with sizes, finished measurements and fabric requirements. All print files should have size layers and test squares.
Do I need separate A4 and US Letter files?
Not necessarily. A tile grid designed to fit both paper sizes, with margins, works as a single file; if you make two files, name them clearly.
What size should the test square be?
Commonly 10 cm and 3" (or 1"), labelled, on page 1 of the tiled file and on every large-format and projector file. Buyers measure it after printing at 100 %.
Why do my buyers say the layers don't work?
Some PDF readers, especially in browsers and on phones, don't display layers. Name layers by size, test in several readers, and also give each size a distinct line style.
How should I handle pattern updates after release?
Correct the master file, regenerate all outputs, raise the version number, note the change, and give existing buyers access to the new files.